Not a single existing power supply system is complete without power outlets, in the absence of which the normal functioning of household appliances is impossible. Due to the constant increase in the number of devices connected to them, the current load on the supply lines increases noticeably. This cannot but affect the architecture of building household electrical networks, the total number of outlets in which must be increased. Users often need to connect 3 sockets from one wire without disturbing the distribution of currents in the supply line.
Types of electrical wiring
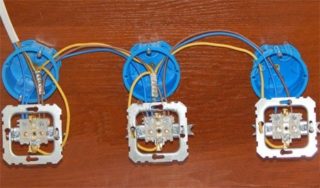
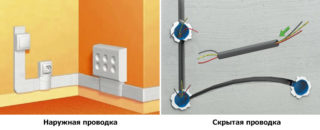
Before you figure out how three sockets are connected from one wire, it is advisable to familiarize yourself with the existing types of laying electrical circuits. In accordance with the rules for their arrangement, prescribed in the PUE, modern electrical wiring has two designs: closed and open. In the first case, a harness with wires, through which voltage is supplied, is laid hidden. For it, special recesses (grooves) are made in the walls and ceiling, into which the cable is laid. Benefits of a hidden gasket:
- Reliable protection against mechanical damage.
- Safety of electrical wiring operation.
- Lack of external wires that impair the aesthetics of rooms and other premises.
The disadvantage is the difficulty of accessing the cable if it is necessary to restore or completely replace it; repairs will require large labor costs.
The advantages of this installation method:
- Ease of maintenance and recovery.
- Accessibility, if necessary, to connect an intermediate socket.
- The possibility of arranging electrical wiring in the "retro" style.
The disadvantage of this technique is the need to allocate special sections of the walls for laying cable channels or corrugations, without forcing these zones with furniture. To eliminate this inconvenience, the harnesses are laid in special niches in the plastic skirting boards.
When choosing a suitable method for laying a bundle or cable, one proceeds from the specific conditions and requirements for connecting individual elements of the electrical network.
Connection methods
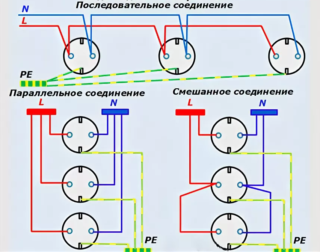
Before connecting many power outlets in a row, it is important to understand the existing methods of connecting them. Depending on the order of commutation of individual conductors, the following options are distinguished:
- Parallel connection, in which the sockets must be connected with a star.
- Serial connection, otherwise called "loopback".
- Combined inclusion using a loop and a "star".
- Ring connection.
Each of the listed methods is selected depending on the architecture of the room and considerations of saving on installation products. The parallel connection "star" is convenient when wiring the supply network from a single center (distribution board, for example).
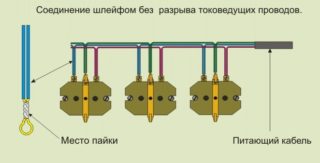
The sequential method (or loop) is used when a number of outlets installed one after another are turned on on a given line. Separate contacts (phase and zero) are connected to each other in parallel, the sequential method is called only because of the order of the socket nodes.
With combined switching on, in separate sections the products are installed in a row, after which a "star" is set up from one of them.
A ring connection is a sequential arrangement of sockets, the end of which closes at its beginning. This way of switching on allows you to connect sockets on large objects: at exhibitions, in workshops and sales halls.
Installation procedure

Before proceeding with the self-installation of the sockets, you will need to familiarize yourself with the instructions for their installation. The easiest example to consider is when they are installed in a plasterboard wall. The order of work in this case looks like this:
- An electric drill is taken with a "crown" type attachment, through which a hole for the socket is prepared in the selected place. Its diameter must match the size of the plastic body (cup) used as a mounting base and fixed directly at the installation site.
- A mounted socket is placed in the glass and fixed in it with the help of long spacer screws.
- It is necessary to connect the phase and neutral conductors brought out to the contacts, and then close the product with a decorative cover.
If there is a third conductor in the electrical wiring in yellow-green insulation, its bare end is connected to the ground terminal on the socket.
To correctly connect several outlets in a row (with a loop), experts advise you to pay attention to the following points:
- The wire from the phase terminal of one socket node is pulled to the same contact of the next product, and so on. To such a loop, you can add the entire set of outlets installed in a given room.
- The same is done with a zero conductor laid from the corresponding contact to the second and subsequent products fixed on the wall.
- If there is a grounding conductor, the same operations are performed with it.
The advantages of this method of connection include ease of implementation and economical use of consumables (wires). The disadvantages are the unreliability of the system, in which a break in one of the conductors will lead to a de-energization of all subsequent sockets connected to this loop. In this sense, the star connection looks much more preferable.
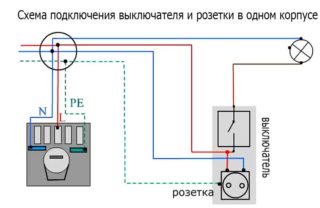
Installing the product with a switch
The advantages of combined structures include:
- The permissibility of excluding an electrical unit from a common loop without prejudice to all its other elements.
- Convenience of service and repair, not related to other socket products.
- Aesthetics and ease of installation.
The only drawback of such devices from the point of view of the consumer is the high cost. Experts note the inconvenience of the sockets combined with switches, which consists in the need to replace the entire product as a whole if one element fails.


Author, are you by any chance a politician or journalist? Operates in terms, misleading people. In all three schemes, the connection is parallel, the only difference is in the geometric arrangement of the sockets. It would be interesting to see the work of electrical appliances connected to the sockets connected in series.
Exactly noticed. There is no serial connection of sockets. The first outlet will work, but the rest are unlikely.
In addition, there are circuits on several wires and not on one.Of course, one also has it (you can google it), but that's a completely different story. There really is one wire that goes to the outlet, but there is a different design for the outlet. Of the advantages of sockets with one wire, there is a smaller amount of conductor, of the minuses, low efficiency, work only with alternating current is desirable with HDTV.
Practical application in practice, we carry everything along the ceiling, do not make snot and do not rot the concrete.
1. Corrugation - not needed, as a relic of history, whether it is black or gray or any other. It will not protect against anything, just unnecessary fuss with cables and a waste of money.
2.Entry into the apartment should be thicker, 10 squares just right, i.e. 3-core cable for 220V, and 5 if 380V, you can just PV1x10, multi-colored.
3.Junction boxes, at least 100x100 external, it is necessary to heat, but not critical, it is better to put on the wall closer to the ceiling, on a straight vertical line to the switches, so it is easier to get to them if necessary, and it is more convenient to twist the wires under the PPE, ideal firms 3M, very rarely found on sale, KBT (Kaluga) is also in the subject. For especially principled ones, you can flatten the sleeves, for a long time, tediously and drive them into a colorful heat shrinkage.
4. Cable VVGp 3x2.5 (if it is stranded, which is many times worse, then push such a wire into sockets, switches and machines - only with sleeves) on sockets and 3x1.5 lighting, in each of the rooms its own, better observing the principle, one wall - one branch, also with the kitchen, if the stove is 3x6 (5x6) and three branches 3x2.5 for sockets.
5.Mounting of routes is better than a self-tapping dowel 6mm and pieces of wire 1.5 in insulation, saving on slop clips, platforms and clamps
6.No diagonal broaches, everything in straight lines, separating each cable from each other with the same piece of 1.5 wires, we do not forget to mark, every meter is better, paper tape is cheaper and does not wear off.
7. Crossings through the walls with 20 or 32 PVC pipes, and better not one, you can also use a plumbing pipe.
8. Sockets and switches - it's easier here, we make blocks of 4-6-places for sockets and 1-3-places for switches, one-key ones are almost always more convenient, although they will come out more expensive, do not try to take on clamps, only for a screw, ideally from the junction box at the top, drown two PVC pipes 20 cm in the wall and drive the cable into it, the second pipe in case of a reserve, but it is better to drag the cable right away, leaving the ends 20 cm each (you will always have time to cut it off). By the way, no snot like a jumper from outlet to outlet, from one point (the sleeve is very appropriate, but PPE will do) wires are divided for each outlet, so the unit is placed in the center, relative to the vertical pipe (2 is better).
9. Everything that we drown in the wall, we drown on alabaster, there is no dancing with a tambourine and nothing will fall off.
10. Shield, no need for a specific number of machines, we always take more, take less in a confined space and there will be space for laying wires, ideally three rows of 12-18 modules. We bring 32 PVC pipes to the shield, how many will fit in the size of the box and better from all sides. From the new shield we throw out everything except DIN rails, add a terminal block for zero and ground, this is such a box with a cover, attached to a DIN rail, for 14 connections or more, there is less, but not worth it. We do not install the phase bus at once, it is more convenient to change the machines, without it, temporarily jumpers from the 10 square cable wire.
We remove the insulation from the cable before the transition to 32 pipes and leave pieces of each wire by the meter, in the sense of the shield, immediately marks for everything, and not just for the phase.
When connecting machines, and it is better to take them Legrand (Poland) or ABB (Europe, although there is a lot of bullshit, and it is quite difficult to distinguish well from gomn), we do not put all the necessary ones at once, 25A for 2.5 cable, 16A for 1.5, 32A (40A) by 3x6, then adjusted for loads.
The color scheme of the ZhZK (yellow-green-red) for the phase, if the input is 3-phase, phasing is not relevant for a simple teapot, if there is something to measure, then it is better to do it right at once, zero is always blue or blue, the ground is striped green.
Nuu on the collective farm, it's like that!
Differences from the ideal, this is a NYM cable (sevkabel) and everything is recessed in 16-25 PVC pipes with a 20% reserve.By the way, it is better not to touch the concrete, in the sense of not sawing the grooves, stuffing two sheets of drywall on the walls and sawing it, glasses for sockets 68mm in diameter and a clear latch of each glass in the centers, the depth is like a glass or a little more, all the turns are smooth and better than this the same pipe, heating it with a hairdryer and bend through the spring, and the connections through the coupling and glue with a second glue. All connections are only crimped. In addition to machines, an RCD or simply a DIF is placed on the entire outlet network, an automatic machine is not needed, but apart from saving space and money on machines, there is really no benefit.
All the weak current on the other side of the ceiling, in the same way.
According to the latest standards, grounding is PROHIBITED.
Andrey, you pour in terms that electricians do not use - the constructive of the outlet, low efficiency. How do you determine the efficiency at the outlet? The efficiency can be at the consumer of electricity, but not at the switching device. Working only with alternating current - do you have direct current in your home? Have you worked with direct current? High frequency currents - why and how? Below your comment is sensible, read.