When servicing electrical networks and their emergency repairs, it is difficult to do without a special tool designed to detect the potential on the supply wires. One of these devices is an electrical indicator, which has several versions. Regardless of the model of a particular device, all these samples have a classic scheme and work on a similar principle. The order of their use depends on the internal device and the method of displaying information on the indicator.
The principle of operation of the indicating device

The simplest phase indicator in electrical wiring is a small structure made in the form of a pointer or a screwdriver. It includes the following required parts and assemblies:
- working metal probe, like screwdrivers;
- a neon lamp with two flat contacts;
- resistor with a resistance of 1 MΩ;
- conductive contact plate with pressure spring.
Such an indicator is used only to identify the phase, the presence of voltage, as a potential difference, it cannot be determined with its help. The zero core is usually found by the elimination method. The general principle of operation of indicator devices consists in the formation of an additional branch chain, through which a current that is safe for the operator flows.
In various types of screwdrivers, energy selection for indication is made in its own way, unlike others.
Types of indicator screwdrivers and their device
In addition to the classic version (neon screwdriver), many other indicator devices are produced by the industry. Among them, the following well-known models stand out:
- indicators with a liquid crystal scale;
- LED devices with a battery built into the case;
- non-contact electronic voltage testers - they are called "smart" screwdrivers.
Products with liquid crystal indicators, as well as screwdrivers with LEDs, are distinguished by increased functionality. They can not only detect the presence of a phase, but also estimate the magnitude of the voltage acting in the circuit. With their help, it is possible to determine the zero contact, information about which is presented as the absence of scale divisions. With an intermediate value of the voltage acting in the circuit (110 Volts, for example), the indicator shows a half deviation from zero.
Electronic testers have a more complex device and allow you to check circuits in a non-contact way due to electromagnetic interference. They can also be used for test detection of buried wiring and the presence of voltage in a wall-mounted cable.
To work with existing power circuits, you need to know how to use voltage indicator screwdrivers with an LED and a battery to determine the correct wire.But first, it is important to understand the design of these devices, as well as the principle of their operation.
Working principle of LED screwdriver
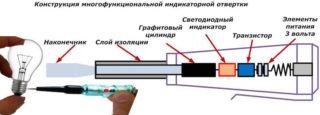
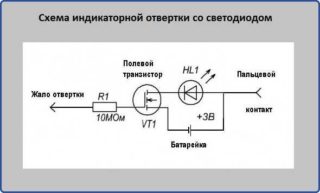
The indicator circuitry is based on the following main elements:
- working sting;
- field-effect transistor on which the key stage is assembled;
- conventional LED and three-volt battery;
- top contact.
A 3 Volt battery built into the device is required to power the electronic key circuit.
When the meter touches the bare part of the wiring or contact with the phase voltage, the tested potential opens the field-effect transistor through which a direct current begins to flow. Due to this, the LED built into the device lights up - indicates the presence of potential. When checking the zero core of the wiring, this does not happen, since the key remains in the closed state - the LED does not light up.
How to use the LED indicator screwdriver
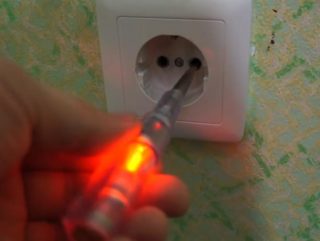
To check the phase and zero with indicator screwdrivers with a built-in LED, you will need to investigate their design. At the bottom of the electronic gauge, there is a working probe that touches the bare contacts during testing. On its upper cut there is a contact plate, when pressed, the battery power circuit is closed - it performs the function of a switch.
There is a hole in the case with a built-in LED, according to the state of which it is possible to find out about the presence or absence of voltage. To do this, you need to do the following operations:
- Take the screwdriver in your right hand so that your thumb is directly over the contact plate (switch).
- You need to touch the sting to the checked outlet terminal, for example.
- At the same time, press the top plate with your finger and visually check the status of the LED.
If it lights up after all the manipulations have been carried out, there is voltage on the tested contact or core. Otherwise, it is absent at this point. The same effect will be observed if the neutral wiring of the mains supply is controlled.
The main types of checks
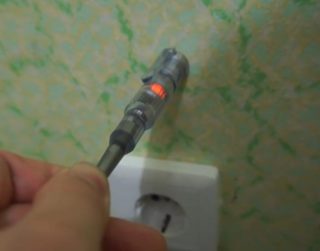
To determine the presence of a phase in the tested electrical circuit, it is necessary to follow the generally accepted rules for handling an indicator screwdriver and similar devices. The order of work is determined by the model of the tool used and the features of its design. Depending on this, the check can be contact or non-contact, as well as designed to detect a break or search for a wire route. In the first case, you need to touch the tip of a screwdriver to the contact of the bulb holder, for example, and make sure that there is no voltage on it.
In the second approach, to check the presence of a phase, it is enough to bring the control part of the screwdriver to the circuit under test (without touching it). In a similar way, they act if they wish to determine the route of laying the wiring hidden in the wall, using electronic voltage testers for these purposes. In addition to these simplest operations, indicator devices are used to search for a wire break, which, with hidden laying, is recessed into the thickness of the walls.
Finding a cliff
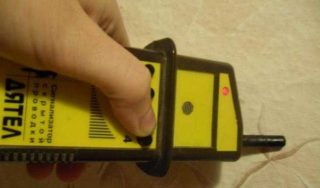
Many electronic devices are known by means of which it is possible to find a break hidden from the user's eyes under a layer of plaster or concrete. Some of them work on the principle of a metal detector, capable of detecting metal objects by reflecting the signal generated by the device from them. It is possible to find damage in the wiring due to the fact that there is no reflection in the cutoff zone and the response signal weakens.
The cost of such devices is quite high.To find out where the cliff is located, it is better to use indicator devices that work on other principles.
To find a broken conductor at home, devices that are considered the best in their class in terms of price and quality are suitable. We are talking about a domestic product called "Woodpecker" and an E-121 signaling device. With their help, you can search for the exact route of laying electrical wiring in the wall, and also easily detect a break in its veins. The depth of penetration of the control signal into the thickness of the walls is no more than 7 cm. This is quite enough to detect a broken wire going to a room lamp, for example, even under a thick plasterboard.
The principle of operation of these devices is based on the registration of residual electromagnetic energies, which retain their field structure even in a broken conductor. The only condition for the efficiency of such devices is that an alternating voltage must act at the ends of the monitored circuits.
If there is an indicator screwdriver with an LED in the home wizard's tool kit, the user will be able to solve many issues related to maintaining the internal power supply on his own. This approach is the only correct one, since it allows you to independently deal with existing problems, as well as significantly save money by refusing to call an electrician.

