Thanks to electricity in homes, there is light, water and heating, people have the opportunity to use a variety of household appliances that significantly improve the quality of life. At the same time, the current poses a huge danger if an emergency occurs during the operation of machinery and equipment connected to the circuit. A properly installed socket with grounding will eliminate the risk of electric shock. To carry out the installation correctly and safely, you do not need professional skills and devices. A set of home tools and basic knowledge in the field of physics are enough.
- What is grounding
- What role does
- What is the difference between grounding and earthing
- Distinctive features of a grounded socket
- When it is forbidden to connect the ground to the outlets
- How to choose the right outlet
- Mounting a socket with grounding
- How to know if there is a grounding in the outlet
- Installation of the overhead option
- Internal option connection
- Connecting wires
- Checking if the connection is correct
- Double socket
- The main mistakes in the manufacture of the grounding loop
What is grounding
Electric current is a stream of electrons moving along a conductor under the influence of a magnetic field that creates a potential difference. By the nature of substances, particles move from a positive potential (+), which is called a phase and is fed to technology, to a negative (-), called zero. A person who is 70% water is an ideal conductor of current. The earth has absolute zero potential. If there is a separate line and a recessed circuit, it will take on both leakage and static charge, which will follow the path of least resistance bypassing the human body.
What role does

What is the difference between grounding and earthing
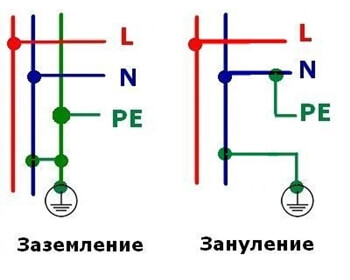
Not all housing stock has grounding in sockets. At the same time, there is a need to protect residents from electric shock when using household appliances, especially those equipped with a steel case and installed in damp rooms. For this, grounding is used - connecting the body of the electrical installation to the neutral wire. By its purpose, this solution performs a protective function - preventing a person from being injured by a leakage current.
The difference with grounding is that in the event of a zeroing, when the current breaks down to the case, a short circuit occurs, which leads to the operation of automatic devices installed both on the line and in the device itself. The defeat of a person is excluded from the outset, since the broken device will be de-energized even before the moment of contact with it. It can be connected to the network only after the malfunction has been eliminated.
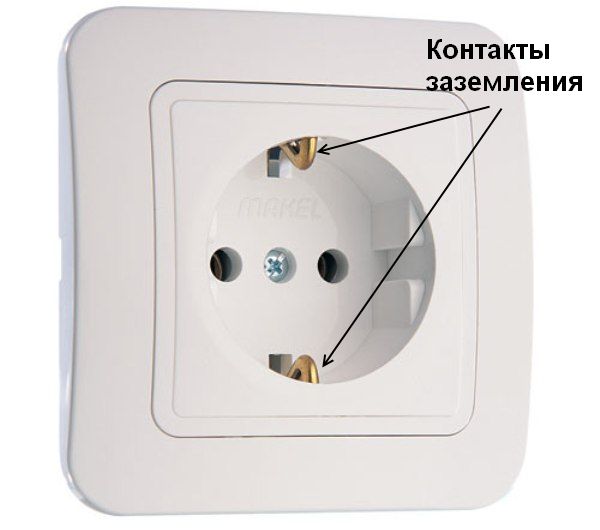
Distinctive features of a grounded socket
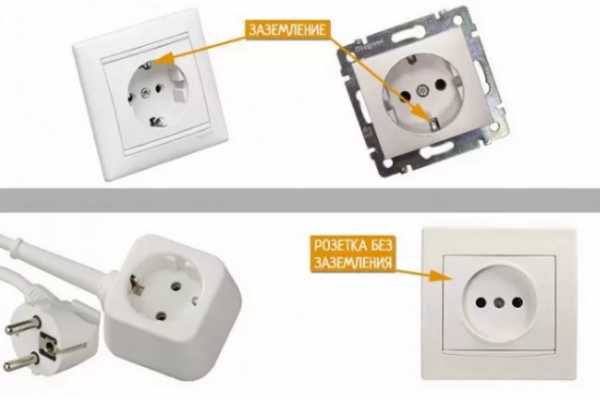
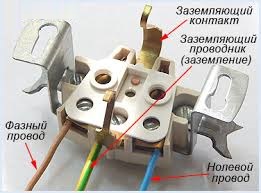
In order not to be mistaken when making a purchase, you need to know what a socket with a grounding contact looks like. In appearance, it practically does not differ from analogs with phase and zero. The lid of the product is white, black or brown. The module can be single or double with connectors for 3.6 mm plugs.
The modules have the following technical characteristics:
- voltage - 220-250 V;
- current strength - 8 A, 16 A;
- power - 3.6 kW, 7.2 kW;
- fastening - internal and external.
Some models are equipped with stabilizers with indicator display and emergency shutdown device.
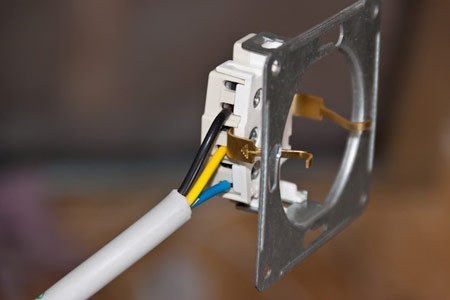
The external difference between sockets with grounding consists in the presence of metal springs on the sides of the socket, which are in contact with the plug terminals. The springs are brought out to the third contact located in the middle between the phase and zero, to which the grounding cable is connected.
When it is forbidden to connect the ground to the outlets
It is forbidden to connect the socket of the hidden wiring to the ground in the following cases:
- Broken or broken wire leading to buried steel frame.
- The presence of a jumper between the zero and grounding lines.
- Conclusion of the third wire to house communications - water, gas or heating pipes.
The connection can only be made after the defects in the wiring have been eliminated.
How to choose the right outlet
To choose the right outlet, it is necessary to study and evaluate a number of factors that will affect its reliability and functionality.
You should focus on the following criteria:
- Type of metal. The best characteristics are stainless steel parts.
- Power. A good option is a 16A 2-pin device.
- Body material. Better to stick with ceramics, which are resistant to heat and corrosion.
- A type. If you install an indoor unit, you can save space. The open method saves time and effort.
When choosing, every little thing matters, including the color and design of the product.
Mounting a socket with grounding

Installation must be carried out in a de-energized room with protective gloves and goggles.
For work you will need:
- multimeter;
- screwdriver;
- steel slats;
- pliers;
- nippers;
- knife;
If you need to hide the cable in the wall, you need a grinder and a puncher. Work should be done while standing on a dielectric mat.
How to know if there is a grounding in the outlet
Installing a three-pin jack only makes sense if it is connected to a ground loop. This can be determined in several ways that are available even to a beginner.
- Visually check the connection of the third yellow-green wire.
- Measure the resistance between phase and earth. If there is one, the connection is available.
- Connect the wires from the lamp to the socket. Its burning is evidence of the integrity of the line and the serviceability of the circuit.
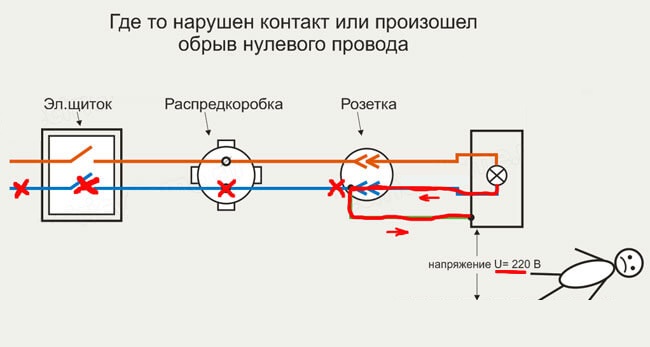
Indirect signs of a lack of grounding are crackling in the speakers and weak electric shocks from working devices with a steel case.
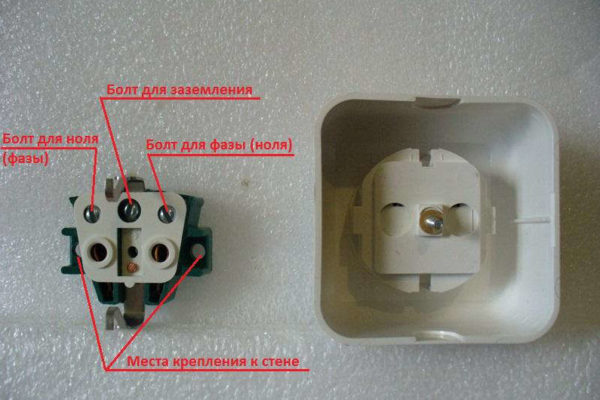
Installation of the overhead option
Overhead points are installed on solid wood, plasterboard and plywood walls.
The sequence of actions is as follows:
- Mark the location of the socket and cable attachment
- Lead the wires.
- Disassemble the device case, loosen the bolts.
- Strip and connect the wires to the contacts.
- Screw the base to the surface.
- Assemble the socket, check the tightness of its fixation.
Open wiring can be hidden in pipes, plastic channels, run over strings or insulators.
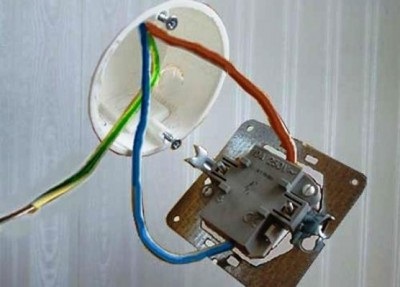
Internal option connection
Before connecting the three-wire grounded cable to the outlet, you need to check its integrity. It should not have external damage, creases and melted areas.
The work is done in this order:
- Carry out the markup.
- Make grooves and a hole for the back box.
- Remove dust and crumbs from the openings, treat the walls with a primer.
- Lay the cable out of the hole by 15-20 cm.
- Cover the back box. You need to put it on the same level with the wall.
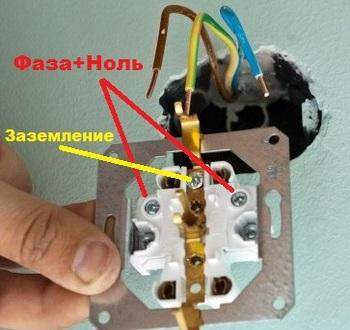
- Connect the wires to the contacts.
- Fix the device with screws and sliding tabs.
After that, you can supply electricity to the room.
Connecting wires
The stability of the device depends on the correct connection of the wires. It should be remembered that copper tends to oxidize over time, which reduces the quality of the contacts. To avoid this, the ends of the conductors freed from insulation by 10 mm are soldered. After that, they must be inserted into the holes until they stop and pressed as tightly as possible with the bolts. The reliability of fixation is checked by lightly pulling on the wires.
Checking if the connection is correct
After installation and before supplying electricity, it is necessary to check the correct connection.
This procedure consists of checking the following elements:
- mounting box;
- matching wires and terminals;
- the integrity of the line to the contour;
- the strength of the housing fastening;
- reliable fixing of the cover.
If there are additional options in the housing, they must be connected to the phase.
Double socket
The installation of a device with two sets of connectors is practically the same as the installation of single products. The contacts are connected in one common circuit, which removes the leakage current from both consumers, regardless of where they are connected. At the same time, it should be borne in mind that the current strength indicated on the cover is the total for both installations.
The only difference is the size of the back box. Depending on the design of the product, it can also be double. The opening is made by drilling holes or sawing rectangular openings in the wall. Connection is carried out in the usual way.
The main mistakes in the manufacture of the grounding loop
The most common installation mistakes:
- lack of electrodes connecting the frame to the ground;
- the use of excessively small products that are unable to accept the leakage current;
- the use of bolted and welded joints not treated with paint or sealant;
- laying copper cable with insufficient cross-section.
You can avoid mistakes if you first familiarize yourself with the requirements for connecting electrical installations.


How to know if there is a grounding in the outlet
1. Visually check the connection of the third yellow-green wire.
Where to check? In an outlet? Not a fact, in the floor panel, this wire can simply "hang" in the air.
Connected to the dashboard housing? Only if the TN-S system is used (five wires in a riser, as a rule, only in new construction). And if the TN-C-S system is used, the separation of the PEN conductor into PE and N must be performed at the entrance to the house, in the ASU. And the PE conductor of the riser must sit on the shield body.
2. Measure the resistance between phase and earth. If there is one, the connection is available.
There is always resistance, even on a piece of wire that is not connected anywhere!
3. Connect the wires from the lamp to the socket. Its burning is evidence of the integrity of the line and the serviceability of the circuit.
Where to connect the wires? To the phase and the yellow-green wire? We look at point 1.
The PUE (clause 1.7.57) states that electrical installations with voltages up to 1 kV in residential, public and industrial buildings and outdoor installations should, as a rule, receive power from a source with a solidly grounded neutral using a TN system (the system is understood as a power distribution system) ...The letter N in the TN designation means that the open conductive parts (OPC) are connected to the solidly grounded neutral of the power source (see PUE, clause 1.7.3), i.e. are zeroed (protective neutralization has been performed (see PUE, p. 1.7.31). Conclusion: since all power supply up to 1000 volts is made according to the TN system, it means that the third contact in the outlet is incorrectly called grounding. The third contact in the outlet is neutral. It will be grounding only in IT and TT systems, where HRE are grounded (the second letter in the designation, the letter T just means that HRE in IT and TT systems are grounded.) I am very surprised that electricians talk about grounding HRE in TN systems. If they don't know this, then they have never passed exams for admission to work in electrical installations. And the author of the article has a very vague idea of the material presented.