The construction of a private house is a responsible and lengthy process that requires taking into account technology and many nuances. After the construction of the box, the walls, floor, ceiling and other parts of the structure are finished. Many works can be done by yourself. To install floors in a private house with your own hands, you need to decide on the type of construction, materials used, and also consider a step-by-step installation guide.
Demanded flooring options
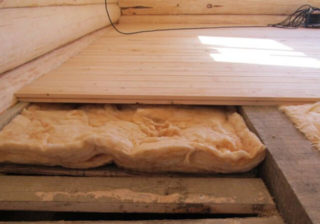
For arranging the base, use wood, concrete or dry screed. Each option has its own characteristics and purpose.
Wood
The wooden floor is used mainly in houses made of timber, although it shows itself well in structures made of bricks and concrete blocks. The material is environmentally friendly, durable, easy to repair. When using boards, there is no need to purchase additional finishing material.
Benefits of wood:
- low thermal conductivity;
- relatively small load on the supporting structures;
- ease of replacement or repair of floorboards;
- the ability to change the color.
Boards can be installed directly after the installation of the sub-base. However, if a basement floor is planned in the structure, it will be necessary to erect a double floor structure with additional insulation.
When choosing a board, attention is paid to the quality of the wood. All elements must be sufficiently dry, free of knots and chips. When choosing boards, you must first calculate the required number. When buying, it is better to give preference to products, the length of which is 2 m or more. Products from the same batch are suitable, otherwise they will differ in shade and texture.
For the installation of the floor, he uses an edged board. It does not need to be sanded further. The most common species are pine, cedar and their spruce. Such wood is durable, wear-resistant, and affordable.
To extend the service life, the floor is treated with protective compounds. Do not allow the tree to dry out, as well as its direct long-term contact with moisture.
Concrete
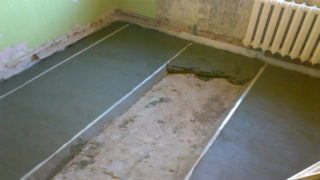
The concrete floor is characterized by high strength, durability, resistance to moisture and mechanical stress. Such a base is not damaged by insects or rodents, it is not subject to inflammation. Moreover, its thickness should not be more than 5 cm. The cost of the screed is lower than the wooden structure.
The disadvantage of a concrete floor is its high weight, which increases the load on the supporting structures. I rarely use this option for the upper floors. To make concrete floors correctly, you need to mix the mortar strictly according to the instructions, observing the proportion of the components. The mixture must be poured evenly.
Between the laying of the screed and the installation of the finishing floor covering, an interval of 21-30 days must be observed in order for the concrete to gain strength. For cladding, it is allowed to use different materials, but installation of waterproofing and insulation is required. If you need to replace communications or pipes inside the screed, you will have to completely disassemble the base.
Dry screed floor
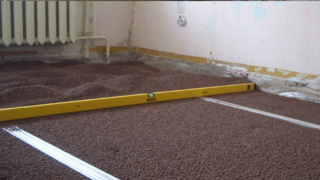
The fastest way to arrange a floor in a house with your own hands is a dry screed.Laying materials is simple. This option is used if there is no time to wait for the concrete to harden or it is not possible to install a wooden structure. Among the advantages of such a floor are:
- ease of installation;
- absence of dirt, as there are no “wet” processes;
- the possibility of laying the finishing material immediately after laying the screed;
- provision of sound and thermal insulation (expanded clay is present in the “pie”);
- environmental safety (chemical components harmful to health are not used to create the base);
- small load on the floor.
Do not use a dry screed in rooms with high humidity levels. It goes well with a wooden sub-base. The design is suitable for older houses that will not be able to withstand the load of a concrete screed. In this case, the repair time is reduced.
Features of the device floors
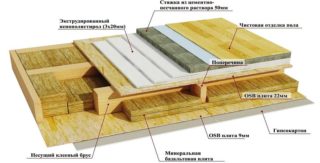
The floor usually consists of a subfloor and a topcoat. The type of construction is determined depending on the materials used for the construction of the house, the number of storeys of the structure, the need for additional insulation or waterproofing.
The floor is a functional part of the room and influences its interior. A properly equipped base ensures the durability of the house and comfort.
The material for the manufacture of the base is selected taking into account the intensity and operating conditions of the coating. The floor is under the greatest stress, so it wears out faster than other surfaces. They lay the floor on the ground or on wooden logs, brick posts. The first option is suitable for houses without basements. Wood floor can be either rough or finished. In the first case, laminate, linoleum or other finishes are laid on the base. To create a finished floor, the boards are polished and varnished (painted).
The manufacture of the floor takes about 30% of all construction costs.
Preparation of the base
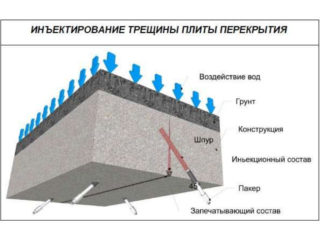
Before making the floor with your own hands in the apartment, prepare the base. The list of works depends on its type.
Concrete floor slabs are inspected for cracks, chips, exfoliated areas. It is better to seal the joints with a silicone-based sealant or putty. When examining wooden structures, attention is paid to their strength. In the presence of rotten or fungal elements, they are replaced. All parts are treated with antiseptics, as well as insect repellent compounds that increase the wood's resistance to fire.
If necessary, the wooden structure is reinforced with additional beams. Lags are laid at a distance of 0.5 m from each other. For the manufacture of boards, oak and larch are used. The optimal board thickness is 5 cm.
Required tools and materials
For work, you will need a building level, a marker, a ruler and square, a tape measure. A hacksaw or circular saw is required to cut wood. For the manufacture of a concrete base, a concrete mixer, shovels, a metal profile for installing beacons, as a rule, a reinforcing mesh are used.
For the processing of wooden products, antiseptic impregnations, fire retardants are used. Also, to form the structure, you will need a waterproofing film, insulation.
Features of DIY floor installation
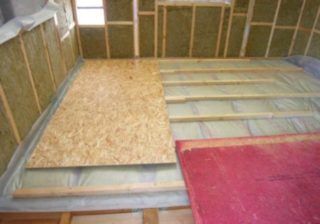
To lay the floor correctly, you need to follow the instructions and the sequence of work. Installation of a wooden base involves the following actions:
- Laying the vapor barrier. In this case, roofing material, ordinary plastic film, and a special membrane are used. The canvases are overlapped, and the joints between them are glued with construction tape. It is necessary to lay a vapor barrier with an approach to the walls.
- Installation of lag. Wooden beams are placed at a distance of 60-80 cm from each other.In this case, a deformation gap is left between the lags and the walls of the foundation. It is 2-3 cm. It is necessary to fix the bars with the help of the guide plates. To raise the wooden elements, use special racks with the ability to adjust in height.
- Installation of thermal insulation. The material is placed in the space between the lags. Expanded clay, expanded polystyrene, mineral wool are used as insulation.
- Fastening wooden boards. They are screwed onto the support bars. Sometimes a crate is made on the logs, on which the finishing finishing material is directly laid. The first plank is placed against the wall, but you do not need to lean it tightly against the base. There must be a deformation gap between the wall and the product so that the tree does not warp during expansion.
In some cases, the logs can be laid on supporting posts or pedestals. This option is acceptable if it is necessary to raise the floor, if significant leveling of the base is required or the area of the room is too large.
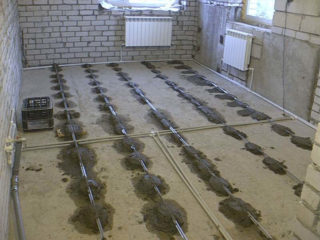
A concrete floor is most often used if tiles are used as a finishing material. It is more suitable for brick and aerated concrete houses. Installation of the screed involves the following actions:
- Base marking. A laser level is used to determine the height of the screed. You need to install it at the bottom of the doorway. All marks are made on the walls. Along a line on a vertical base, nails are driven in, between which a thin cord is pulled.
- Waterproofing flooring. Use a special membrane or thick plastic wrap. The canvases are laid overlapping and overlapping the walls. The joints are glued with construction tape.
- Installation of beacons. A metal profile is used as guides. The step between elements should be slightly less than the length of the rule. The horizontal installation of the beacons is checked by the level. If necessary, a substrate is placed under the profile.
- Reinforcement of the screed. A fine mesh metal mesh is used. The material is laid so that the solution completely covers it.
- Pouring concrete. The mixture is distributed between two beacons, after which it is leveled with a rule of undulating movements from side to side.
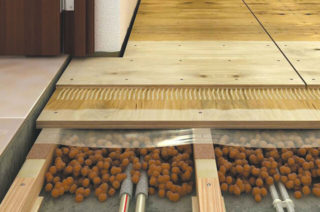
To prevent the screed from cracking, it must be moistened for 2-3 weeks. In this case, the presence of drafts in the room should be avoided. Concrete will gain final strength within a month. Only then can you start laying the finishing material.
The dry screed can be used in any living room. It allows you to speed up repair work that you can do yourself. The step-by-step guide assumes the following list of works:
- Laying waterproofing film. They lay it on the walls and overlap.
- Installation of wooden bulkheads. The step between them is 60-80 cm. At the same stage, beacons are installed, along which the screed will be aligned.
- Backfilling of material. The dry mixture is poured onto the prepared substrate and leveled using the rule.
- Laying the draft layer. Plywood plates are mounted on the screed. They start laying from the front door and continue towards the far wall. The laying of the first sheet is most important. The rest of the elements are adjusted according to it. Before installing the plywood, the screed is compacted. Sheets must be laid with bandaging of seams. If the installation of two layers of material is required, the second is fixed with glue so that the seams do not intersect. The joints between the plywood and the wall are filled with sealant.
After preparing the base, you can start laying the clean material. In this case, there is no need to wait 2-3 weeks.


