Door frame - a frame installed in a doorway. It can be supplemented with platbands or additional elements if the depth of the opening is too great. The box masks gaps, technological openings, and also provides a tight fit of the sash. You can make a box for an interior door and install it yourself.
Door frame complete set
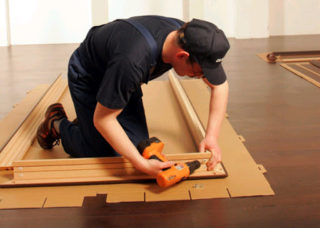
The door frame in the apartment is usually made of timber. Its structure and dimensions depend on the size of the opening, door design, and other factors. The complete set includes:
- 2 uprights and a horizontal bar are a must for any model.
- Threshold - usually appears on the doors leading to the toilet, bathroom, kitchen. Thus, they prevent the spreading of water from broken communications, which more often happens in non-residential rooms.
- Platbands are decorative elements that mask the assembly seam.
- Fittings - door handles, hinges, locks, door closers. Some of the elements are fixed to the frame, some - to the door leaf or to both elements.
The telescopic box is slightly different. When assembled, it looks like a regular one, but it consists of a larger number of strips that are connected to each other through grooves. Such a structure can be installed on any doorway - too deep, with uneven walls, too wide.
Material selection

The following materials are used for the door frame:
- MDF - or wood fiber. The material is lightweight, resistant to moisture, strong enough, designed for fastening sash made of wood, MDF, glass, plastic.
- Wood is the most popular material because it is always available and easy to work with. For interior doors, wood of medium and low density is taken. Most often it is pine, as it is affordable. Hardwoods are chosen for the entrance blocks - oak, larch, hornbeam. Such material is not afraid of water and serves for a very long time.
- Metal - galvanized steel, very rarely stainless. The box is made by bending a steel sheet of appropriate thickness. The frame is designed for the heaviest doors. It is rarely used for interior blocks.
It is undesirable to use chipboard. The material is weakly resistant to the action of water and steam, poorly holds fasteners due to its low density. Chipboard is cheaper than wood or MDF, but the total area of the box elements is not large, so this savings does not justify itself.
Most often, the complete set of the door includes all the elements, including posts and crossbars for the frame.
Marking and measurements
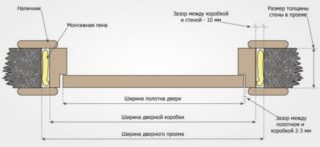
The manufacture of a door frame begins with measurements. They do this in two ways: measure the opening or an already acquired door.
In the first case, measurements are taken of the height and width of the opening. Measurements are made in several places with a step of 50-60 cm. It is important to measure the diagonal of the opening. Thus, the flatness of the slopes is assessed and the correctness of the frame manufacture is controlled.
It is also necessary to measure the thickness of the box, since it depends on the thickness of the wall.
In the second case, measure the sides of the door leaf and add 5 cm to the results.Then measure the threshold, if it is expected, leaving space for allowances.
Door frame assembly options
The installation of the product is reduced to the construction of a rectangular frame structure. It can form a closed loop, if equipped with a sill, or open.
Do-it-yourself door frame is assembled by several methods. Choose a method based on experience and the nature of the material used.
Baguette connection
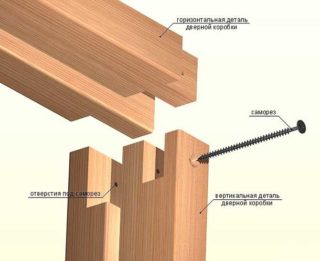
Reliable assembly method. The ends of the uprights and crossbeams are filed at 45 degrees. When the elements are combined, they are fastened with self-tapping screws or screws. Since the box is inserted into the opening, the fasteners remain invisible.
The downside of this solution is the limited choice of material. A frame made of MDF is not worth assembling like that. Over time, the edges loosen, cracks and chips appear at the joints.
Spike connection
A much more durable, albeit complex, method of assembly is the tenon connection. In this case, spikes are cut out on the crossbar for insertion, and on the ends of the racks there are grooves for them. Such a connection is so strong that it does not need additional fasteners. However, to extend the service life, the boxes are fastened with self-tapping screws. After installation, the nail heads are pasted over with a film to match the color of the wood.
DIY assembly is very difficult. Experience and a special tool are required, without which it is impossible to cope.
At right angles
The simplest way, although not very aesthetic. In this case, only the crossbar is filed so that it is inserted between the vertical posts. The lintel is fixed with self-tapping screws. The fasteners are on the outside of the frame and remain invisible.
Necessary tools for the job

To assemble a wooden door frame correctly, you need the following tools:
- construction knife, hacksaw for wood, hammer;
- screwdriver for fasteners;
- planer and chisels for trimming planks;
- pencil, laser or water level, tape measure, square and other measuring instruments;
- polyurethane foam, liquid nails.
Additional tools and materials may be required, such as sealing tape to improve sound and heat insulation.
DIY door frame assembly instructions
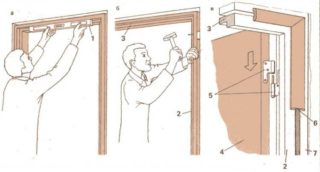
The manufacture of the box depends on its design. However, the general scheme is simple.
- Choose two beams equal in height to the opening - racks, and 2 boards equal to the width of the opening - lintel and sill.
- On the side from which the door will open, a gap is made. If the sash opens in both directions, gaps are made on both sides.
- The same groove is made on the transverse elements.
Finished parts are painted or stained. The color is matched to the color of the door leaf. This operation can also be performed after installation.
No threshold

The design without a threshold is called open. It's a little easier to assemble and install.
- Collect the box for the interior door on the floor, out of the blue. The details are laid out according to the drawing and the shape is aligned. If necessary, adjust the size of the bars.
- Mark the joints - at an angle, in a quarter. The marks are made with a hacksaw, and then the excess material is removed with a chisel. The cut of the joint is processed with a file or grinder.
- The racks are placed under the fittings - door hinges, the counterpart of the lock, the closer.
- According to the marks, the material is sampled with a chisel. Hinges of a new type, "butterfly", for example, are installed on the frame already during the installation of the door leaf.
- The parts of the box are again connected and fastened. Each line must have at least 2 bindings. The finished box is checked again for verticality.
- The structure is installed in the doorway and leveled. Using a square and a plumb line, check the verticality of the installation. Correct the position with wooden wedges.
- A preliminary hinge of the door leaf will be carried out. To do this, hinges are attached to the rack, and then the door is hung.Check the verticality of the installation and ease of opening. If the sash moves with difficulty, use wedges to adjust the position of the box until they achieve free opening.
- The door leaf is removed. The wooden box is firmly fixed. The gaps between the frame and the wall are covered with polyurethane foam.
- After drying, the remaining foam is cut off. To mask technical gaps, platbands are installed.
If the opening is too deep, the door frame includes extensions.
A useful addition to the interior door is an emphasis. This is a short pin with a rubber grip. The stop does not allow the opening door to hit the wall. This prevents damage to both the door leaf and the finish. For a stop, a hole is drilled in the floor, then you need to put a fixing screw into it, screw the stop onto it.
With a threshold
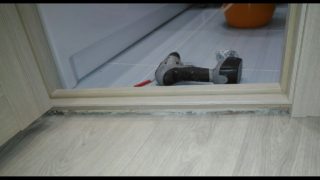
Installation of a door block with a sill is not much different from a conventional installation. Threshold - a bar equal in width to the size of the opening. It is attached to the overall structure and, during installation, is fixed to the floor after the door frame is finally aligned.
You can do it differently: buy a nut in a store and install it separately. Finished models can be customized at any time. Fix them with screws or glue. Aluminum sills are popular: they are resistant to water and wear.
Typical mistakes
Installing a door frame seems like a very simple job. In fact, there are many subtleties here. Beginners often make mistakes, which later leads to difficulties in opening doors and rapid wear of the product.
- There must be technical clearances between the wall and the box. If there are none, it will not be possible to seal the gap between the wall and the frame.
- When mounting the racks in the locking part, the upper or lower edge is pulled too tight. In this case, the canvas ceases to fit snugly to the box, which leads to a decrease in heat and sound insulation.
- Do not secure the box until the sash check has been performed. Only when the door leaf remains fully vertical when closed and open can the frame be fixed.
- The main condition is that the box must be firmly fixed. Otherwise, under the weight of the door, it "loosens".
- Holes for fasteners must be made at a certain distance from the edge of the rack or crossbar. Otherwise, fragments of the wall may chip off.
Door frame installation is the most important part of door installation. The position of the box ensures the verticality of the sash and freedom of opening. Relatively simple models can be made and installed by hand, if you follow the instructions.


