To mark the site, install the fence posts and connect them with jumpers in a state of one person. For further installation, assistants are often involved. If you make a device for installing a profiled sheet on a fence, all the work can be done alone. Before starting the arrangement, it is advisable to familiarize yourself with the features of the sheathing of fences made of various materials.
Features of the profiled sheet
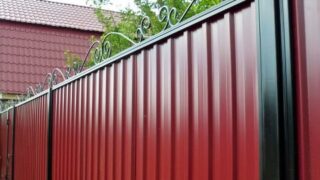
When sheathing a fence with a profiled sheet, it is necessary to take into account the features of such building structures:
- the surface has a large windage, which makes increased demands on the stability of the base;
- thin metal must be fixed with hardware with wide hats and elastic washers so that gusts of wind do not tear out the sheets;
- sheathing the fence, they clearly maintain the horizontal level of the edges - on a long section, even the minimum error is visible to the naked eye;
- during installation, be careful not to damage the appearance of the material, leaving dents and creases;
- high demands are placed on hardware, which can be destroyed by temperature changes.
Most often, the profiled sheet is attached to horizontal lintels located between the support posts. The mounting methods of the lag differ depending on the method of making the pillars.
Brick fence filled with profiled sheet
It is necessary to fasten the profiled sheet to a fence with brick posts not on a stone, but on horizontal lintels.
The log material can be a tree or a profile pipe. The first option is undesirable, since even with high-quality processing, the tree begins to rot after a few years, bend from the constant exposure to moisture.
The most susceptible to destruction are the places of contact between brick pillars and wooden logs - the stone absorbs moisture and gradually releases it to the tree, accelerating the decomposition process.
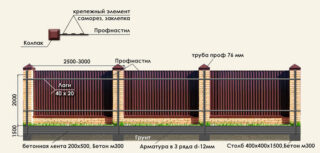
When building a brick or stone pillar, as a rule, a metal pipe or large diameter reinforcement passes inside. Horizontal crossbars are attached to them.
The profiled pipe is attached by welding or bolts, wooden ones - with bolts. After making the metal frame, they begin to lay bricks.
When marking the installation sites of the posts, the size of the profiled sheet is taken into account. Inaccuracies will lead to the need to cut the material, which spoils the appearance, and the cuts begin to rust.
Wooden base
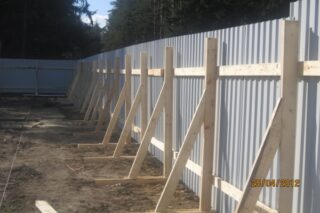
A wooden frame is a budget option, but in the long term, a fence made of natural material is more expensive than stone and metal. In addition to the costs of the timber, it is necessary to take into account the costs of dismantling and installing a new frame.
The service life of wooden bases is short, after 8-10 years the fence will have to be redone.
It is possible to dig wood pillars into the ground only after careful processing. Antiseptics and waterproofing materials are used.
For mounting the lag, brackets are attached to the base, to which the jumpers are screwed. It is undesirable to use nails - over time, the joints loosen, the fence warps.
Metal bases
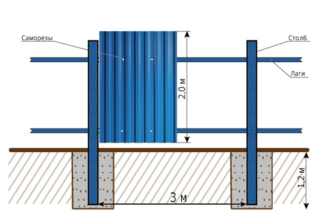
The metal sheet is placed on the frame from the outside of the site. This will prevent intruders from using the crossbars as support to get past the fence. During installation, the pillars are reinforced in the ground with concrete, which will exclude roll from wind loads.
A profile pipe is used for the frame:
- for pillars at least 40x40 mm in size;
- for lintels from 20x40 mm.
Connections are made by welding, bolts or self-tapping screws for metal.
An option that allows you to mount the lag alone is the use of special brackets. They buy finished products or make them on their own. A less costly way is to weld pads with holes to the lintels. In this case, the distances are especially carefully measured so that the logs accurately enter between the posts.
Through holes are drilled for the bolted connection. Self-tapping screws with a drill tip can be used. For the convenience of work, clamps are used when welding. In this case, you can work without helpers.
During installation, the horizontal levels are carefully measured.
The frame is treated with an anti-corrosion primer and painted at least 2 times.
Mounting scheme
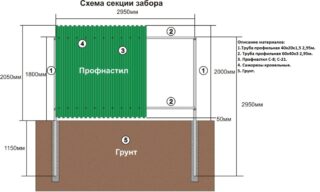
For a sheet with a height of 1750 mm, they are placed according to the scheme:
- The bottom lintel is located 410 mm from the ground or foundation.
- The top lintel should be attached 350 mm below the top edge of the post.
- The distance from the bottom edge of the sheet to the ground is 50 mm and 50 mm above the cut of the pillar.
For fences up to 1800 mm, two logs are enough, if the fence is higher, add one crossbar for each subsequent meter of height.
It is necessary to screw the sheets to the upper jumper through two waves, and the bottom through one.
A decorative strip is mounted on the top of the fence.
Sheets are joined end to end or overlapped. The first option is more economical, so the working area is not lost, but less reliable. The best way to place the sheets is to overlap them, which eliminates gaps and increases the rigidity of the structure. When buying, you should specify the working width of the sheet, usually it is 100-110 mm less than the geometric dimensions.
Installation sequence
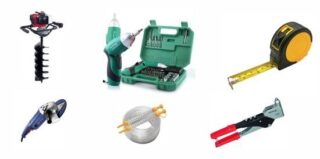
Depending on the hardware, you will need different tools:
- drill with adjustable speed;
- screwdriver;
- drills or bits of the required size;
- level and plumb line;
- marking twine;
To make it easier for one person to screw the profiled sheet to the fence, it is recommended to make a special device. The principle of operation is based on the fact that a base is attached to the lower profile, on which the sheet is supported at the time of installation. There are several design options. The easiest is to use clamps. You will need 4 products. Two clamps hold the lower edge of the sheet at the same level, being a kind of support. The other two pull in the top and middle, freeing your hands to install fasteners.
The second way to simplify the work is to make simple devices for adjusting the level and retention of sheets. The material is the lengths used for the lathing of the profiles.
The mechanism works as follows:
- The upper part slides over the lower bar and is secured with thumbscrews.
- The bottom and top parts can be shifted relative to each other by adjusting the distance from the web to the bottom edge of the sheet. - this allows you to accurately maintain the horizontal level.
- A profiled sheet can be placed on the lower part of the device during installation.
Another design option can be used if the joists are fixed exactly at the horizontal level. In this case, it is enough to make a simple suspension.During installation, the device is hung on the lower lintel, the profiled sheet is installed and its upper part is fixed. After that, remove the device and complete the installation.
Features of fastening with self-tapping screws
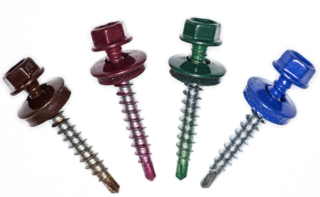
Self-tapping screws - self-tapping screws - are metal rods with a head and a thread. There are three types of products: for wood, metal and a reinforced version. The first and second types differ in the diameter of the drill-tip - it is smaller for wood screws. The reinforced view cuts a full thread in the log, and is able to withstand heavy loads due to the increased diameter of the rod. Fasteners are made of stainless or carbon steel. Such a composition does not rust, parts do not break with temperature drops.
A feature of roofing screws is a wide head and a thread along the entire length of the rod. A damping washer made of elastic material: rubber or silicone is required under the head. The washer prevents spontaneous unscrewing of the fasteners, and also prevents dents from forming on the surface of the profiled sheet.
They choose self-tapping screws with a hex head - this is less likely to damage the sheet when the tool slides off.
The length of the self-tapping screw depends on the material of the purlins. For wooden logs, choose a length of 1.5–2 cm less than the thickness of the timber. When attaching to a professional pipe, it is necessary to choose a self-tapping screw of such a length that it fits completely inside the log without reaching the second side. Usually, hardware is purchased with a length of 17-19 mm - they are suitable for pipes with a section of 20x40 mm.
Despite the fact that the self-tapping screws have a drill-tip, it is recommended for novice craftsmen to pre-drill a hole in the sheet and crossbars with a conventional metal drill with a diameter of 0.5 mm less than the size of the fastener. This sequence will help to avoid slipping of the drilling point and damage to the coating. As you gain experience, you can proceed to drilling directly with a self-tapping screw.
When fastening, some features are observed:
- it is necessary to drill strictly at right angles to the surface;
- on a drill or screwdriver, if possible, set the maximum torque;
- avoid loose fit or constriction of fasteners - the ideal option would be when, after touching the elastic washer of the profiled sheet, the self-tapping screw turns by ¼ or ½ a turn;
- The preliminary marking of the drilling sites will help to evenly screw the corrugated board to the fence, the marks are made with a washable marker along the stretched cord.
An insufficient seal on the washer will allow moisture to enter the hole and cause gradual corrosion of the metal. In addition, under the influence of the wind, the sheet will rub against the logs and screws, which will ruin the appearance of the fence.
Too tight can cause deformation of the sheet and lack of movement necessary to compensate for thermal expansion.
Mounting with rivets
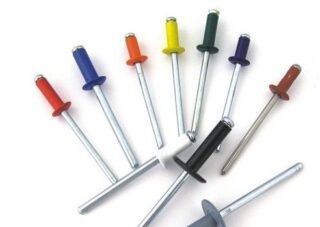
Structurally, the rivet consists of two elements: an aluminum head with a rim and a steel pull rod. For installation, you will need a special device - an assembly gun.
The diameter of the working part of the hardware is from 3.1 to 6.7 mm, the length is up to 20 mm. For fastening, products are selected with the dimensions of the working part by no more than 10 mm exceeding the sum of the thicknesses of the profiled sheet and the wall of the purlin. For example, if a sheathing with a thickness of 0.7 mm is chosen, and the wall of the log is 2 mm, they acquire a rivet from 8 to 12 mm.
Manufacturers paint the heads in standard colors, so it's easy to find the necessary rivets.
The strength of the connection is not affected by external loads (wind), therefore, elastic washers are not placed under the side of the rivets.
Installation is carried out in several stages:
- The sheet is suspended if one person is involved in the work, or attached to a previously mounted part if there are assistants.
- Align the sheet, focusing on the readings of the plumb line (level), overlap with the previous sheet.
- A through hole is drilled in the profile and one side of the log.Select the drill diameter 0.1–0.3 mm larger than the rivet thickness.
- Mount the rivet.
For the installation of profiled sheets, rivets with a thickness of 4 mm or more are purchased - with a smaller diameter, the fence can be pulled out by the wind due to the small diameter of the cap.
Bolt fastening
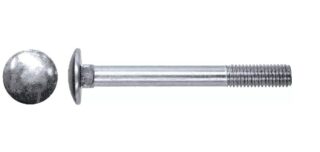
The bolted connection is the most protected from intruders, since it cannot be disassembled on the one hand - you need access to the nut.
At the same time, the profiled sheet is rarely bolted for several reasons:
- The profile must be drilled through, the nuts are visible, which impairs the appearance.
- The bolt-nut connection is the most time consuming and costly due to the price of fasteners and consumables. More drills will be needed as there are two profile walls to be drilled.
- Drilling places are subject to increased corrosion, the nuts will have to be repainted regularly.
Bolting option is using screws. To work, you need a tap with a holder and a drill of a suitable size:
- The attachment points are marked.
- A hole is drilled in the profiled sheet and one side of the log is 0.3 mm less than the screw diameter.
- The thread is cut.
- Fasten the profiled sheet with a screw. An elastic washer is placed under the head to prevent spontaneous loosening.
The disadvantage of this method is that the screws can be unscrewed with a screwdriver and entered the territory.
Welding
Welding for attaching profiled sheets to a fence is extremely rare. When heated, the paint burns out, and the appearance irrevocably loses its attractiveness.
For work, you need a semi-automatic welding machine, since it will not be possible to fix the sheet with arc welding - it will burn out at the slightest carelessness.
In the places of welding, active corrosion inevitably begins due to the loss of the protective paint layer.
Decorative strip
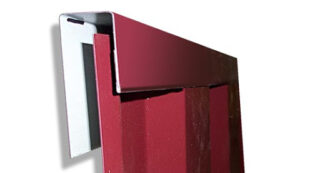
To give the fence and gates rigidity and improve the appearance, at the end of the installation of the profile, a protective decorative strip is installed. The fastening of the part is carried out with the same hardware as the sheets: self-tapping screws, rivets, screws.
Observing simple rules, one person will cope with the installation of a profiled sheet on the fence. Tools to make work easier can be made in minutes, saving you the cost of hiring a construction crew.

