Replacing a window sill is a common procedure when installing window structures. As a rule, you have to mount this element yourself. To keep the warmth in the room, to prevent the formation of condensation, this element must be installed hermetically. It is also important to choose the appropriate type of product: it must be visually attractive and functional.
Reasons for replacing the window sill

It is necessary to change the window sill in the following cases:
- The appearance of mechanical damage on the surface of the product, deformations. They make the window sill less functional and attractive.
- Violation of the integrity of an element, leading to its complete or partial destruction. At the same time, it is no longer possible to put indoor plants or any objects on its surface.
- Changing the interior of the room, replacing old window frames.
- Destructive processes in the adjacent wall. In this case, the fixation of the window sill is weakened, it may fall. Depressurization of the structure leads to drafts. In winter, this leads to an increase in the cost of heating the house.
Sometimes it is necessary to increase the size of the window sill in order to arrange indoor plants or make it part of the working area.
Required tools and materials

To replace the window sill, you need to prepare the following tools:
- scrap or hammer drill (you can also use a hammer and chisel if you need to knock down a certain part of the concrete base);
- knife;
- a hacksaw for metal, wood or plastic (depending on the material of manufacture of the element);
- mallet;
- chisel (for wooden window sills);
- screwdriver or Phillips screwdriver;
- grinder (it is equipped with a circle for cutting concrete);
- putty knife;
- building level and tape measure;
- pencil for marking the base and the decorative element itself.
In addition to the window sill, you will need mounting foam, self-tapping screws, and perforated metal tape. If the slopes are plastered, a mixture is needed to finish them. Often a load is placed on the product for a tight installation.

The window sill is made from different materials:
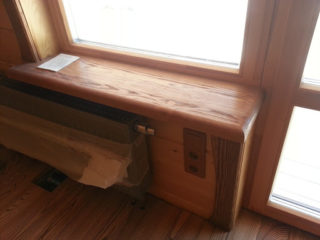
- Wood. Such elements never go out of style. They give a feeling of coziness, are natural, and are suitable for most interior solutions. The tree has a beautiful texture, is an environmentally friendly material, and is easy to repair. Better to use it when installing wooden window frames. Due to the production processing, the material does not warp, does not rot, does not lend itself to damage by insects, therefore it lasts for a long time. Moreover, its appearance is easy to change.
- Plastic. This material has a low weight, is easily attached to the base with glue or polyurethane foam, and has an attractive appearance. Such a window sill is resistant to mechanical stress, moisture and direct sunlight, and is environmentally friendly. The product has a wide range of shades and configurations. However, you should not load it too much, so as not to break it.
- Acrylic. Such window sills are not cheap, but durable and can even withstand human weight. They do not lend themselves to mechanical damage, easily cleaned of any contamination.
You can make a window sill from natural or artificial stone. It will add elegance and luxury to the room. However, such elements are heavy. When choosing, special attention is paid to the environmental safety of the material.
Preparatory work

Replacing the plastic window sill involves preparing the opening and installation site. Often it is necessary to disassemble the slopes. If they are covered with wallpaper, the canvas is peeled off from the base and wrapped up to a height of 1 m. In order not to tear the finish, you need to use a spatula. Concrete-based plaster is cut with a grinder to a height of 15 cm above the windowsill. The depth of the cut is 3-5 cm. Then the plaster is removed with a chisel and hammer.
It is necessary to work in protective clothing, goggles and gloves. Use a mask or respirator to prevent dust from entering the respiratory tract. If necessary, remove furniture from the room. If this cannot be done, cover it with plastic wrap. The base must be cleaned of excess concrete, debris, dust. It is better to clean the surface with a vacuum cleaner. Sometimes, before installing the window sill, the base is primed.
Dismantling the window sill
To change the window sills on plastic windows with your own hands, you need to remove the old structure. Dismantling is done with hand tools or a hammer drill.
Concrete
A chisel and hammer are used to remove the concrete sill. Using a hammer drill will speed up the process, but will make it more dusty. The first option involves cutting the structure into small strips. After that, the concrete is knocked out with a chisel, hitting it with a hammer.
When working with a punch, you need to be as careful as possible: incorrect movement will lead to cracks in the wall. In some cases, the dismantling of the window sill is possible only together with the window frame.
Wood

Wooden structures are mounted with full or partial pinching of the window frame, on metal brackets or glue. Depending on the method of fastening, the type of dismantling is selected. You can remove metal brackets using a Phillips screwdriver, screwdriver. Next, the product is removed from the grooves located in the window structure and slopes.
To dismantle an element set on glue, it is required to pry it off with a crowbar or knock it down with a hammer along its entire length. There is no need to rush so as not to break the window frame. First, the window sill is raised 1-2 cm above the base, and then loosened in different directions. If there are no additional fasteners, the product will come out quickly and easily. Foam or glue can be trimmed with a narrow trowel.
If you have additional fasteners, you will have to remove the window sealing gum, ebb.
Plastic
To dismantle the PVC window sill, you can use a regular knife or crowbar. The first option is used if the element needs to be removed carefully without breaking it. With a knife, glue or polyurethane foam is cut through, after which the window sill is removed. However, it remains intact, so it can be reused.
Diy window sill replacement sequence

To replace wide window sills, after dismantling, it is necessary to prepare the base, adjust the protrusions, fix the window sill, and seal the slopes. Self-assembly provides for the following manipulations:
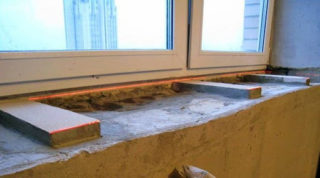
- Preparation of the base. It is cleaned of dirt, polyurethane foam, and remnants of concrete mortar. Insulation is replaced under the frame and inside the window opening.
- Cut the canvases. The new element has a rectangular shape, so it is cut so that the wide leg goes under the slopes and part of the inner wall. In this case, it is taken into account that the width of the product should be such as to block the heating radiators. If the window frame is not installed parallel to the window, it is necessary to trim the window sill.When calculating the size of a decorative element, the following parameters are taken into account: it should fit into the groove of the wall by 2-3 cm, the length of the protrusion behind the slope is different, but it should overlap the finish.
- Installation of a window sill.

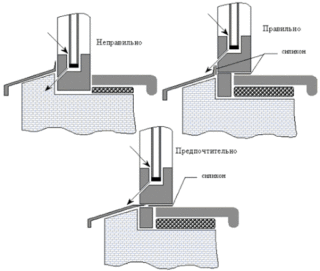
- The upper edge of the product is tightly pressed against the window frame (support profile).
- The canvas is adjusted using mounting wedges or shims. This should be done so that the plane has a slope of 2 mm towards the room.
- The insulation seam under the frame is restored; for this, the element is temporarily removed.
- Installation of vapor barrier tape.
- For fixing the window sill, foam is used, but the element itself is installed only after it expands slightly.
- After laying, a load is placed on the product: it can be three-liter cans of water (thanks to this, it is possible to achieve a tight fit of the canvas along the entire plane of the base).
- After 20 minutes, polyurethane foam is applied at the junction of the window sill with the frame, and then another 7-10 kg of load is installed on the structure.
The void under the canvas is foamed, leaving 3-4 cm empty from the edge of the wall. The perforated tape is installed only after the substance has dried.
Slope finishing
The finishing of the slopes begins a day after the installation of the window sill. Usually they are plastered and painted. If wallpaper is glued on the base, the canvas is fixed back. All joints between the window sill and adjacent surfaces are sealed with a sealant.
The installation of this structure is not difficult, so you can do it yourself. It is only necessary to observe the technology and sequence of work.


