Block masonry makes it possible to build a durable building with a high level of fire safety, although its construction will not be as quick and easy as from wood. One of the examples of such premises is a brick bath.
Pros and cons of a brick bath
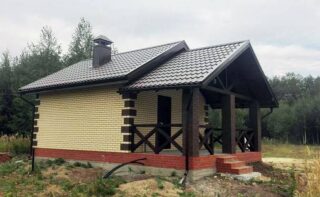
A do-it-yourself brick bath requires the right choice of material. White silicate products have the best performance characteristics. The price is slightly lower for red clay bricks, which are also well suited for the construction of a steam room. The high temperature environment in which they are manufactured contributes to the strength and reliability of the material. It is also possible to use solid bricks - smooth (grade 100 or 175) and corrugated ceramic (100 and 125).
The construction of a brick bath is often considered if it is planned to operate it often and for many years. Buildings made of this material can last for more than a century. Other benefits include:
- moisture resistance and no need for regular treatment with antiseptics;
- incombustibility;
- attractive appearance that does not require additional cladding;
- environmental friendliness;
- no predisposition of the walls to rotting from the inside in the humid environment of the steam room and shower;
- resistance to microorganisms.
The downsides are the need for a very solid foundation (which takes a lot of resources) and higher financial costs than building a wooden bath.
It will take much longer to heat the stove in a brick room, but it will cool slowly.
Building projects
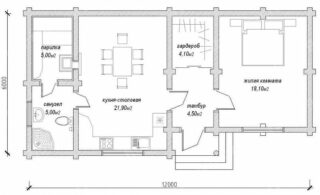
Before starting work, it is necessary to prepare a bath project. The drawing indicates the internal premises, their relative position and dimensions. If there is not enough space on the site, you can make a mini-bath with dimensions of 3x4. In this case, the dimensions of the pair room will be 1.5x3 m, the dressing room and shower room - 2.5x1.5 m.
If there is sufficient space and funds in the building, additional premises can be provided, for example, a veranda or a terrace, as well as a spacious and comfortable dressing room, which also serves as a rest room.
Choice of location and brick
Before building a brick bath with your own hands, you need to choose the right place. According to sanitary standards, a wood-heated steam room should be located at least 12 meters from the house. If a boiler (electric or natural gas) is installed in the sauna room, this figure is reduced to 5 m. To prevent the foundation from flooding in spring, the building must be located at a sufficient distance from water bodies (at least 30 m). Since brick is a non-combustible material, such a bath can be attached to the house. This saves communication costs, and in this case the foundation can be built in parallel.
It is important that the windows and doors in the building open outward. It's good when the stove is opposite the door leading to the dressing room. If the windows of the steam room face the west, the rays of the sun will penetrate into it longer, so that visitors will less often have to turn on the electric lights.
Step-by-step instruction
In the absence of sufficient experience, it is better to entrust the calculation of the required materials to specialists.
Foundation
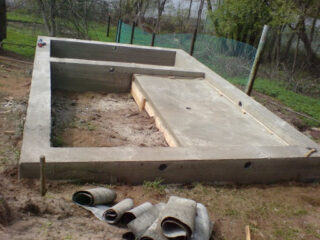
The base should be buried below the freezing point of the soil. The type is selected depending on the characteristics of the soil.If it is mobile, heaving or freezes easily, screw piles are suitable. They are placed in the corners of the building, with piers and around the perimeter every 2 m. When the soil is not problematic, they equip a strip foundation. It can be made from bricks, concrete blocks or cement mortar poured into the formwork.
Step-by-step description of the organization of the strip base:
- the site is cleared of debris and branches;
- marking is carried out in accordance with the project;
- a trench with a width of 0.3-0.4 m is pulled out;
- at the bottom, a pillow is organized from 0.1-0.2 m of sand and the same height of the crushed stone layer;
- from above, sheet waterproofing or geotextile is laid in several layers;
- formwork is being mounted, the inner walls of which must be wrapped with plastic wrap (the structure itself must rise 0.3-0.6 m above the soil);
- inside, a reinforcing cage is placed, connected from iron bars with a diameter of 12-16 mm;
- grout is poured (you can do it yourself or purchase a ready-made mixture at a construction store).
Water supply and sewerage systems are also being developed at this stage. The formwork is dismantled after 2 weeks. The first 5 days after pouring, the foundation is moistened with water three times a day to prevent deformation. Several holes must be made in the tape for ventilation with a diameter of 10 cm. A separate foundation is arranged under the stone oven. To protect against precipitation, a meter-wide blind area is organized. It is made from gravel and oily clay. It will be possible to lay out the walls in a month, when the cement hardens.
Walls
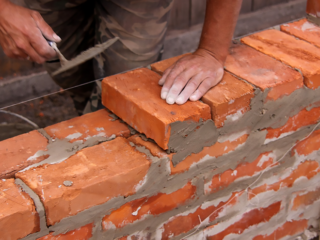
The walls can be made by laying in one and a half to two bricks (after which insulation is organized), or in two rows, between which there is a gap. It can be left blank or a heater can be installed there.
A waterproofing layer is mounted on the foundation before laying the brick. You can use mastics or roll materials. Window and door frames are adjusted in the process. On the sides of the openings, beams of wood are placed, having the same thickness as that of the brick itself. They are covered with a roofing felt layer and smeared.
Broken bricks must not be placed in dressing corners and piers. If the block needs to be split, a pickaxe hammer is used. The masonry mortar is applied to the entire surface of the product.
Roof and floor
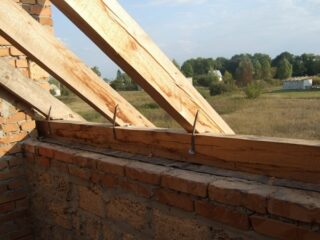
The more complex the roof and the more pronounced the slope, the larger the construction budget will be. In the walls, you need to drill holes for the fastening pins and install the Mauerlat and ceiling joists on top. In the areas of contact with the brick, the beams are covered with roofing material. An unedged board is suitable for flooring. During its installation, a chimney channel is provided. In the area of contact of the latter with the ceiling, a metal sheet is installed. Then the rafter system is assembled, the lathing and finishing flooring are installed.
The floor joists are attached to the bricks with metal corners. Cranial bars are nailed to them from both sides, supporting the rough covering of unedged boards. On the latter, 2 layers of waterproofing are placed with insulation between them, and a finishing flooring is made on top.
Exterior and interior decoration
Interior decoration can be arranged using hardwood lining - aspen, alder or linden. It is mounted on a crate made of wood with an environmentally friendly insulation. Aluminum foil is suitable for vapor barrier. The floors in the shower room can be tiled with ceramic tiles.
The exterior decoration of such a building, as a rule, is not performed: the brick does not collapse under the influence of moisture and looks attractive without facing.


