Balconies and loggias are often functional extensions of living rooms. The owners are trying to increase the level of comfort in these premises, to make them decoratively attractive. However, it is not enough just to glaze a niche. Balcony lathing allows you to insulate the balcony and revet it with different types of finishing materials: siding, plastic panels, drywall.
The choice of material for the balcony lathing
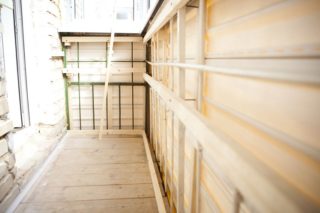
The material for the frame is mounted on a brick, concrete base or on a metal grid. Its main qualities are simplicity of subsequent finishing, resistance to external influences.
Most often, the lathing of the loggia is made from the following products:
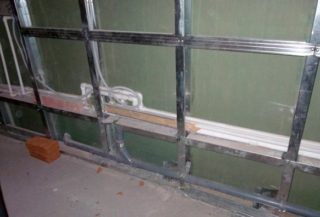
- Metallic profile. For its manufacture, thin galvanized steel is used. It is most suitable for fixing drywall sheets. Certain skills are required to work. The profile can only be fixed on the surface of the base with self-tapping screws. You cannot mount it on the floor. The material does not warp, deform, rot and does not rust for a long time. He is not afraid of moisture, insects and does not require additional processing.
- Wooden bar. Such material is cheaper than a metal profile. It is recommended to use it if the area of the room is small. This is possible due to the different section of the beams. Thin slats allow you to save maximum free space on the balcony. Clapboard, siding, fiberboard and chipboard, drywall are attached to the wooden crate. Such a frame is simply fixed on the most rigid base. For fastening the bars, you can also use different elements: nails, screws, staples. However, the tree requires additional treatment with antiseptics and fire retardants.
Wooden blocks are recommended to be used in closed heated rooms, the metal profile is suitable for installation inside and outside, even if the balcony is cold.
Plastic panels
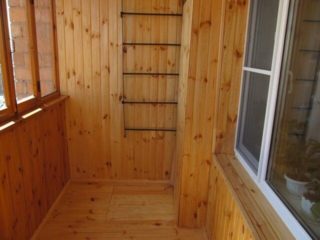
Plastic panels are a popular material for installation in the bathroom and in the kitchen, for decorating a loggia. They are inexpensive, provide a good appearance of the room, and are easy to install and maintain. For the construction of the lathing for such a cladding, a wooden beam is used. The panel on the frame is fixed with staples, small decorative screws.
Siding
Siding is more often used if the balcony has a metal grate as a fence. For this material, you can use a wooden beam, the cross-section of which is 5 * 5 cm. However, specialists from large construction firms use a crate made of metal profiles.
Wooden lining
For the installation of wooden lining, a lathing of beams is required. The cladding is fixed with staples, clips, nails or screws. If the base is concrete, the installation of the frame is accompanied by the fixation of the vapor barrier film. The lining is nailed to the crate with small nails. A heat insulator can be placed between the trim and the base.
Drywall
It is recommended to screw drywall to the metal profile crate. For work, self-tapping screws are used, which are recessed inside the sheets. To make the right frame, you need to use a building level and a plumb line. Installation of longitudinal and transverse elements is required.
If preference was given to a wooden structure, thin mounting rails are required for its arrangement. A double frame is made in those places where the sheets of drywall are joined vertically.
Necessary tools for the job
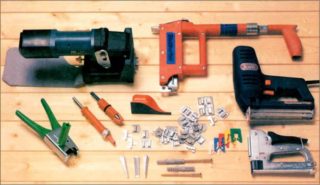
The lathing on the balcony for plastic panels or other types of finishes must be done correctly so that it does not lose its shape and withstand the load.
To work, you will need the following tools:
- standard building level;
- measuring tape, marker or pencil for marking;
- hammer drill with the appropriate drill, depending on the type of base;
- metal corners (they fix the horizontal and vertical parts of the lattice);
- fasteners: anchors, concrete screws, self-tapping screws with dowels;
- Phillips screwdriver or screwdriver;
- wedges or pieces of wood for leveling the battens;
- a cord for checking the vertical and horizontal level of the guides;
- grinder or scissors for metal for cutting a profile.
To seal the gaps between wooden elements, as well as the area of joints of walls with the ceiling and floor, use polyurethane foam or polyurethane sealant.
DIY installation instructions
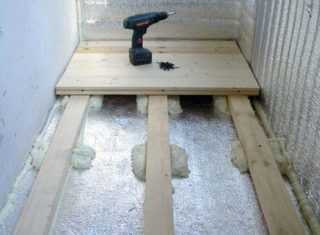
Before making a crate for plastic panels on the balcony, the surfaces of the base are cleaned of dust and debris. The old cladding is removed. If it was not there, the base is checked for cracks, cracks, fallen off areas. It is better to cover all surfaces on the balcony with waterproofing mastic. If wooden blocks are used for work, they are treated with wax-based protective compounds, fire retardants, water repellents.
Floor
After preparing the subfloor, logs are laid on it. The bars are cut to the length of the room. It will take 3-4 elements, with a balcony width of 1.5 m. The crossbars are mounted at the side walls. If it is necessary to strengthen the structure, small transverse fragments are fixed in the central part of the base between the longitudinal segments.
You need to find the highest point on the floor using a building level, align all structural elements. Pieces of plywood are laid under the bars. The logs are fixed with anchors or bolts for concrete bases with a pitch of 40-50 cm. After the elements are installed, a heater is placed between them (basalt or mineral wool, expanded clay). When the floor crate on the balcony is ready, boards or other finishing materials are laid.
Ceiling
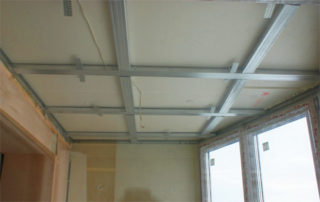
The wooden lathing is suitable for fixing the lining, plastic panels, over which I fix the insulation. The frame also allows spot lighting on the ceiling. It must be done from a bar with a section of 5 * 5 cm. 3 elements are screwed to the ceiling: along the edges of the balcony and in the center. Anchor bolts are used for fixing. The distance between them does not exceed 40 cm.
No cross members are used for the upper base. The gap left between the trim and the side wall is covered with a plinth. If plastic panels are used for cladding, they are fastened with a construction stapler. Insulation is laid in the course of work.
Walls
To organize the frame on the wall, I use different mounting methods. Some of them involve laying insulation, while others do not. Most often, clapboard or siding is used to decorate the walls of a balcony or loggia. If the elements will be fixed vertically, the lathing elements are placed perpendicularly (in the horizontal direction). For work, you will need slats 2 cm thick.
First of all, screw the horizontal guide at the bottom of the base. The second rail is attached to the ceiling. Using small nails and a cord, check the gaps between the wall and the ceiling. Fix the elements of the crate with self-tapping screws. The remaining horizontal frame elements are mounted along the cords stretched along the edges and in the center. All work is checked by the building level.The distance between them is 50-60 cm.
If necessary, the slats are mounted along the perimeter of the balcony. Staples or small nails are used to attach the lining or siding. The joints of the wall with the ceiling and floor are covered with plinths.
Warming and waterproofing
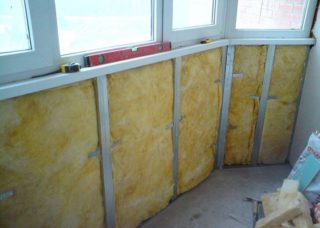
The lathing for PVC panels on the balcony requires additional insulation and waterproofing. Foil materials are used for work. They are easy to install and practical. Attached to the base before installing the frame. Mineral wool or expanded polystyrene is also used for insulation. In this case, the crate is first made, and then the protective material is fixed.
Mineral wool is more in demand among builders. It has a low cost, is easy to install, provides reliable thermal insulation, is resistant to ignition, quickly dies out when smoldering and does not release substances harmful to health into space.
The waterproofing is fixed over the insulation. Staples are used for fastening. It is important to mount the film so that there are no cracks or tears on it. Otherwise, moisture may leak out even through minor damage. The waterproofing material is attached with an overlap of 10 cm. The joints between the canvases are glued with tape.
Balcony lathing helps to secure the cladding and insulation. In this way, you can make the room more comfortable. It is quite possible to carry out all the installation work on your own, but you need to strictly observe the nuances of the installation, depending on the selected material. Also, do not forget about the preparation of elements and bases. Step-by-step instructions will allow you to install quickly and easily.


