A water floor in a private house is an effective addition to an autonomous central heating system. In most cases, it is installed in children's rooms and rooms with high humidity. Invested funds and expended efforts are compensated by comfort, healthy microclimate and savings on energy costs. The manufacture of this structure cannot be called a simple event, but with knowledge of the theory of the issue and adherence to the installation technology, you can make a water-heated floor in a house from vulture panels with your own hands. To guarantee the achievement of a successful result, you need to understand the rules for choosing materials and equipment, installation and connection.
Construction of a water floor in a private house
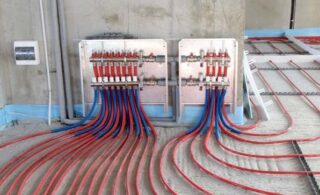
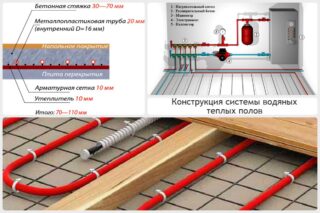
A water floor in a wooden house consists of the following structural elements:
- Pipeline. It is a complex closed loop of a certain configuration. The material of manufacture is usually special metal-plastic or polyethylene pipes. They are characterized by good flexibility, strength and minimal coefficient of thermal expansion.
- Collector. Regulating and distributing device designed to maintain uniform pressure and temperature in the circuits.
- Circulation pump. Provides continuous circulation of the coolant through the pipes. Set when the heating element is not connected to the main heating boiler.
- Screed. It is a cement slab with a thickness of 5 cm or more. Provides protection of pipes from mechanical damage and uniform heat distribution over the surface. In frame and wooden houses, the floating type is made. A damper tape is installed around the perimeter of the pour to compensate for the thermal expansion of the concrete.
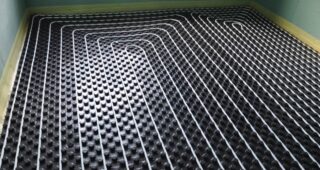
- Mounting fasteners. Brackets with fasteners or molded mats are used to position the pipeline. This ensures the correct location of the line and its immobility during the pouring process.
No special equipment is required to assemble the system. The set of tools that any real estate owner has in his arsenal is enough.
Calculation rules
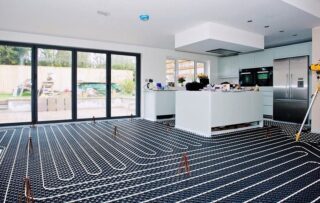
The design is carried out taking into account the configuration of each room, its purpose and the presence of interior items in it.
At the planning stage, you need to adhere to the following rules:
- A separate collector must be installed on each floor of the building, connected to a common riser.
- Depending on the presence or absence of radiator heating, the temperature of the circuit is adjusted to 50 degrees for the main heating and 24 degrees for the auxiliary heating.
- The packing density is determined in linear meters of pipes per square. Along the walls, an indicator of 5 is taken, and for passages - 1.5-2.
- Regardless of the material used and the area of the room, the maximum heating area for one circuit is no more than 15 square meters.
- The concrete layer above the pipes must be at least 3 cm. In this case, it is precisely the cement mortar that must be used, since gypsum-based compositions have low thermal conductivity.
Based on the available information, you need to draw up a diagram, carry out calculations and purchase the necessary equipment.
Design and assembly

Underfloor heating design requires consideration of a number of important nuances. Its efficiency, reliability and durability will depend on this.
Basic planning rules:
- In multi-storey buildings, water systems can only be installed on the ground floors after obtaining a permit.
- The number of circuits and the frequency of pipe laying depends on the building material, the quality of its insulation and the prevailing climate.
- Rooms with an area of more than 25 square meters must be divided into parts, for each of which separate contours are made.
- Pipes are not laid over the entire area of the room. There should be gaps under sofas and cabinet furniture, at least 10 cm from the walls.
- The layout of the highway depends on the purpose of the premises. In the residential interval, 10-15 cm is taken, and in the auxiliary ones, 25-30 cm.
- The spacing between the lines is determined by their diameter in direct proportion.
- The design takes up within 7-10 cm of height. This should be taken into account in the presence of cabinets, the height of which is either under the ceiling or close to it.
To make the final decision on the feasibility and location of the water floor installation, the characteristic features of this design should be taken into account:
- reducing the cost of electricity by using a gas boiler, which is cheaper to operate;
- uniform heating of rooms due to the location of heaters throughout their area;
- safety for people due to hidden location;
- improvement of the interior of the rooms;
- variability in the design of the location of the contours.
It is necessary to take into account the high initial costs and the long construction period. If an emergency arises, you will have to dismantle the entire system until the very overlap.
Laying schemes for the water floor
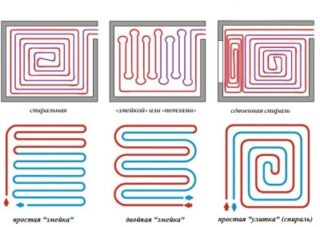
The technology of laying the highway is not diverse. There are two ways to place it:
- Spiral. The line forms a round or square shape with curved corners. It is used for arranging small rooms with the installation of one circuit. Since the supply and return pass side by side, the temperature throughout the area is practically the same. The downside is that the corners are not covered. However, in most cases, they are busy with interior items.
- Snake. The most popular option, which provides full coverage of the entire plane and bypassing places covered with furniture. The system is universal and can be used in rooms of any configuration and size. On large areas, two or more lines are laid.
The double spiral is two consecutive figures on the same square. The first fits more tightly, the second with large gaps. The purpose of this solution is to distribute the heating intensity depending on the functionality of the room.
For large areas, several contours of various shapes can be installed: a spiral is made in the center, and snakes are launched along the walls.
Material selection rules
The heating efficiency, reliability and durability of the system directly depend on the correct choice of material for the manufacture of the circuit.
The following types of pipes are on sale:
- Metal-plastic. Links and fittings are used as in radiator heating systems. To reduce the resistance of the coolant current, the corners are rounded. The assembly is carried out exclusively by soldering.
- Crosslinked PEX or PERT polyethylene. The pipes have a length of up to 100 m, they are distinguished by excellent flexibility with a small coefficient of thermal expansion. The plus is that the line is made without joints, which means the likelihood of leaks is reduced to zero.
- Copper. The most reliable but expensive way to install underfloor heating. The metal bends well and is soldered. Its service life is at least 200 years.After installation, you can forget about planned and preventive repairs, since they are simply not needed.
When choosing pipes, the last thing to think about is their price. In the event of leaks, the cost of repairs will be several orders of magnitude higher.
The nuances of installing a water floor in a private house with your own hands
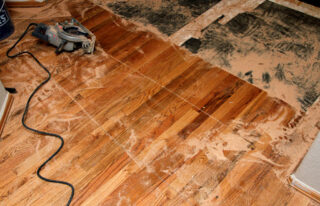
The installation of the system begins with the preparation of a reliable base for the placement of its elements.
This process consists of the following stages:
- dismantling of the old coating;
- removal of protruding fragments, cleaning the surface from debris;
- filling holes and cracks, deep penetration primer treatment;
- setting a zero level;
- leveling with expanded clay or gypsum-based screed;
- arrangement of waterproofing with a film or coating agent.
Having carried out competent preparation of the premises, do-it-yourself floor heating in a private house is done in the following sequence:
- Installing the collector. Depending on the thickness of the walls and the interior of the room, a wardrobe is made for it or an internal niche is selected.
- Fastening the damper tape. It is glued along the entire perimeter of the room and serves to compensate for the thermal expansion of the screed.
- Placement of shaped heat-insulating plates with openings for pipes. In order not to disturb the waterproofing layer, they are glued to the floor.
- Layout of the highway. The line is unwound and inserted into the openings so that there are no bends and twists. Brackets and clamps are used if necessary.
- Connecting to the manifold. This is done in accordance with the developed scheme. The system is filled with coolant and left under pressure for at least two days to make sure there are no leaks.
- Filling the screed. A mortar of cement and sand is used in accordance with 1: 4. The slab must stand for curing for 14-28 days, depending on the air temperature. All this time, it needs to be moistened with water twice a day so that there are no cracks.
In conclusion, the screed is treated with a primer and a top coating with high thermal conductivity is laid on it - linoleum, tiles, porcelain stoneware or a bulk polymer floor. The choice is determined by the specifics of the premises.


