A four-pitched roof over a private house is a classic that many property owners tend to when planning a roofing system. Structures of this type have many advantages, the first of which is a presentable appearance. The four-pitched roof has a closed monolithic structure, characterized by excellent aerodynamics, effective rain protection and resistance to wind loads. The roof combines the requirements of modern design and the patriarchal interior of a rural lifestyle. The structure cannot be called simple in design, but with a competent approach, it is quite possible to build it with your own hands, without spending money on the services of a professional team.
Hipped roof device
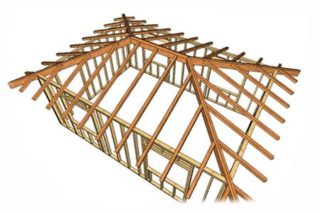
4, the pitched roof is structurally four planes located at a certain angle on the ceiling slab of the building. Depending on the type chosen from above, the roof looks like a rectangle or square. A characteristic feature is the absence of pediments or their size reduced in comparison with the gable counterparts.
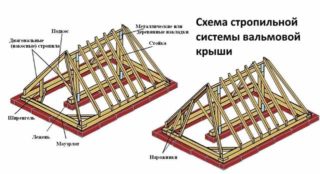
The rafter system of a hipped roof consists of the following elements:
- Mauerlat. A beam that fits on the attic floor. It takes the weight of the frame, roofing material and distributes it evenly around the perimeter of the building. It is the basis for attaching trusses or rafters.
- Rafters. They are inclined purlins on which the lathing and roofing are attached. They are made of rectangular beams.
- Sill. A horizontally laid beam that prevents deformation of the Mauerlat under the influence of tensile loads emanating from the rafters.
- Lathing. Parallel rows of slats on which roofing materials are fastened - tiles, rolls, panels, sheets.
- The brace. Supports between the bed and the rafters, installed to strengthen them and increase their strength.
When the length of structural elements is not enough to ensure the removal of the roof, fillets are used.
Area calculation
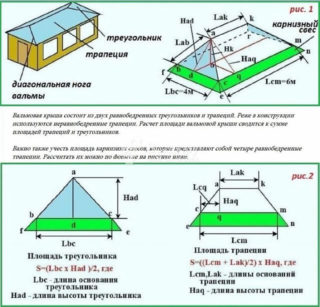
Depending on the chosen structure, the roof is made up of four isosceles triangles (classic hipped roof project) or two trapezoids and two triangles. It is enough to take the drawn up diagram and divide the planes into right-angled triangles. Then a simple calculation is carried out:
- the height and width are multiplied and the result is halved;
- add up the areas of each triangle;
- a 10-30% reserve is added for trimming, depending on the complexity of the shape of the slopes.
Having received the area of the outer covering, it is necessary to design the inner part of the roof. It includes a membrane, waterproofing and insulation. Without these materials, there is simply no point in making a beautiful house, under the dome of which it will be damp, excessively hot or cold.
Foil materials are taken 30% more of the roof area above the floor slab.Such an excess is justified by the fact that the fabric is laid with sagging necessary for its reduction during cooling. In addition, the strips are laid with an overlay of 20-30 cm, and this is also an expense.
The insulation is selected in advance and the step of the rafters is often selected for its size. Standard insulation widths are 60, 80 and 100 cm. In most cases, the cuttings are reused.
If the decision is made to use polyurethane foam, the volume of the space between the rafters is calculated. The foam is sold in cans, the estimated volume of which is indicated in the instructions.
Varieties of hipped roof
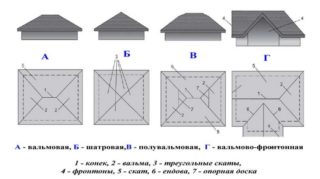
The configuration of the hipped roof is determined by the configuration of the building and the wishes of its owners regarding the originality of the structure.
There are the following types of construction:
- Dutch. This option is considered a classic, it is distinguished by the complete absence of gables, tightness and strength. Consists of two trapezoidal and two triangular slopes. In addition to the aesthetic component, the hip roof is characterized by resistance to wind loads. The rafter system consists of four diagonal support rafters running from the two tops of the ramps to the upper corners of the structure. The structure is simple enough to design and assemble to make your own.
- Half-hip Dutch. Combines roof elements with two and four slopes. It differs from the classics in truncated end slopes. The size of the end hips is much smaller than the length of the side slopes. The discrepancy is 2-3 times. The end slopes are installed with a steep slope, which makes it possible to install observation windows in them, attached to the rafters.
- Half-hip Danish. It differs from the Dutch version in greater complexity and originality. It is difficult to make such a structure, but the effort spent is worth it. Construction is being carried out in stages. First, the side parts of the frame truncated at the edges are made, then inclined end parts in the form of a trapezoid are attached to them. There remain vertical triangles, which give the roof its uniqueness. The downside is that large windows cannot be installed, this possibility is limited only by the size of the gables.
- Tent. This type of hip roof is distinguished by the correctness of the geometric parameters and consists of four isosceles triangles with the same degree of inclination. The vertices converge at one top point, and the sides join at the edges of the shapes. Despite the apparent simplicity, the design and construction of the hipped-roof frame is rather complicated, since you need to correctly connect all the rafters at one point.
It is necessary, on the basis of a comprehensive analysis of the issue, to make a choice in which aspects such as presentability, strength, cost and the possibility of building a structure with your own hands are organically combined.
The hip hip roof is a complex structure. It is worth taking on its arrangement, having full confidence in the success of the event.
Roof materials

Roof construction cannot be done alone. You will need the help of at least two people who have the skills to carry out such work.
For installation, you will need the following tools:
- plumb line, level, tape measure, protractor;
- ax;
- saw;
- cutter;
- hammer, sledgehammer;
- plane;
- lift;
- drill for wood;
- paint brush;
- hardware for fasteners (studs, anchors, corners, plates).
From the materials you need the following:
- timber with sides within 100-200 mm, square or rectangular section;
- boards 50x100 mm or timber 60x60 mm for the manufacture of lathing;
- material for arranging an armored belt, when the house is built of bricks or foam blocks (cement, sand, crushed stone, reinforcement);
- antiseptic to protect wood from insects, fungus and mold, as well as a hydrophobic and fire-fighting agent;
- membrane film to ensure the removal of moisture from the attic space;
- thermal insulation material (basalt wool, polyurethane foam, cellulose wool, foam);
- interior decoration (lining, plastic panels, drywall, chipboard, OSB, solid board);
- roofing (slate, ceramic and ondulin tiles, corrugated board, roofing felt).
To eliminate the risk of injury, you need to work in a helmet, goggles and gloves, using safety equipment.
Features of erecting a hipped roof with your own hands
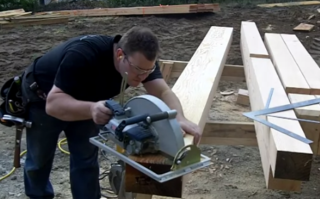
Building a roof with four slopes is a step-by-step process that must be completed in its entirety.
- Design. You need to decide on the type of roof, draw up a sketch, and then a drawing. Then the calculation of materials, tools and equipment is done.
- Armopoyas making. A monolithic base along the perimeter of the walls will give them strength, resistance to deformation and will ensure an even distribution of the weight of the roof. It is necessary to lay embedded mortgages connected to the frame with a thread of 12 mm or more and a height of 300 mm or more in the mortar.
- Installation of waterproofing. The optimal option in all respects is roofing felt folded in three layers. To prevent the substrate from moving during construction, it is recommended to glue it to the base.
- Wood processing. The timber and slats are gradually impregnated with an antiseptic and a hydrophobic agent. It will not be superfluous to use a flame retardant, which will significantly reduce the risk of fire.
- Laying the Mauerlat. Fastening is carried out on embedded pins followed by tightening onto bolts. The connection of the timber is carried out only in the patch with the subsequent strapping of the joints with plates.
- Installation of the wind board. It is attached to the ends of the rafters protruding beyond the building and is used to equip the gutters and impart rigidity to the structure.
- Installation of the lathing. Its structure depends on the selected roofing material. For panels and slabs, a bearing surface is made in the form of a mesh with cells corresponding to the parameters of the coating elements, taking into account the overlay. When a roll or tile material is selected, the base is made solid. It is made from thick waterproof plywood, wood-based panels or boards.
- Creation of the first layer of waterproofing. It is laid on top of the lathing in order to protect the frame from moisture penetrating from the outside and the release of steam from the inside.
- Roofing laying. Its installation is carried out in accordance with the manufacturer's instructions. Tiles and panels are laid from bottom to top, seam coverings - from the center to the edges, and roll - from one of the edges of the slope.
- Insulation placement. Installation is carried out between the rafters so that not even the slightest gap remains. Styrofoam is glued and mineral wool is inserted into the hole.
- Securing the second (inner layer of vapor barrier). It must completely close the frame and insulation from the influence of the dampness of the attic.
- Installation of plastic or wooden windows, ventilation grilles.
In conclusion, the internal sheathing of the frame is carried out, and, if necessary, its additional finishing.

