The lathing increases the stability of the roof frame and serves as the basis for the installation of the roof covering. The distance between the slats is determined by calculation so that a soft or hard roof does not sag under snow or wind force. The lathing for metal tiles evenly distributes the weight of the insulation, insulation layers and the roofing carpet itself between the support rafters.
The device and features of the lathing for metal tiles
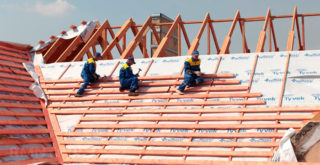
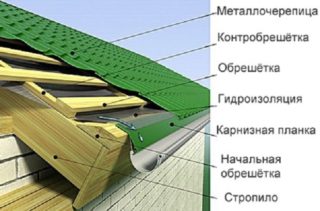
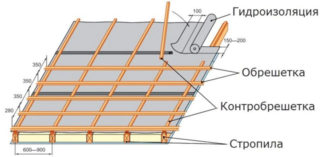
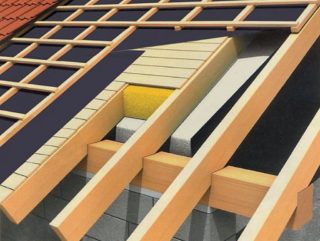
The frame from the bars can be made two-layer and one-layer. In the first version, we are talking about an additional layer of counter-lattice, the slats of which are fastened along the length of the rafters. The main lathing is a classic and is installed across the rafters. An air space is obtained between the insulation and the roofing flooring, which prevents condensation from falling out and the protective layer from getting wet from the cold.
A single-layer roof lathing for metal tiles consists of a rack frame across the rafters at a preselected distance. There is no ventilation gap, therefore this type is used when arranging a roof without insulation. Sometimes a single-layer scheme is used when using expanded polystyrene, polystyrene foam, foamed polyurethane foam and other artificial materials that are not afraid of moisture.
Board size for lathing
Edged lumber and unedged board are placed for a solid base or used in a combined and sparse version. Natural dry wood is a lightweight and durable material, but the thickness and width of the elements must be taken into account.
The geometric parameters of the boards depend on the size of the step of the rafters:
- at a step of 0.3 m, a board with a thickness of 25 mm is enough, plywood or chipboard - 9 - 12 mm;
- an increase in the gap between the supports to 0.9 m leads to a thickening of the board and is 30 mm, and veneered types are set with a thickness of 18 mm;
- a rafter pitch of 1.2 m requires a plank thickness of 35 mm, chipboards - 21 mm;
- the gap between the supporting elements 1.2 - 1.5 m dictates a thickness of 40 - 50 mm for boards and 27 mm for plywood.
The thickness of the boards or solid sheets should not differ for one roof. Wood is taken without falling out and rotting knots. Before installation, they are treated with agents against moisture, inflammation and the appearance of bugs. Boards with a width of 100 - 120 mm are used, large sizes are not used, because wide elements are turned inside out under load during operation.
Sometimes, according to the instructions, they install metal strips or a corner as rails. The footage of such material is more expensive, but you can save on the number of strips by increasing the pitch of the lathing, since iron has a greater bearing capacity.
Correct lathing reinforces high stress areas. These include the ridge head, valleys, grooves and places around the protruding structural elements of the roof.
Step options
If the fundamental factors for the selection of the grid pitch are not taken into account, the stamped sheet material can bend under the weight of the snow. In another variant, there will be an overconsumption of wood or metal due to the reinsurance of the roof against subsidence of the coating.
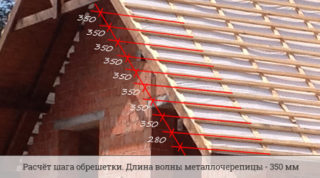
The step of the lathing under the metal tile between the bars is determined by the type of the metal profile of the roof. The distance between adjacent battens is indicated by the manufacturer of the roof covering in the instructions.The gap is measured from the bottom of the first board to the bottom of the next element. The pitch also depends on the width of the exit of the sheets beyond the first batten of the crate. The position of the downspout has an effect.
The initial fastening of the bars near the eaves is done at a certain distance. On the ground, two pieces of boards are laid in parallel or baited onto the crate. A piece of roofing metal profile is placed on them and a ledge for a drain is found. With a large outflow, the water will overflow over the edge of the drain, a short one will cause the flow to hit the wall in the gap.
If the gutter is fixed to the frontal board, add 30 mm to the overhang, take into account the width of the drain, which is 90 and 120 mm.
Sparse
The flooring is carried out with edged lumber, bars, slats. The elements are installed at some distance from each other, more often a step of 20 - 40 cm is referred to this type of lathing. Constructive calculations of the bearing capacity are carried out taking into account the weight of the roofing structure, wind and snow. Air currents act more strongly on steep slopes, gentle ones almost do not feel the force of the wind.
Sparse lattice rules:
- lumber is taken with a thickness of at least 2.5 cm, the width is taken at the level of 100 - 140 mm;
- boards are changed with beams with a section of 50 x 50 mm or 30 x 70;
- materials are impregnated with linseed oil, diesel working off or special antiseptics.
Installation of rarefied type battens is easy to do. The boards are placed parallel to the ridge and the overhang at a selected distance, they are fixed to the crate with nails, self-tapping screws, and staples are used. The axis of the nail should be perpendicular to the body of the rafter, and not enter it at an angle.
A sparse lattice often serves as the basis for installing a continuous roofing substrate, and in its own form can withstand most types of metal tiles.
Solid
Chipboard sheets form a uniform surface. Such a base is used for roll materials, shingles, polymer membranes. In the case of metal tiles, a one-piece support is placed if the roof is tilted less than 20 °. Gentle slopes do not allow snow to fall under its own weight, and the load on the frame increases.
Chipboard boards are from 10 to 27 mm thick. The width ranges from 1.75 - 2.0 meters, and the length is 2.5 - 3.5 meters. Sheets can be installed as a whole, if the dimensions are multiples of the step of the lathing under the tiles, but more often they are cut according to the actual dimensions. They are fastened in a checkerboard pattern, shifting the joints in each overlying row, the connections are made on the rafters, and not by weight. At the junction of the sheets, an interval of 2 - 3 mm is made. This is necessary to expand and contract the panels in hot or cold weather.
The first slabs are laid parallel to the cornice, fastened with nails with a ruffled foot or wood screws:
- on the rafters, hardware is placed every 30 cm;
- at the ends - 15 cm;
- the edges are punched through 10 cm.
The panels of a solid base must be moisture resistant, without distortions and bends as a result of improper storage.
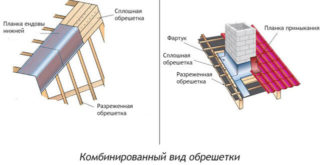
Combined
Boards or strips of chipboard, waterproof plywood are placed in the following areas:
- around windows protruding on the roof surface, hatches;
- on valleys, gutters, tongs;
- in the place of fixing snow holders, parapets, stairs, bridges;
- at the top, at the junction of the slopes and the installation of the ridge element.
Parallel to the ridge, beams are usually mounted, and plywood on them. The strip is laid parallel to the ridge, perpendicular to the rafters so as not to close the gap at the junction of the rafters of the slopes. There must be a ventilation gap under the ridge and it is not covered with a solid crate. On this basis, waterproofing is laid, insulation is done and the design of the upper joint of the roof is set.
The combined type includes a version with a lattice, when sparse bars make up the bottom layer, and solid panels are used on the top.
Step selection criteria
When choosing a lathing step for a metal profile, influence factors are taken into account:
- slope of the surface;
- the weight of the roof deck together with the insulation system;
- climate in the construction region.
The square of the metal tile, depending on the height of the wave and the thickness of the iron, ranges from 5 to 9 kg, this indicator is taken into account when calculating. To it is added the mass of insulation, normal humidity, waterproofing film, the weight of bitumen for lubrication and gluing of protective membranes.
The climate affects the amount of snowfall in winter, the amount of rainfall and the strength of the wind. These values are presented in a calculated value for each region and are contained in the tables of building reference books. Correction factors are used that take into account the windage of the slopes and the steepness.
Influence of the angle of inclination of the slopes
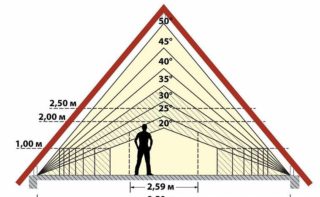
The greater the slope, the less often the slats are placed and the dimensions of the crate change in the direction of increasing the gaps. The advantage of the steep slope is that the precipitation does not linger on the surface, it falls down. Snow does not accumulate on the roof, does not leak when melting and does not create leaks. The downside of steep slopes is that there is a lot of windage and wind currents create an exorbitant load on the roof plane.
The optimal solution is chosen when determining the type of lathing and the gap between the elements:
- the roof is shallow, flat and with a low slope, it is equipped with a solid base of particle boards;
- a roof of medium steepness (15 - 35 °) is equipped with free-standing bars for metal tiles with a step of 10 - 15 cm;
- if the angle exceeds 35 °, then a sparse distance between the bars is made with an interval of up to 40 cm.
The moisture content of the material should not exceed 20% so that the strips do not swell when dry in the mounting position.
Instructions for assembling the lathing for metal tiles
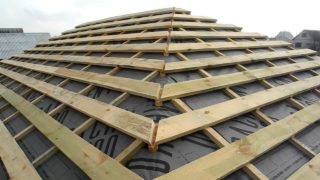
It is not difficult to mount the crate, you need to strictly follow the dimensions and recommendations. The horizontality of the elements is constantly checked, right angles are verified.
Stages of work:
- mark the position of the beams on the rafters, pull the lace for installation accuracy;
- check the evenness of the surface of the rafters at the place of fixation, the protruding sections cut off;
- spreading steam and waterproofing parallel to the cornice, the strips begin to be fastened from above;
- counter-lattice slats are placed on top of the membranes (the width of the lumber coincides with the transverse dimension of the rafters);
- mount a solid or lattice base;
- make a solid surface in weakened places.
It is advisable to use planed beams and planks to get a flat surface. The width of the lower lath is taken more than the others, or 2 elements are put in a row. Under the metal tile, it is impossible to overlap the slats, as is allowed for slate, connect the beams with an end.

