Slate continues to be a popular roofing material. It is used in country and housing construction. The product is characterized by low price, ease of installation and durability. Correctly organized slate lathing allows you to attach sheets and redistribute the load of the roof itself, as well as atmospheric phenomena.
Sheathing device for slate
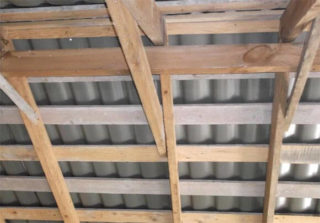
Despite the fact that the slate has a fairly large weight, the construction of a powerful sheathing is not required. The material itself is tough, so the frame is made sparse. The main thing is that it can withstand the mass of the roof and the effects of atmospheric phenomena. It is impractical to use slate for complex roofs.
The structure includes a rafter system, as well as a crate. For supporting elements, a beam with a cross section of 4 * 15 cm is suitable. To form the frame, wooden elements are required, the cross section of which is 3.5-4.5 cm. You can also work with an edged board. Additionally, insulation and waterproofing film are included in the roofing cake. Protective materials are laid before the installation of the battens. Insulation is mounted between its beams. For this purpose, stone wool mats are used, since they are resistant to fire and moisture.
Varieties of crate
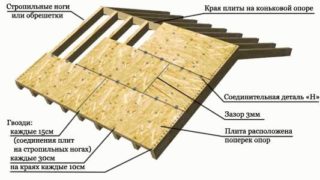
It is necessary to fasten the slate on a prepared base. The lathing helps to distribute the load on the rafter system, does not allow the material to deform. There is a solid and sparse design.
Solid
The solid version is applicable for a pitched roof with a slight slope. Flat roof sheets are laid on such a support. For work, use moisture-resistant plywood or a specially treated board. The elements are stacked tightly to each other, leaving a deformation gap of 2-3 mm. Such a frame is capable of supporting a lot of weight.
Sparse
A regular timber frame is suitable for corrugated slate. The cross-section of the slats is 2.5 cm. They are fixed at right angles to the rafters. The step of the lathing depends on the mass of the roof, as well as the angle of inclination of the slope, the design of the rafter system.
Material requirements

The lathing for a slate roof must be strong and durable. To ensure these qualities, you need to choose the right material. Usually, wood is used to build the frame.
Primary requirements
- the material must be dry so as not to warp during operation (the maximum moisture content is 12%);
- it is better to use hard wood for work: spruce, larch, pine;
- before installation, all elements are treated with fire retardants, as well as antiseptics that protect against fungus, insect pests;
- wooden blocks should not contain knots, rotten areas, blue spots (they are even, straight, solid).
Roof slate lathing should be done taking into account that each sheet weighs about 25 kg. All types of wood processing with protective compounds are carried out three times. Each layer dries within 3 hours.
The choice of the step of the lathing and section
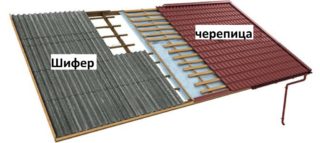
It is necessary to install the roofing material so that it is securely held on the base.The most commonly used type of frame for slate is sparse. If the sheets are standard, slats with a section of 5x5 cm are used for work.If it is necessary to use reinforced profiles that are longer than standard ones, elements with a section of 7x7 cm or edged boards with a thickness of 4 cm are suitable.
When calculating the pitch of the lathing, the size and weight of the sheets, the angle of inclination of the slopes, and the operating conditions of the roof are taken into account. In some cases, the sheets are cut to the size of the base. Parameters recommended by slate manufacturers:
- 50-60 cm, if a material of standard sizes is used, regardless of its type (wavy or flat);
- 75-80 cm, if products with a reinforced profile are used.
In order for the fixation of the sheets to be reliable, they must be fixed so that the canvas has at least 3 points of support. In this way of installation, it is possible to achieve a decrease in internal stress, to prevent deformation of the roof.
How to fix the crate under the slate
Before attaching the slate to the roof, you need to choose the correct fasteners. For work, take galvanized or slate nails, screws, staples or screws. Whatever fasteners are used, a hole for it is drilled in the slate, and not punched. If the wind load is too large, in addition to the main clamps, you will have to use additional ones.
The brackets are mounted on the first row of the roof. Each sheet requires 2 elements. If the fastening of the brackets is also carried out on ordinary sheets, the overlap joint is filled with hernite or polyurethane foam. Additional screws can be installed at the bottom of the sheets.
Self-tapping screws
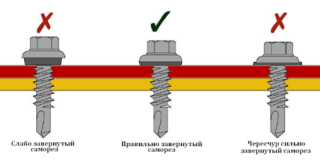
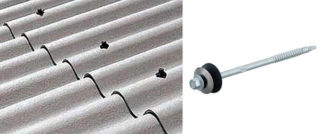
The slate can be fixed with a roofing screw, but you need to pay attention to the quality of the elements. They must be made of hardened steel. Such screws are much stronger than nails. The choice of elements in terms of length, thickness, and color of the head is large.
The fastener caps are usually hexagonal, so you can tighten them with an ordinary wrench or screwdriver. A screwdriver will help to facilitate the work. To prevent damage to the slate, as well as to seal the hole, the self-tapping screws are equipped with sealing washers. If the element is in the shape of a drill, you do not need to use a drill to make the holes.
Fasteners have the following advantages:
- do not rust (the protective layer does not allow moisture to affect the metal);
- do not damage slate sheets;
- reduce styling time.
Self-tapping screws are fastened to the extreme slate waves in each element of the sheathing.
Slate nails
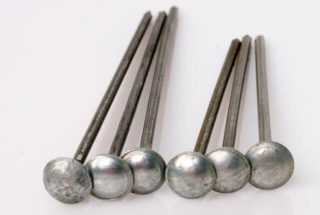
Slate nails are thicker and longer than conventional fasteners, the diameter of their heads reaches 1.4 cm. To ensure anti-corrosion properties, the elements have a galvanized coating. The choice of nails depends on the height of the wave. Additionally, the thickness of the batten element is taken into account. To the sum of these indicators, add another 1 cm.
Slate nails do not come with gaskets, so you have to buy them separately or cut them out of rubber yourself. There are elements with an unusual barrel shape and notches. Such fasteners are used if the house is located in a region with strong winds. Do not drive nails all the way in, so that they do not damage the coating.
Installation of the roof involves laying a hydro-barrier or roofing material. The first option is preferable. The procedure protects the rafter system and the sheathing from moisture, which increases the service life of the structure. Since when laying the roofing material, gaps are formed under the waves. The resulting space is filled with a special seal. In this way, you can protect the under-roof space from accidental rainfall.
DIY assembly features
Installation of the lathing under the slate coating is not an easy process. In order for the structure to withstand heavy sheets, the following nuances must be observed:
- the step of the lathing should not be less than 50 cm;
- the bars are not fastened at the same level: the odd elements are fixed below the even ones by about 3 cm (with this arrangement, the risk of deformation of the slate is reduced);
- flat sheets are screwed to a solid frame;
- laying work begins from the bottom row in the direction of the roof ridge;
- nails or self-tapping screws should be 3 times longer than the bars of the rafter system (in this case, even minimal movement of the coating under the influence of gusts of wind is prevented);
- if the length of the roof slope is greater than the length of the wooden beams, these parts are joined in the middle of the rafter leg (nails are hammered at an angle, departing from the edge of the rafter system element 2-3 cm;
- the frame elements that protrude beyond the pediment scales are cut off;
- the wind board is nailed down last.
- the frame is mounted so that the required number of whole sheets can be placed on it;
- the joints above the rafters are staggered;
- if the bars for the lathing are of different sizes, wider elements are attached under the joints of the slate and at the ridge;
- the fragment on the cornice should be 0.6-1 cm higher than the rest;
- on the edges of the roof, the bars are mounted on the edge;
- there should be no depressions and drills on the finished base;
- the sheathing must be strong enough to support the weight of the roof and the weight of a person.
The slate frame must have the necessary technical and mechanical characteristics. You should not make it too powerful, since the roof is already heavy. With proper installation, the roof will perform its functions for a long time and efficiently.


