Skirting board is a functional decorative element that hides the gap between the wall surface and the floor plane. The protective strip is attached to the vertical fence and acts as the final frame of the flooring. Installation of the plinth on the floor is done in several ways, the choice of method depends on the material, type and shape. A contrasting strip along the contour visually limits the height of the room, and a monochromatic outline will visually increase the area.
- Varieties of skirting boards depending on the material
- Plastic
- Wood
- Polyurethane
- MDF
- Advantages and disadvantages of skirting boards
- Component elements
- Determination of the amount of materials
- Required tools
- Options for fixing the plinth to the floor
- Glue or liquid nails
- Self-tapping screws with dowels
- With clips, latches and fastening rails
- DIY plinth installation
Varieties of skirting boards depending on the material
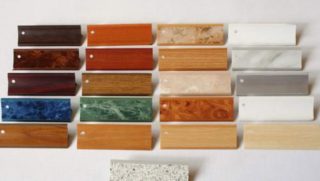
The type of feedstock determines the characteristics of the product and the likelihood of improving the properties by means of technological additives to the mass during manufacture.
They produce products from materials:
- plastic;
- wood;
- polyurethane;
- MDF.
L-shaped strips for carpet are made of plastic. In these frames there is the possibility of gluing the coating, they produce products with and without rigid ribs.
Fluted skirting boards are used in places with increased requirements for cleanliness. Linoleum is raised to the wall, then a plinth strip is formed from it.
A tape is produced from PVC for installing a floor plinth in rooms of irregular shape. The elements are flexible, they can frame semicircular walls.
Plastic
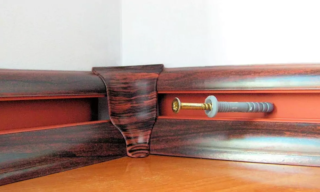
Inexpensive PVC borders are popular; they are placed on linoleum, laminate, carpet coverings. The system provides corners and plugs to create a neat joint, the frame is fastened with clips, rails.
Plastic is a brittle material that cracks on impact or under pressure. In unheated rooms, products are destroyed in severe frost. The height of the plastic skirting boards is 5 - 10 cm, the strips may bend slightly, so they can be placed on curved wall fences. The positive qualities of plastic frames are that they are lightweight, they are not saturated with water and odors.
Wood
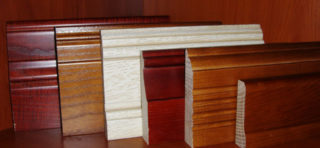
The products are made from solid wood; decorative veneer can be glued to the surface.
There is a heterogeneity in weight in the products:
- the base is made of inexpensive pine or spruce;
- for the veneer layer, valuable species of wood are taken.
There are options for skirting boards made of homogeneous wood - such models are expensive. The positive properties of the planks include their cozy, warm appearance and environmental friendliness of the material, the skirting boards are durable and easy to process. The disadvantages include the high cost of even a combined option and susceptibility to moisture in damp apartments, when washing floors, as well as significant weight.
Polyurethane
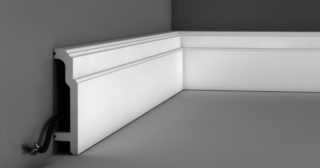
Strong skirting boards are lighter and harder than their wood counterparts. The material does not absorb moisture, but its structure weakens with sudden temperature jumps. The installation of the polyurethane skirting board is completed by painting. The material combines well with water-based compounds, but skirting boards are not painted with oil compounds so that the product does not begin to warp from the solvent.
They produce rigid and flexible versions, the latest models bend to a radius of 30 °. For elasticity, rubber is added to the mass. The disadvantages include the likelihood of shrinkage in length and thickness during operation.
MDF
Installation of MDF skirting boards ensures the stability of the connection between the floor and the wall for a long time. Products are produced up to two meters in length and up to 20 cm in height. The planks are covered with decorative films of various colors, so there is always a wide choice in relation to parquet and laminate.
Skirting boards are made of wood fibers by pressing. The elements are bonded using modified urea resins. The skirting boards are easy to cut, you can fix them yourself. The strength of MDF curbs is low, they are afraid of dampness and are saturated with moisture from direct ingress of water, therefore they are not suitable for a bathroom or kitchen.
Advantages and disadvantages of skirting boards
The advantages of plinth framing of the floor are that they hide wires behind them, install heating elements. If you make skirting boards on the floor with fasteners, they are disassembled for cable inspection and repair. There are options with an external cable duct with a snap-on longitudinal panel. Elastic seals are provided on both edges of the strip so that the nervousness of the wall is not conspicuous.
Disadvantages of materials can be manifested in the fact that budget types of skirting boards are not suitable for expensive coatings, since they make the style interior solution cheaper. Maintenance of the strips is simple, they are washed with a damp cloth, but this method of cleaning is not suitable for MDF skirting boards, as it accelerates their destruction.
Component elements
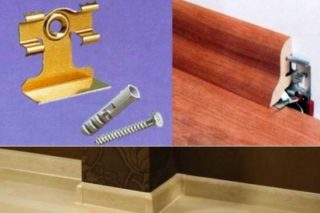
Connecting or transition elements are designed to obtain a continuous contour and connect the strips in straight sections. If there is wiring, it goes through them easily.
Other details for a harmonious floor frame:
- external and internal corners, in order to insert lamellas at a right angle at the junction of the walls, the angle can be assembled at an angle of 45 or 135 °, for this, the corresponding elements are released;
- plugs can be installed in the area of junction of the curbs to the door casing or in other blind places.
The mounting brackets can be placed on the wall to allow the skirting rim to be disassembled if required.
Determination of the amount of materials
According to the instructions, the plinth is placed not only around the perimeter of the room, it must be placed in niches under the battery, arched openings, and placed on door slopes. Therefore, the perimeter is initially calculated, then the indicated areas are measured and all the values are added. To take into account the cutting, the obtained value is multiplied by a factor of 1.1.
Fasteners are counted with an interval of 0.5 m, the number of outer and outer corners is counted. For a direct joint, two elements are provided for a small room, the number of plugs near the door frames and in other places is determined.
Required tools

A vacuum cleaner is used to remove dust from the joint between the wall and floor. Before installation, interfering mortar protrusions and other material residues are knocked down. For this, a chisel, a hammer and a straight spatula are used.
Other tools:
- miter box for cutting plinths, saw-hacksaw;
- tape measure, pencil, knife, Phillips screwdriver;
- square, hammer.
You will need an electric drill, a perforator, drills for the diameter of self-tapping screws, a drill with a winch for holes in the walls. If self-tapping screws are visible, they acquire round small overlays-buttons for them according to the color of the plinth.
Options for fixing the plinth to the floor
Each type of curb and material corresponds to a special fastening technology. If all the nuances are taken into account, the product will stand for a long time and will not have to be altered over time.
Options for installing skirting boards on the floor:
- on standard mounts;
- with glue;
- on self-tapping screws.
The functionality of the frame and the likelihood of dismantling depend on the fixing method.
Glue or liquid nails
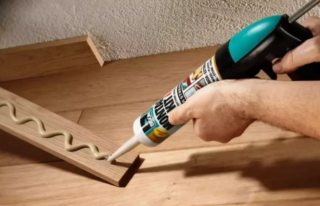
In this way, you can put any kind of skirting board, and for polyurethane panels it is the only possible one. The glue is applied to a clean and dry area free from dirt and dust. Additionally, the surface is degreased with a compound recommended by liquid nail suppliers.
The glue is applied pointwise to the inner side surfaces of the skirting board, then the strip is pressed tightly to the surface against the wall and held for a minute. After that, proceed to the fastening of the next element.
The glue is not applied too thickly so that it does not go beyond the bar when pressed.
Self-tapping screws with dowels
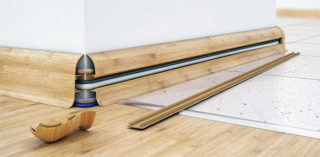
You can mount different skirting boards with self-tapping screws, more often plastic slats with niches for wiring are fixed in this way. One part is mounted to the wall, an electrician is laid inside, then the lid is snapped on. With this technology, the screws remain inside.
The plinth is applied to a vertical surface and a hole is made with a drill so that a mark remains on the wall. The strip is pushed back, a slot is drilled with a perforator for a plastic dowel, it is placed in a recess, then the plinth is put in the mounting position and fastened with a self-tapping screw into the dowel. The hardware is screwed in without effort so that the strip does not crack.
With clips, latches and fastening rails
To install the mounts on the wall, make a horizontal line at the level of fixing the brackets, the height size is taken according to the instructions from the baseboard passport. On a line with a step of 50 cm, a number of holes are made in the wall for plastic dowels, while the initial and last holes are placed 5 cm from the end.
The clips are attached to the concrete wall with dowels, screws can be put into the tree. Do not press the strip to the floor while rolling. After installing all the brackets, the framing element is simply put on and snapped onto the mounts.
DIY plinth installation
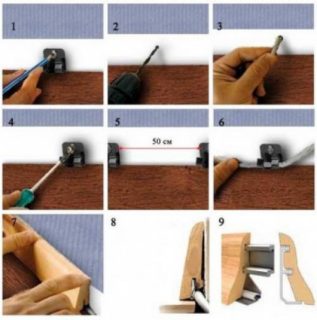
The fastening method depends on the type of skirting board and its construction. Before installing the plastic skirting board on the floor, the strip is applied to the wall and through holes are made, deepening them by 25 mm.
Priority of actions:
- work starts from the corner, cut off the bar of the required size;
- on short sections, the step between the dowels is reduced to 25 cm;
- drill holes in the wall and fix the plinth by screwing in self-tapping screws;
- a connection or corner piece is placed at the end of the segment, then they move on to another strip.
Each piece is cut off after installing the previous one, for which measurements are taken. It is impossible to form all the plots at once.
After installation, the wire is inserted, if provided, a protective strip is installed.


