Choosing a stove option for heating, take into account the positive and negative aspects of different designs. A Dutch stove for a home can be a compromise option when considering an assortment from a potbelly stove to a Russian stove. Models differ in characteristics, complexity of construction and functionality. All the nuances must be learned before starting work.
- Features of the Dutch woman
- Advantages and disadvantages
- Principle of operation
- Varieties of ovens
- Design options
- Construction and materials
- Materials (edit)
- Arrangement rules
- Required tools
- Step-by-step instructions for building a Dutch woman with a stove
- Project selection
- Pouring the foundation
- Construction of a stove and chimney
- Finishing works
Features of the Dutch woman
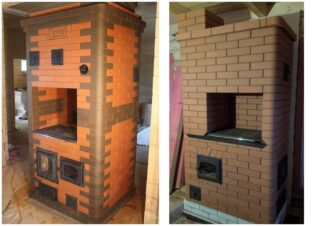
All ovens have the same requirements:
- compactness;
- performance sufficient for heating a given volume;
- warm-up speed;
- maximum efficiency;
- multifunctionality - heating at home, cooking, drying clothes;
- safety;
- ease of maintenance.
All these properties are inherent in the furnaces of the considered design.
Advantages and disadvantages
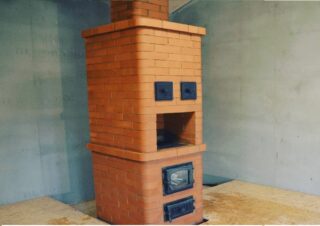
Heat transfer primarily depends on the size of the furnace walls. A Dutch woman can be built narrow but tall. Compared to Russian stoves, with the same power, 2-2.5 times less brick is consumed per Dutch oven, which reduces the price and allows the construction of a less massive foundation.
Performance depends on combustion chamber size and surface area.
The thin walls of the oven heat up quickly.
The increased efficiency in comparison, for example, with stoves, is due to the design features, when hot combustion products give up almost all the heat before evacuation into the chimney.
Safety is achieved by the fact that the walls are not heated to high temperatures. With the correct location and adherence to the construction rules, the walls and ceiling will not catch fire.
Design features impose restrictions on the use of Dutch-type ovens:
- low final efficiency even for the best models;
- reeds are not suitable for the firebox, thin branches - due to the high draft, the bookmark will burn out quickly;
- low heat capacity of thin walls, which is why it is necessary to carry out furnaces more often;
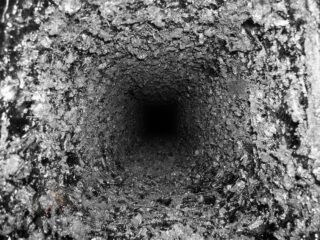
- the chimney and flue ducts require regular cleaning of soot.
Some of the shortcomings are solved by choosing the right model and operating mode.
Principle of operation
The main difference between the Dutch woman and other stoves is that the chimney channels are artificially lengthened. For this, the flue gases are deployed one or more times in the direction of travel from the furnace to the chimney.
Work algorithm:
- Burning firewood heats the air, filling the firebox with hot gases.
- Thanks to the draft, heat rises through the smoke channel, heating the walls.
- Through the return channel, the gases that have given off heat are lowered, where reheating from the walls of the furnace occurs.
- The process is repeated in the next channel in the direction of travel.
The design also determines the disadvantages:
- combustion products quickly cool down in the direction of travel, which results in accelerated deposition of soot (unburned particles), especially in areas of the chimney farther from the firebox;
- the only way to prevent backdraft is to close the damper on time.
For cooking, a hob is installed on the firebox.
Varieties of ovens
Dutch models differ:
- design;
- material of manufacture;
- functional.
Sometimes there are combined options.
The main feature of Dutch-type furnaces is the removal of hot combustion products through special channels.
Design options
Classic version most often they are rectangular or square in cross-section. The simplicity of the form makes the "classics" popular with those who decide to fold a Dutch brick oven with their own hands. In addition to simple masonry, which does not require great skills of the stove-maker, the straight lines of the body make it easy to decorate the stove with various materials.
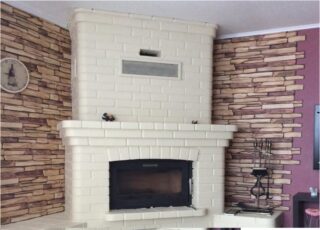
Dutch woman with fireplace can be performed by replacing the cast-iron door with a glass one, but more often the combustion chamber is enlarged - the stove becomes more like a fireplace, which increases its attractiveness.
Heating and cooking stove has increased functionality and allows you to cook food on a horizontal surface covered with a cast iron stove.
The Dutch round stove takes up a minimum of space in the room, but at the same time, its capacity may not be enough for year-round living in the house.
In turn, round models are built according to two main schemes.
At the same time, the absence of a blower, and as a consequence of a sufficient air flow, sometimes leads to the fact that the stove begins to smoke and give off smoke.
Stoves Grum-Grigailo are built according to the scheme with a dome holding the heated air in the upper part. The circulation is carried out by convection. Such a scheme has an increased efficiency, and the stove cools down more slowly, since part of the heated air remains in the firebox after all the firewood has burned out.
Construction and materials
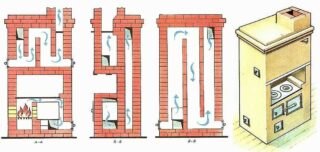
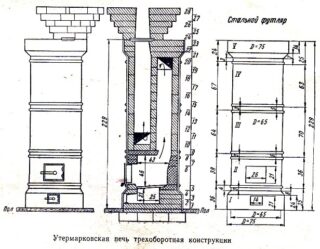
The main elements of the classic Dutch oven are:
- foundation foundation;
- combustion chamber - firebox;
- smoke channels;
- chimney pipe.
As they gained experience, stove-makers began to add hobs for cooking.
Materials (edit)
Dutch women are undemanding to the quality of materials, since the walls do not heat up to high temperatures. Only in the area of the firebox are refractory bricks used, all other elements are laid out from ordinary ordinary ceramic bricks.
External walls are plastered or covered with metal.
The solution is used ready-made, or you prepare a mixture yourself from sand and clay.
Latches, doors, grates and hob must be cast iron. Parts are available at any major building supplies store.
Arrangement rules
A separate foundation is built for the furnace, not connected to the house. Thermal deformation with frequent heating-cooling cycles will not create stress between the warm (heated) base of the furnace and the cold base of the building.
The place of construction of the stove is determined at the design stage of the house, since the floor beam or slabs should not interfere with the construction of the chimney.
The combustion chamber is laid out separately from refractory bricks without ligation with smoke channels and walls. Deformations in the hot zone are greater and if the elements are tied tightly, the furnace will quickly collapse.
It is forbidden to use cement as a binder in masonry mortar - it does not withstand high temperatures.
The seams are made as thin as possible. In the firebox up to 5 mm, in the walls and chimneys up to 8 mm.
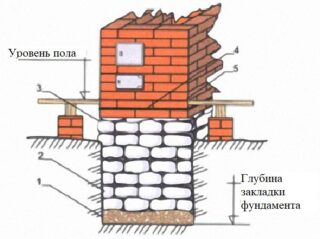
In finished houses, floor slabs are being dismantled and a new foundation is being prepared. The foundation is raised to the floor level of the first floor with solid ceramic bricks.
Before the blower, a steel or asbestos sheet is laid so that the wooden floors or floor coverings do not burn out from the fallen coals or sparks.
To improve air circulation in the room, a distance of 200 mm is left from the walls of the house to the walls of the stove.
Furniture and other objects, the surface of which may be damaged by the high temperature, are not placed near the stove during the firebox. Fire safety rules prescribe to arrange thermal insulation between the walls if the surfaces are heated above 45 ° C.
In the places where additional elements are located, the seams are additionally protected with an asbestos cord. Due to the different temperature expansion, gaps are gradually formed through which carbon monoxide can enter the room. Asbestos will save you from unpleasant consequences.
Required tools
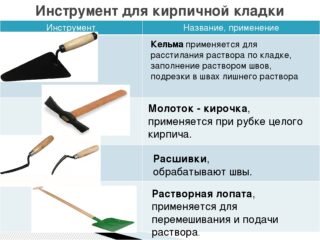
- bayonet and shovel;
- measuring instruments - ruler, level, corner, marking cord;
- a trowel or trowel for laying stoves;
- a container for mixing the mortar and a bucket for working with the mixture when laying;
- hammer pickaxe.
For pouring the foundation, if it is massive, it is advisable to use a concrete mixer - this will significantly speed up the process.
Step-by-step instructions for building a Dutch woman with a stove
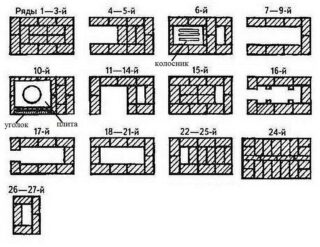
The construction of a heating device consists of several stages:
- selection of a project;
- arrangement of the foundation;
- construction of the base and firebox;
- erection of walls with smoke channels;
- chimney construction;
- restoration of the roof.
You can work at any time of the year, only at the stage of removing the pipe through the roof you need to choose warm weather without precipitation.
Project selection
The stove model must be of the appropriate capacity to heat the room. For simplicity of calculations, it can be assumed that for every 10 square meters of room, the walls, floor and roof lose 1 kW. heat. Therefore, for a house of 60 square meters, a 6 kW stove is chosen. The parameter can be found from the project. If there is no such data in the drawings, it is generally accepted that each square meter of the walls of the Dutch woman is capable of giving about 500 W / h into the room. A 6 kW oven should have a surface of about 12 m2. With ceilings of 2.5 meters, the perimeter of the walls will be 4.8 m.Thus, we can assume that a stove with a size of 1.5x1 meters will suffice.
Pouring the foundation
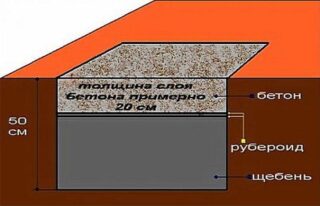
- A pit is dug in the ground, at least 50 cm deep. The base should protrude 15–20 cm beyond the edges of the furnace body. This will strengthen the structure and help avoid mistakes in determining the correct location.
- At the bottom of the pit, 10 cm of sand is poured, which is spilled with water and rammed to shrink.
- On top of the sand, 15 cm of crushed stone is poured, which is tamped.
- Next, formwork is installed, the height of which should provide a layer of concrete of 20-25 cm.
- Reinforcement is laid with a diameter of 8 mm in increments of 15-20 cm.
- The formwork is poured with concrete of the M150 – M200 brand. Cement, sand and crushed stone are taken in a proportion of 1x2.5x3.5.
Strength of concrete will take 28 days.
Construction of a stove and chimney
A sheet of roofing material is laid on the foundation before the construction of the furnace, this will protect the brick from getting wet, which may be caused by underground waters or leaked moisture from precipitation.
If necessary, cut the brick with a hammer-pick or cut it with a grinder with a circle over the stone.
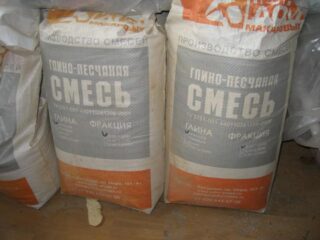
For masonry, a purchased or homemade clay-sand mixture is used. For oily clay, the ratio by volume of filler and sand should be 1x2.5, for medium - 1x1.5, for lean - 1x1. Clay is cleaned of impurities, small stones. After grinding, it is sieved through a mesh with a mesh of 5–6 mm. Before starting the preparation of the masonry mixture, the clay should be softened in water for at least 3 days. Gradually adding sand, kneading is carried out. The consistency should be uniform.
The laying of the body of the furnace of the smoke channels and pipes is carried out, strictly observing the order. As the construction progresses, the inner surface is cleaned from the influx of mortar.
Three rows from the ceiling, the dimensions of the pipe are increased by 20 cm on each side.The element is called cutting and serves as additional protection for wooden ceilings from overheating and possible fire. After entering the attic, the pipe is returned to its original shape.
Having made the chimney, the roof is restored, excluding the access of precipitation to the brickwork.
Finishing works
The final work includes the cladding and the first firing of the furnace.
Finishing is carried out with tiles, clinker tiles or plaster. For fastening, use a special heat-resistant masonry mixture.
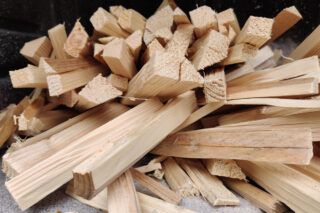
At the first furnace, no more than 3 kg of small slats, bars or brushwood are laid. Firewood is not used so that the walls do not heat up above 45-55 ° C. Then, during the week, the furnace is heated twice a day with half of the fuel load.
If, after the oven has cooled down, no condensation remains on the doors and dampers, the preparation is completed and the device can be used in operating mode.

