Plastic windows are popular in private and industrial construction. Sometimes it becomes necessary to disassemble a plastic window or dismantle a glass unit. Disassembling the window can be done by hand. To do this correctly and without losses, you need to understand its structure and work procedure.
Plastic window device

Plastic products presented on the construction market have approximately the same device. The difference may lie in the external form and configuration of individual elements working on the same principle.
Standard plastic windows installed in apartments and houses consist of the following parts:
- Frame. It is a rectangle made of a reinforced polymer profile, rigidly fixed and walled up in the wall. Serves as the basis for the sash and mosquito net.
- Sash. It is hung with hinges on the box. A closing mechanism in the form of a narrow steel strip is installed in special grooves on the end part around the perimeter. A rubber seal is placed along the edges.
- Double-glazed window. Made of transparent sheets glued to aluminum frames. It is fixed in the opening using plastic glazing beads equipped with seals.
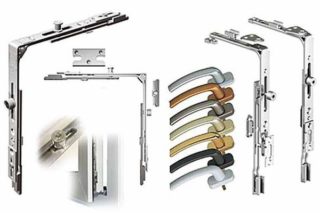
- Fittings. This is the handle with which the sash is swung open or translated into a vertical position. It is made in the usual version or with an internal lock.
The design is prefabricated, so as not to spoil anything, it must be disassembled in a certain sequence.
Causes of damage to windows
There are many reasons why windows lose their presentability, tightness, stop opening and closing normally.

Most often, malfunctions occur under the influence of such factors:
- Violation of assembly technology. Even at the production stage, errors in the installation of mechanisms, distortions, inaccuracies in the installation of parts could be made.
- Shrinkage of the building. This is typical for houses made of massive beams and logs. In multi-storey buildings, this phenomenon occurs when the gap between the frame and the wall is covered with cement mortar without a damper joint.
- The use of substandard components. This is fraught with breakdowns, seizures and seizures. It happens that the package fogs up from the inside.
- Careless use of the product. Strong slamming, overtightening of mechanisms, untimely maintenance and adjustment cause premature wear and failure of parts.
The main reason for replacement is aging or loss of presentation. Frames and sashes are scratched, burned out, stained due to inept repairs, careless handling of household items. Sometimes the sash gets dirty with drops of paint on the outside when the neighbors upstairs are painting.
Required set of tools

To carefully remove the elements of a plastic window, you need good technical equipment.
For work you will need:
- grinder, puncher;
- screwdriver or curly screwdriver;
- mount;
- sharp knife;
- narrow spatula, chisel;
- pliers;
- a hammer;
- chisel;
- garbage bags;
- cardboard or plywood;
- construction film.
Since dismantling a window system is a rather dangerous business, it is necessary to prepare tight gloves, a respirator, glasses or a transparent visor.
Dismantling a plastic window with your own hands step by step
Even if the structure is not planned to be used further for its intended purpose, it is necessary to remove it from the opening carefully, observing the utmost care. The product is heavy, with many sharp corners and protruding steel parts.
Preparation of the workplace

Disassembly is quick, but it is accompanied by the release of a large amount of debris and the movement of large objects.
Space preparation guidelines:
- Remove from the room as many items as possible that will interfere with work, may be damaged and dirty. Cover everything else with a film, pressing it down with oppression along the edges.
- Lay cardboard, plywood, wood-based panels, boards from boards in front of the opening to protect the flooring from damage.
- Close windows and doors in the apartment to prevent drafts that could carry dust throughout the premises. For the same purpose, plug the cracks with wet rags and glue the transfer and exhaust ventilation grilles.
- Prepare trash bags, bags, scoop, broom, rags and containers of water to clean up the workplace.
After making sure that everything is ready, you can proceed to the practical phase.
Removing the glass unit

The glass block is the heaviest, most fragile and potentially hazardous piece of construction. It is advisable to pull it out first. In the future, it will be much easier to manipulate the sash.
To remove a glass unit from a plastic window with your own hands, you need to do the following:
- Close the window tightly to keep it stationary.
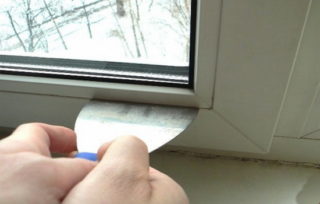
- Take a narrow trowel and insert it into the gap between one of the side glazing beads and the frame. Turn the tool so that you can pick up the part with your fingers and pull it out of the groove.
- Remove the bottom, side and, last of all, the top glazing bead one by one.
- Holding the block with one hand, open the sash and fix it. With the other hand, press on the outside of the top of the glass unit, after lowering, grab it along the edges with both hands, remove it from the opening.
The removed unit must be immediately removed away from the place of work in order to exclude the possibility of its falling and damage.
Removing the window

There are several types of hinges used in the manufacture of metal-plastic structures. You should figure out which of them is used in the product, so as not to break anything and not make unnecessary efforts.
It is necessary to remove the window in the open state, using a pry bar to raise it, laid on a rigid base so as not to damage the floor.
Action options:
- Remove the decorative caps from the hinges, separate them by pulling out the upper connecting pin. After that, the sash can be easily removed from the lower hinge, on which it is simply fitted.
- Unscrew the loops themselves from the canvas. To do this, the frame must be propped up and fixed in a strictly vertical state. Most likely, the assistance of an assistant will be required.
- Disassemble the fastening mechanism. This is somewhat more difficult and longer, but it allows you to achieve the desired result when other methods do not help.
The removed frame must also be taken away from the opening. The parts of the swivel and fastening mechanism must be placed in a box with a lid.
Frame recess

This is the most time consuming and time consuming exercise.
It is performed in the following sequence:
- Removing the window sill. It must be lifted slightly and pulled out of the grooves. If necessary, polyurethane foam is cut from below.
- Removal of platbands from the outside and facing corners from the inside.
- Removing slopes. The plastic panels are unscrewed, and the plaster is knocked off with a chisel and perforator.
- Loosen the fixing bolts.The anchor plates can simply be pulled out with a nailer.
- Cutting the polyurethane foam with a sharp knife so that it reaches the stop in the front wall of the opening. Cutting it into strips, you need to pull out as much material as possible.
- Then you should knock on the box with a mallet to free it from the last obstacles. Then, using a mallet, remove it from the opening.
After dismantling, the product is cleaned in place from foam residues and prepared for further use.
Removing fittings

The fittings are removable for the convenience of packing and transporting the window. Using a screwdriver or screwdriver, the parts located on the frame, internal and external handles, openings for the mesh are unscrewed. In the process of work, it is recommended to photograph the location of the fittings in order to facilitate the process of its subsequent installation.
Glass unit repair
To disassemble a double-glazed window, you need to carefully cut the sealant layer on which the sheet is glued to the frame. Then the glass must be cleaned and washed well. After replacing the sorbent in the frame, the canvases are glued into place and, after the sealant has hardened, can be used again.
It is only necessary to remove the details of the window and its box, making sure that all fasteners and obstacles are removed. Otherwise, something can be broken, broken or bent.
It is advisable to remove the old structure after delivery of the new one in order to immediately close the opening formed.


