Concrete flooring in a wooden house is used almost everywhere. This decision is due to the fact that modern housing is filled with heavy household appliances and numerous cabinet furniture, which requires a strong base. In addition, most property owners prefer new types of flooring, such as laminate, parquet board and bulk polymer mixes. The classic boardwalk for them will not be the best basis.
Appointment of screed in the house
For all its merits, wood cannot provide sufficient strength to the base. The material is prone to deformation, decay, insect damage.
A floor screed in a wooden house is completely devoid of these disadvantages. The reinforced concrete slab will serve as an excellent base for laying board flooring in any available design.
Pouring the floor in the house makes it possible to solve the following engineering and household tasks:
- Ensuring an even distribution of vertical pressure on the foundation. This is the extension of the service life of the structure, the prevention of cracks and distortions.
- Creation of a solid and stable foundation for the construction of the walls of the building. This is especially true when they are laid out from foam blocks or bricks.
- Protection of premises from moisture from the ground, preventing odors, insects and rodents from entering the building from the underground. The concrete is very durable and completely waterproof.
Concreting is quite expensive, but houses are built for more than one season. The investment pays off by maintaining the geometry of the building, the absence of regular major repairs or the maximum increase in the intervals between them.
Concrete thickness for different surfaces
Pouring the floor with concrete in a private house is carried out on the basis of careful calculations.
The initial data can be as follows:
- soil type;
- depth of groundwater occurrence;
- building height;
- wall material;
- estimated load;
- climatic conditions;
- the estimated life of the building.
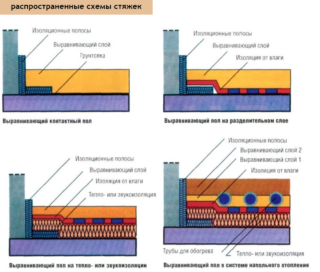
It is necessary to subdivide the screeds according to their purpose and place of installation. The minimum thickness of the base plate is 20 cm, provided that the walls are made of sawn timber or lightweight foam blocks. For tall structures or brick structures, you will need to make a base 30-50 cm thick. The base plate has a multi-layer structure. A reinforcing cage is laid inside, concrete must be poured onto a cushion made of a waterproofing pad, sand and crushed stone.
Another type of screed is the arrangement of a leveling level above the subfloor. This is done for the subsequent laying of coatings that require a perfectly flat base or subsequent polishing of concrete without facing. For mixtures based on gypsum, the minimum level is 5 cm, for cement - 3 cm, and for underfloor heating - 6-10 cm.
Methods for pouring the floor in the house
To make the best choice, you should familiarize yourself with a brief description of each technology:
- Classic wet concrete. It is the most popular and most often demanded option in individual construction. Depending on the design loads, a mixture of 1 part cement, 3 or 4 parts sand is used.To improve performance, plasticizers, fine crushed stone, stone chips can be added. The slab is distinguished by its high strength, durability, the ability to eliminate large differences in the base in height. The disadvantages are the large mass, the duration of solidification and the laboriousness of the process.
- Semi-dry concrete. In essence, it is a variation of the method described above. The difference is that the minimum volume of water is added to the mixture, which is required only to hydrate the cement. In addition, fiber is used as a reinforcing additive. The advantages of the technology are in the small mass of the solution, the exclusion of its shrinkage after drying, the absence of strong fumes, and a decrease in the time of hardening. There are disadvantages - it is difficult to concrete, since the solution practically does not have fluidity. To lay on an area of more than 70 square meters, you will need to rent a pneumatic compactor.
- Bulk. They are mixtures based on cement or gypsum, which include plasticizers that increase the fluidity and plasticity of the solution. The addition of reinforcement agents helps prevent cracking. Self-leveling slabs are distinguished by simplicity and speed of manufacture, relative ease of operation, sufficient strength indicators, resistance to moisture and temperature extremes.
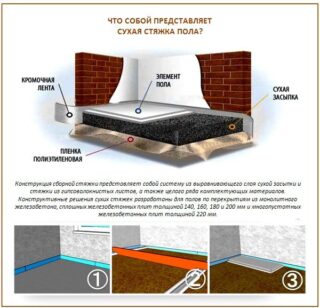
- Dry. This process is not associated with pouring, since the formation of a smooth surface is carried out using solid boards (plywood, OSB, GVL). At the same time, insulation can be carried out when expanded clay, foam, mineral or cellulose wool is laid under the new flooring. The advantages of the technology are the speed of installation, the absence of wet works, the need to wait for the solution to solidify, as well as the ability to split the installation process over several days. The downside is the noise and limited durability of the coating.
When carrying out construction or major repairs, the methods of arranging the screed can be selected separately for each room, taking into account its specifics. It is advisable to pour concrete into the floor in the house in the hallway, bathroom and kitchen. In the bedroom, a decorative polymer mixture is well suited, and in the nursery it is better to equip a warm dry flooring.
Required tools and materials
To concrete a floor or pour a self-leveling mixture, you will need the following tools:
- construction mixer;
- level;
- rule;
- putty knife;
- stationery knife;
- paint brush;
- needle roller;
- manual or electric rammer;
- shovel.
List of materials:
- ready-made solution or ingredients for its preparation;
- deep penetration primer;
- reinforcement and annealed wire (if reinforcement is provided);
- knitting machine;
- antiseptic;
- damper tape.
- puncher;
- screwdriver;
- mallet;
- hacksaw;
- Sander;
- a hammer.
List of materials:
- painting net;
- antiseptic;
- impregnation;
- frame boards;
- hardware (corners, dowels, screws).
In all cases, you need to purchase materials with a margin of up to 20%.
It is necessary to work with solutions in boots; when using tools, wear construction gloves and goggles.
Stages of work
Step-by-step process of screed pouring using the example of classic wet concrete technology:
- Preparatory work. They begin with an even distribution of soil within the foundation. If necessary, excavation or filling is carried out, a thorough ramming is carried out. To prevent the bedding from eroding and germination of plants, it is recommended to lay a geotextile fabric at the bottom of the pit. Then a pillow is made of layers of sand and gravel 20-30 cm thick each, depending on the degree of heaving of the soil. The bedding is poured with water, leveled and rammed. In conclusion, cement mortar is poured with a thickness of 4-5 cm.
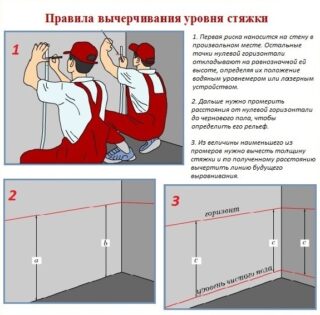
- Reinforcement. Depending on the thickness of the screed, an iron grating or a three-dimensional frame is used. It is better to knit it with wire, since welding reduces the strength of the metal. When laying, the frame must be rigidly fixed to the embedded foundations in order to ensure its monolithic connection with the slab. If the reinforcement is placed on a cellophane film, then a thin layer of perlite or expanded clay should be poured over it so as not to tear the material. Spacers are installed on the sides of the cage to ensure that the structure is motionless. After checking the strength of the reinforcing cage, beacons are installed. Landmarks are mounted on a cement mortar or on a reinforcing grid. They are made from a strong steel profile and are attached at a distance less than 30 cm than the length of the existing rule.
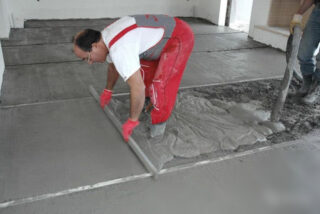
- Carrying out filling. It is desirable to perform it continuously, constantly feeding the mixture between the beacons and leveling it with the rule. As the pit fills, the concrete must be pierced with a pin to remove air. It is recommended to level the finished surface with a heavy long-handled mop.
To use the screed as a finishing floor, it is compacted and polished. To do this, a mixture of cement powder with admixtures of corundum, quartz or metal is added to the surface, after which grouting is performed using a special machine called a "helicopter". The treated surface becomes smooth, dense and mirror-like.

