After installing windows, large openings inevitably remain between the frame and the wall, partially filled with polyurethane foam. The choice of material for subsequent finishing largely determines the quality and aesthetic side of the final result. Plastering window slopes is one of the time-tested options for performing this process. Its technology is not particularly complex, but it contains a number of subtleties that should not be neglected. In order for the plastering of window slopes to be successful, you should understand its features, sequence and rules for performing each stage.
Advantages and disadvantages of plastering window slopes

Despite the appearance on the market of new and modern building materials, such a method of repair as plastering window slopes does not lose its relevance. It is widely used in the industrial and private sector.
The following advantages testify in favor of this choice:
- The ability to do it yourself. Savings on the services of hired workers.
- Simplicity of the process. Even a beginner who has no experience of such work can qualitatively plaster the slopes.
- The budgetary side of the issue. The material itself is inexpensive; for its application, tools are needed that have a purely symbolic price.
- Sufficient strength. After crystallization, the solution turns into a solid substance, second only to concrete in strength.
- Versatility. You can plaster windows not only from the inside, but also outside the room. Apply to plastic, wood and aluminum products.
- Long service life. It can only be affected by external factors such as shrinkage of the building or strong shocks.
Having mentioned the advantages of the technology, one cannot but dwell on its disadvantages:
- Even in high-quality material, surface cracks appear over time.
- Relatively low thermal insulation qualities. In cold regions, additional insulation is needed.
- Risk of mold and mildew formation when operating in high humidity conditions.
Plastering the slopes of plastic windows continues to be the most popular repair method after installing new windows.
Types of solution by composition

For finishing work, compositions of factory and self-preparation can be used. Factory products go on sale in the form of powder and paste, ready for use immediately after opening the package and mixing.
You can choose from the following categories of solutions:
- Simple. Factory mixtures are a finished product in which the proportions of all components are precisely measured. The consumer does not need to spend time determining the amount of a particular substance. Homemade formulations of this type are made from one component. It can be gypsum, starting or finishing putty.
- Difficult. They are made from several ingredients, where clay, cement, slaked lime or gypsum filler are used as a binder. In some cases, inorganic dyes are used to reduce the time and volume of finishing work.
When buying or preparing a mortar, you should pay attention to the potential strength of its constituents.Too fatty composition will crack over time, and a skinny one will not give the necessary reliability and may simply fall off the wall.
Required tools and materials

To plaster the slopes on the windows, you do not need to buy or rent expensive equipment. In most cases, everything you need can be found in the closet or at the neighbors.
To work, you need the following tools and materials:
- puncher, screwdriver;
- level, tape measure, rule;
- scissors;
- construction gun;
- sealant;
- saw with fine teeth;
- miter box;
- set of steel spatulas, trowel, paint brush;
- grater;
- primer;
- external and internal plastic corners;
- painting net;
- synthetic glue;
- finishing (paint, wallpaper, oilcloth).
To protect hands, eyes and breathing, thick rubber gloves, goggles and a respirator should be prepared. If the windows are tall, a stable stool or small stepladder will be required.
Surface preparation

In order to qualitatively plaster a window jamb, it is necessary to carry out a number of preparatory measures:
- Inspection of openings. Identification of through holes and poorly adhered fragments. Those are removed, the holes are sealed with sealant or polyurethane foam.
- Removal of interior items from the room. What cannot be removed is covered with foil.
- Cleaning the working area from dust, dirt and stone chips. Degreasing of surfaces with industrial alcohol, acetone or acid.
- Surface treatment with deep penetration primer. If the liquid is well absorbed, the procedure is repeated.
- Measurements of the vertical and horizontal. If necessary, structures are easy to align. For this, it is better to use a starter putty. The material is distinguished by its strength and high solidification rate.
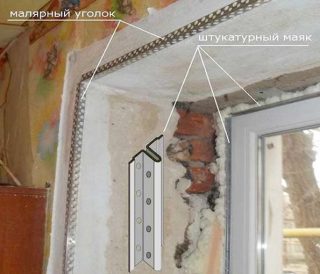
- Exposing lighthouses. The best option is to use perforated profiles, which are installed in the corners of door and window openings. It is better to use plaster or alabaster to fix the guides. The use of beacons will allow you to plaster the opening with millimeter accuracy, prevent curvature and deviations of the planes.
Installation can be started when the mortars have solidified and the liquids have dried.
DIY plastering of slopes

If there are visible slots on the side of the window, you should start with them to protect the internal opening from moisture and temperature changes. From the inside, you need to make the slopes first on the sides, and then the top fragment.
The work is recommended to be carried out in the following sequence:
- Spray the work surface with water from a spray bottle. This will increase its adhesion to the plaster and beat down the dust that is inevitable in any room.
- Knead a little liquid solution from the prepared mixture. Slightly dilute the pasty composition with water until it becomes fatty kefir. Throw the resulting substance into the openings, distribute evenly with a paint brush, while rubbing into the base. Wait until the liquid is completely dry. This technique improves the adhesion of the base to the solution.
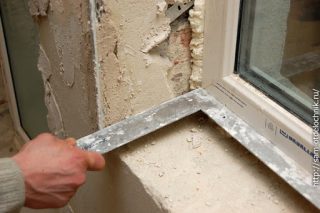
- Glue or screw on the corner profiles. On each side, two products are installed - on the frame and on the outer corner of the opening. The profiles are joined at an angle of 45 degrees. The planks will be a guide when applying the mortar. The inner profile will prevent the formation of cracks and chipping of the plaster in the places of its contact with the window.
- Prepare the main team. The powder is mixed with water and pigments. The liquid is added to the powder, not the other way around. The first batch lasts up to 10 minutes at low mixer speeds. After standing for 5-7 minutes, stirring is repeated. This prevents the formation of clots. The paste also mixes, as it becomes like jelly during storage and can stratify.
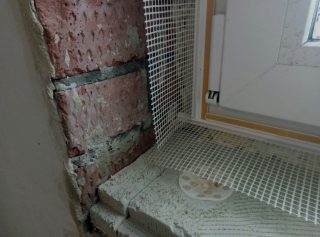
- Install insulation (done if necessary).Stone wool or foam is used. The strips are glued to the base with synthetic glue and closed with a masking net.
- Start filling the side openings. If they are deep, this should be done in layers up to 3 cm thick, feeding the solution from the bottom up. If you apply the plaster all at once, then under the influence of gravity it will slide down, forming nodules. Therefore, the layers are applied in stages, as the previous ones harden.
- Level the surfaces, apply a masking net on them, apply the last layer of mortar 1 mm thick on top with a spatula. The use of a mesh prevents cracking even with strong changes in temperature and humidity.
- Close up the upper slope. It is more difficult to do this, since under the influence of gravity the mass will tend to break away and fall down. To get out of this situation is quite simple - take a bar, a support and close the filled groove. When the mortar has set, the strip can be removed and further rework can be carried out, including leveling and surface reinforcement.
- Align the corners. Take a grater, perform consistent grinding and polishing of the slopes. At the end of the work, remove the dust and cover the surface with a primer twice. Wait at least a day until the solution is completely absorbed and dries out.
Finally, a topcoat is applied. Wallpaper and water-based paint work well for wooden frames. Plastic slopes should be made bright and saturated. Acrylic paints with a glossy surface proved to be excellent.
After the end of the shrinkage of the building, ceramic tiles can even be glued to the surface, for which the strength of the plaster array is quite enough.


No need to plaster them. They will be cold and sweaty, and then the fungus will go. I faced this myself, then I beat off all the plaster and installed a sandwich panel.