A wooden building, despite the visual appeal and practicality of wood, needs finishing. Over time, the material wears out, darkens, dries up. Chalet-style or rustic interiors are boring and you want to change it. The easiest way is to plaster the wooden walls inside the house.
The need for plastering wooden walls
A wooden building is not only a log house, but a frame building, with internal sheathing made of plywood, a construction from a bar, an option from a wooden brick. In such cases, the walls often need additional finishing. Plaster solutions are a simple, budgetary, but effective and practical method.
Advantages of plastering:
- Most plasters have antiseptic properties. They prevent wood decay, fungal growth and mold growth. In addition, the plaster is not to the "taste" of rodents and protects the wooden walls from rats and mice.
- Plaster repels moisture to a certain extent and prevents wood and wood-based materials from absorbing water. At the same time, the material is vapor-permeable and does not interfere with the "breathing" of wood.
- Plaster is the best way to level walls and get a perfectly flat surface for wallpapering, painting, tiling.
- Unlike wood, plaster mixes are non-flammable. Their use increases the fire safety of the building.
Apply plaster for exterior and interior work. The goal is the same: to protect the material from moisture, drying out and to give the walls an attractive look.
Known types of solutions
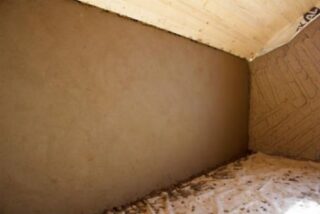
Wooden boards hold any types of plaster mixes: clay, cement-gypsum, limestone and others. The choice depends on the characteristics of the composition. For decoration of rooms with high humidity - kitchen, bathroom, bathroom, - as well as for decorating the facade, you cannot take gypsum. For all its merits, she is afraid of moisture. In areas with difficult weather conditions, lime-based formulations are preferable: their antiseptic properties are noticeably higher.
Most often, the following mixtures are used for finishing.
- Clay - based on clay and sand. The composition is vapor-permeable, absorbs excess moisture and brings it out, like a tree. The mixture is elastic, easy to apply. An interesting feature is that it has no expiration date. The plaster frozen in a bucket can be diluted with water at any time to obtain a working mixture. Moreover, the layer removed from the wall can be reused. In addition to sand, sawdust, straw, needles, felt, wool are added to the mixture. Such plaster serves as an excellent insulation. However, it is ugly, the walls will have to be painted or pasted over with wallpaper.
- Cement and sand-cement plaster is popular due to its high strength and evenness of the resulting surface. Portland cement of different brands is used - from M500 to M200. Plaster is not plastic, therefore, when making at home, liquid soap is added to the solution. The finishing layer dries up to 30 days.
- Gypsum - based on pure alabaster and plasticizers. The walls are leveled with gypsum mixture to perfect condition. The color of the resulting surface is snow-white. The composition is plastic, light, it is often used as a textured plaster. Plaster mix is expensive.
Finishing mixtures can be bought ready-made or made by yourself.
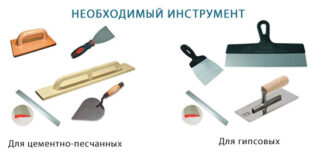
Required tools and materials
- screwdriver, electric mixer;
- as a rule, bucket, falcon, graters and floats of different types;
- mallet - for caulking;
- containers - buckets or tanks for making a solution, a cuvette for directly applying the composition to the wall;
- protective clothing - gloves, apron, glasses.
If the wall is high enough, trestles, ladders, or other devices will also be required.
If you do the plaster yourself, you will need the following materials:
- sand - clean river sand, sifted before use;
- cement - grades from M200 to M500;
- slaked lime - they are quenched 3 days before the preparation of the plaster;
- gypsum;
- clay - oily, medium or skinny is used - this is taken into account when calculating the ratio of clay and sand for the mixture;
- plasticizers - liquid soap, glue for non-woven wallpaper.
Other additional materials may be required: straw, sawdust, wool.
Preparatory work
Wood does not go well with plaster. Regardless of what the house is built from - timber, logs, wooden bricks - you need to strengthen the surface and provide additional support. This is the main task of the preparatory work.
- Plastering a wooden house from the outside begins with sealing cracks and caulking. The tree sits down over time. The process is accompanied by the appearance of cracks. They are carefully sealed both outside and inside. They also get rid of bitumen or oil stains.
- The surface is treated with antiseptics to prevent the appearance of mold and mildew. If the wooden facade is adjacent to concrete parts, the joints are treated with concrete contact.
- If the bathroom or kitchen is being plastered, the walls are additionally waterproofed. Usually plastic wrap or roofing felt is enough.
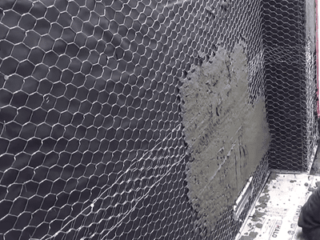
- When finishing from the outside, the facade and plinth are reinforced with a metal mesh. Fix it with mushroom dowels. When finishing from the inside, a reinforcing mesh is placed on the walls and fastened with self-tapping screws. The mesh is pulled tight. Joints are not allowed, the material is laid with an overlap of at least 1 cell.
- If the layer has to be made thicker than 3 cm - in case of irregularities, defects, spray on top of the first mesh, and then attach the second layer.
- Fix the shingles on the wall. The tapes are placed so that they form rhombuses with dimensions of 45 * 45 mm or 50 * 50 mm. The ends of the shingles are moistened and fixed with nails.
To increase the adhesion of a wooden surface, short serifs are applied to it or treated with coarse-grained emery paper.
The process of applying plaster to wooden walls
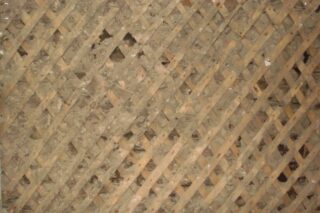
How to plaster a wooden house inside and out depends on the wall material and weather conditions. Plaster forms a rather hard surface. The tree shrinks, especially in the early years. Immediately after construction, frame buildings can be plastered, but houses from a bar or log cannot. In the first case, the frame is built from dried wood, trimmed mostly with wood materials. This option gives minimal shrinkage.
In the early years, a log or a house made of timber shrinks up to 7 cm per year. Plastering the building is allowed after 1–2 years, provided that at this time the building is protected from rain and snow.
The technology is as follows:
- It is necessary to carry out work in the warm season at temperatures from +10 to +20 C. Cold or heat has a bad effect on the adhesion of the material.
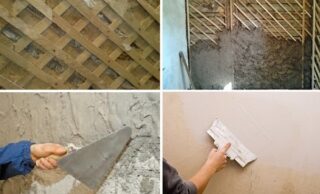
- Plastering is performed after fixing the shingles. Apply the composition in 3 steps. If necessary, beacons are fixed on the surface of the wall.
- The first layer is applied by spraying. For this, a slightly more liquid solution is prepared according to the usual recipe and PVA glue is added - it makes the mixture more plastic. Spraying is done by hand: the shingles do not allow the use of a trowel.
- Start spraying from the lower left corner.For scattering the composition, use a stick and a brush or even a broom. The layer thickness is 9–10 mm.
- The second layer is soil. Apply before the first is completely dry. A thick solution with the consistency of bread dough is prepared for the soil. Apply the mixture with a trowel or a construction bucket. Layer thickness - no more than 20 mm.
- If the soil has not gone beyond the established beacons, the operation is repeated.
- The second layer is aligned with the lighthouse rule. Start work from the bottom. They move upward, the excess compounds are removed. If in some area the layers are too thin, the solution is poured onto the surface and re-leveled.
- 5 hours after the application of the primer, the surface is rubbed with a trowel. Move counterclockwise.
- After the soil has dried, a cover is applied. This is a layer of plaster with a thickness of 1–2 mm. Nakryvka - the solution is more liquid, made from a mixture of very fine river sand and cement, or only from cement. This layer replaces the putty.
- Before applying the coating, a section of the wall is wetted with water. After the end of the work, the surface is again rubbed with a trowel or float.
A plaster layer of this kind is a technical coating. This is how the walls are prepared for wallpaper, clapboard decoration or slabs. You can also finish them with decorative plaster: mosaic, textured, structural.
The decoration inside and outside the building, although it is carried out according to the same schemes, differs in some nuances:
- The decoration of the external walls can only be started after the plastering has been completed from the inside. Otherwise, moisture will become trapped in the walls, leading to mold and mildew.
- Gypsum and clay are excluded from the composition for external use.
- Additional finishing work - cladding with natural stone, clinker, siding, is performed no earlier than 28 days after the mortar has completely set.
Plaster is a finishing method suitable for both brick and wooden houses. The plaster composition protects the wood from moisture and temperature changes and prevents rotting and drying out.

