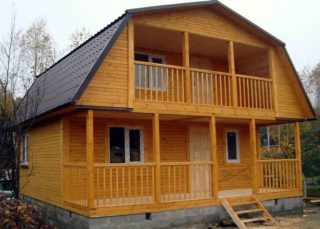
The sloping mansard roof is a popular gable roof option for low-rise private houses. Interest in it is caused by a more rational use of the under-roof space of a country house. At the same time, the area of the attic is significantly increased, which makes it possible to equip a full-fledged living room (attic) there.
Design features of a sloping roof

In general, the construction of a sloping roof is somewhat different from the traditional gable roof.
Technical requirements
Erecting a sloping roof over your house will require the fulfillment of a number of requirements, which will certainly lead to an increase in the cost of the project:
- It will be necessary to develop a ventilation system that will prevent the formation of condensation in the room.
- The ceiling height in the under-roof space must be at least 2.2 m.
- It is necessary to pay special attention to the construction of roof windows, which should not allow water to flow into the under-roof space. Washing their glasses shouldn't be difficult.
- The construction of a sloping roof should not lead to an excess of the permissible loads on the walls and foundation of the building. To do this, you will need to carry out engineering calculations of its load characteristics and geometric parameters.
Despite the fact that the construction of a sloping roof is not much different from a gable roof, it is far from easy to equip it as it seems at first glance.
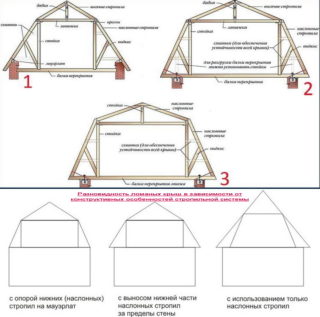
Varieties of rafter systems
- layered, with the help of which they form a steeper slope;
- hanging, making out the upper, flatter part of the roof.
The layered rafter system is a structure in which the rafter legs rest on the walls of the house. If necessary, install a free-standing additional support (wall).
The hanging rafter system rests only on the walls of the house, which allows it to block fairly large spans with its help. To reduce their effect on the walls, the pairs of rafters are tied together. In some cases, the floor beam may be the tightening. If necessary, the middle of the tightening is suspended from the ridge girder using the headstock, which excludes its deflection.
Tightening is a horizontal beam connecting the hanging pairs of rafters. The ridge girder is the meeting point for a pair of hanging rafters. Headstock - vertical fastening of hanging rafters and tightening.
Roof systems for a sloping roof are mounted in a slightly different way than traditional ones.
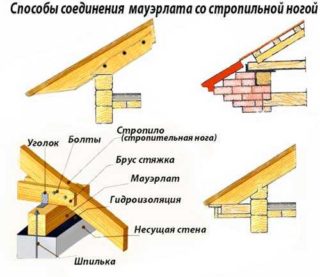
- In the construction of wooden houses, a bunch of Mauerlat is used with floor beams, which makes it possible to obtain a reliable base for a sloping roof.
- When erecting brick, cinder block and other houses, the Mauerlat is attached to the walls, and the floor beams serve as a support for the racks separating the attic living space from the rest of the roof space.
Mauerlat are wooden beams fastened to each other, to which the roof rafter system is attached.
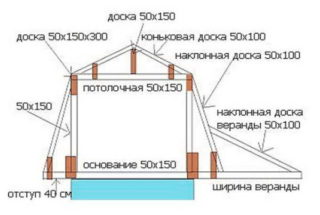
The rafter system of a sloping roof contains a large number of auxiliary elements (struts, struts, ties, etc.), without the correct calculation of which the long-term functioning of the roof will be impossible.
Design and installation of a sloping roof
The sloping roof is designed in two stages:
- determination of the area of the roofing;
- calculation of the dimensions of structural elements of the rafter system.
To calculate the area of \ u200b \ u200bthe roofing, you need to draw a diagram (plan) of the roof and indicate on it all the necessary dimensions. Then divide the roof surface into simple shapes (quadrangles and triangles), calculate the area of each of these elements and add them up. This gives the total roof area.
The second part of the calculations is a more complex process that will require taking into account the relative position of rather complex nodes and parts of the rafter system.
Calculation of the elements of the rafter system
- weight of the roofing components: lathing, counter-lathing, hydro-steam and heat insulation, roofing material;
- wind and snow load parameters;
- operational characteristics: the weight of the personnel serving the roof, engineering equipment, dormers, etc.;
- geometric dimensions of the roof: the angle of inclination of the upper and lower rafters, the size of the span from the roof ridge to the eaves overhang, the pitch of the sheathing, the distance between the rafters, etc.
It is best to entrust the calculation of the rafter system to a company with experience in carrying out such work.
Required materials and tools
For the construction of a rafter system of a sloping roof, well-dried coniferous timber (spruce, pine) is best suited, on which there are no knots, cracks, traces of fungus and other defects. Moreover, their moisture content should not be higher than 20%.
All wooden elements must be impregnated with a fire-resistant compound and an antiseptic. It will not interfere with the processing of wood with agents that prevent the processes of its decay.
From the tool, you will first need:
- a hammer;
- drill;
- hacksaw for wood;
- screwdriver, etc.
It is also necessary to attend to the presence of a large number of metal fasteners (corners, nails, etc.), as well as insulation and roofing materials.
Step-by-step installation of the rafter system
Having installed the Mauerlat, they proceed to the installation of floor beams and vertical racks. First, the extreme beams are laid at the ends of the building and only then the intermediate ones. Vertical racks are installed in the same way. Girders are placed between the racks, completing the installation of the frame for the inner walls of the attic.
Floor beams, like vertical posts, must be mounted in the same plane.
The crossbeams should not be fastened to the uprights, but to the purlins. Connect them with metal corners.
Next, proceed to the installation of the rafter system. First, the lower rafters are installed, and then the upper ones. Their attachment points are marked according to a template, with the lower rafters connected to the Mauerlat, and the upper ones to the puffs. The installation procedure for both of these rafters is the same - first, the extreme ones are fixed, and then the intermediate ones. The step of their installation is no more than 1.2 m. If necessary, the upper rafters are connected to the ridge beam.
Openings must be left in the gables for the installation of roof windows. Their total area should be at least 1/8 of the entire area of the outer walls of the attic.
Roofing
The process of arranging a broken roof is completed by sheathing the rafter system with sheathing and laying the roofing "pie".
The type of lathing and methods of fastening its elements depends on the type of the selected roofing.


I love the attic when the walls and ceiling follow the shape of the roof - that is, sloping. And when an ordinary boring rectangular parallelepiped is inscribed inside the roof, consisting of inclined panels, it is boring and uninteresting, the meaning in the attic disappears. And a lot of volume is wasted.