In low-cost construction, it is important to get a house with a larger area for use with minimal costs. A mansard roof can transform a useless attic into a living or utility room. Installation is allowed to be carried out on its own, having previously studied the construction technology and choosing the right materials.
- Definition and benefits of a mansard roof
- Attic construction
- Rafters
- Heat insulator
- Steam and waterproofing
- Hemming and outer layer
- Single slope option
- Attic with two slopes
- Broken roofs
- Hip
- Construction stages
- Project creation
- Arrangement of rafters
- Lathing, counter battens and waterproofing
- Installation of roofing material
- Installation of windows and ventilation
- Internal work
Definition and benefits of a mansard roof
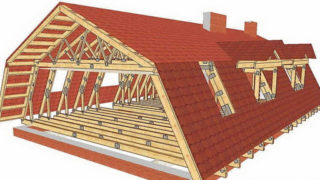
The definition of the attic floor - attic, loft - is described by SP 55.13330.2016 (Single-family residential buildings) and SP 118.13330.2012 (Public buildings and structures).
An attic is understood as an attic room, the walls of which are slopes of a straight or sloping roof. For residential premises, the height from the floor to the intersection with the roof is not regulated. In public buildings, the minimum height of the vertical wall of the room before the intersection with the roof slopes should be more than one and a half meters.
A prerequisite is that the building must have windows located in the roof slopes or in the front wall.
The use of space under the roof is beneficial compared to houses where the attic is made non-residential.
Advantages of the scheme:
- minimum costs for additional usable area;
- reduction of heating costs due to the internal cladding of the roof;
- finished appearance of the building, the ability to additionally equip the balcony;
- construction speed comparable to the construction of an additional floor.
Mansards are distinguished by construction methods and roof configuration.
Attic construction
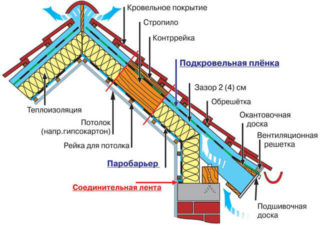
In general, the composition of the attic roof includes:
- rafter system;
- insulated and waterproof roof with external cladding;
- decorative filing from the inside;
- ventilation system;
- window.
Each of the elements in the attic roof has similarities and differences with non-insulated structures.
The composition of the "pie" in the direction from the room to the street:
- decorative filing;
- vapor barrier;
- heat insulator;
- wind and water protection;
- crate;
- external roofing material.
Most common and improvised materials are suitable for arranging the attic.
Rafters
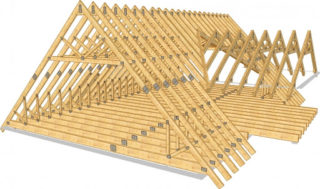
The rafter system is the supporting frame of the roof.
For the rafter, an inexpensive tree is used - more often pine. In some cases, the frame is made of metal. This increases the cost of construction, leads to additional labor costs for the installation of the crate.
For a gable roof, the angle of inclination of the rafters in relation to the horizon should be from 45 to 60 °:
- with a lower slope, snow will accumulate on the slopes, plus the height of the room will not allow you to be there in full growth;
- a large slope will make the roof high, which will require more building materials.
In a sloping roof, the lower part of the slope is equipped at an angle of 60, and the upper one is about 30 °.
Hip and semi-hip roofs are calculated based on the geometric dimensions of the house.
Rafter systems are divided into layered and hanging. In the first case, the rafter beams are supported by vertical beams. The option is applicable in houses with capital partitions on which the bearing racks are supported.The pitched type is best suited for sloping roofs. Hanging rafters are supported only on the solid external walls. This option is suitable for gable roofs.
The complete calculation of the rafter system is done in accordance with SP 64.13330.2017, which is called "Wooden structures".
In practice, the rafter beams are placed at a distance of 60–90 cm from each other. The exact distance is chosen based on the geometric dimensions of the insulation. It should be 1–2 cm wider than the span. In this case, the heat insulator sheet will lie tightly, without air gaps between the beams, which will exclude additional cuts and waste of insulation sheets.
Heat insulator
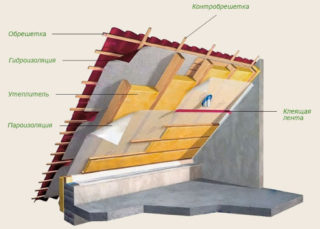
To reduce heat dissipation through the roof, insulation is done:
- stone (mineral) wool;
- foamed (polystyrene) and extruded polystyrene foam (penoplex, penloplex);
- liquid penoizol.
Products from expanded polystyrene have a low thermal conductivity parameter. They are environmentally friendly and only pose a threat when exposed to open flames. The material does not support combustion and self-extinguishes within 3-4 seconds.
The cheapest type of material PSB-15 with a specific gravity of 12 kg / m³ is suitable for insulation.
Styrofoam of any type practically does not absorb moisture and is a wind protection. Service life up to 50 years.
Stone wool weighs from 50 to 200 kg / m³. Such insulation needs good hydro and vapor barrier - when wet, the properties of mineral wool are sharply reduced. Service life up to 20 years with reliable moisture protection.
Steam and waterproofing
From the side of the room, the roof is protected with a vapor barrier, which prevents the thermal insulation layer from getting wet from fumes. Special membranes with one-sided vapor conductivity are used.
Waterproofing is arranged on top of a heat insulator. The layer prevents moisture penetration from precipitation. Along with roofing material, modern roofing roll materials based on resins, petroleum products or non-woven membranes are used.
Hemming and outer layer
Sheathing - interior decoration of the attic roof made of plastered and painted gypsum board, MDF, wooden lining, OSB panels, plywood.
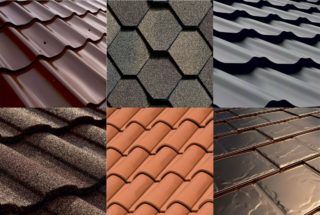
For external roofing use:
- slate;
- metal tiles;
- professional sheet;
- cellulose-bitumen sheets;
- soft tiles;
- roofing iron.
The choice of material depends on the geometric parameters of the roof, the angle of inclination, and the design project.
Single-slope, dual-slope, broken and hip design options are suitable for the roof of the attic.
Single slope option
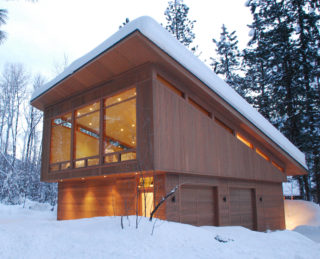
An attic with a roof of one slope is easy to calculate and build:
- less material is required for one slope than for other types;
- installation takes less time;
- the rafter system of a single-pitched mansard roof can be built by 1-2 people;
- the option is resistant to wind loads;
- the mass of the structure is small.
The main disadvantage is that snow loads can cause destruction.
A spacious room can only be obtained with high walls on which the rafters rest - if one wall is low, part of the total area is suitable only for arranging storage rooms.
Attic with two slopes
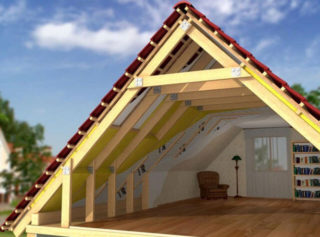
The gable version of the roofing device is considered a classic.
A positive property of the structure is the ease of construction of the attic.
To obtain a room of a large area with high "ceilings", it is necessary to provide a large slope of the slopes and a high ridge. This leads to an increase in the consumption of materials.
Snow does not linger on steep slopes, but their large area strongly resists winds, which will require the manufacture of a reinforced frame.
To increase the height of the ceilings, low walls are built on which the rafters rest.
Broken roofs
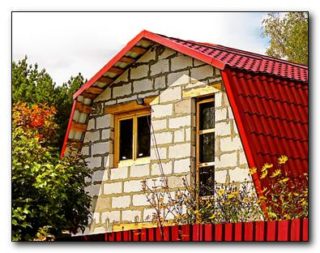
Broken roofs are called roofs, in which the slopes are formed by two roofing planes located at different angles.
The broken type is very popular when arranging attics and has a number of advantages over other schemes:
- the premises are more spacious, and their height is greater than that of the gable view;
- the walls of the room are vertical, which corresponds to the idea of a full-fledged room;
- the technology allows you to make long overhangs, which gives the house an unusual appearance and additionally protects the walls from precipitation;
- the lower slopes, due to the large angle of inclination, better drain water, help remove snow;
- additional supports in the rafter system reinforce the structure.
Among the disadvantages are the increased consumption of material and the need for thorough waterproofing of the roof scrapping.
For the construction of a mansard sloping roof, you need experience in the arrangement of floors and a team of builders of 3-4 people.
Hip
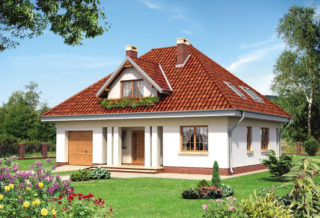
Four-pitched hip and semi-hip roofs are popular in the construction of large private buildings.
Advantages of the hip attic:
- resistance to snow and wind loads;
- aesthetic appearance;
- large usable floor area.
The technology is not very suitable for independent execution - complex calculations in the project will be required.
During construction, a lot of waste remains, since to repeat the geometrically complex roof, it will be necessary to cut the building material.
To build an attic with your own hands in a private house, you need to evaluate your knowledge and skills in the construction business. Choose the option most suitable for self-erection.
Construction stages
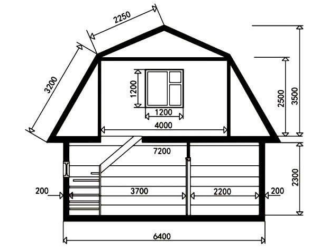
An attic with your own hands is built by performing sequential operations:
- design;
- calculation and purchase of materials;
- frame erection;
- arrangement of the roof outside the house;
- finishing inside the building.
Of all the stages, design is the most difficult.
Project creation
The project describes in detail the structure of the house and the building materials used.
There are hundreds of ready-made solutions freely available that you don't have to pay for. The plan can be drawn up independently, but this will require knowledge of many regulatory documents.
If a non-standard, exclusive building is being erected, it is better to order the project from a specialized organization.
You can calculate the materials yourself. For this, knowledge of geometry in the volume of secondary school is sufficient.
According to the drawings, they recognize the area of the roof, based on the results obtained, they purchase building materials.
Before buying, they get acquainted with the range of products, find out the exact geometric dimensions, on the basis of which they acquire the exact amount of materials.
The simplest method of calculations is to "lay out" on a scaled drawing of the necessary parts - rafters, battens, vapor barrier, etc.
Arrangement of rafters
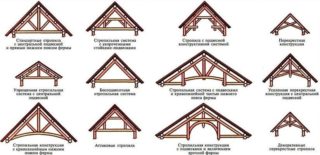
Step-by-step instructions for building a frame:
- The tree is well dried under a canopy, protecting the lumber from the sun's rays.
- Be sure to perform treatment with an antiseptic and fire retardant. It is more convenient to work on the ground before starting construction.
- An accurate marking of the rafters is carried out, taking into account the angles of inclination. They make templates for further sawing the timber and templates for the angles of inclination, which will be needed when installing the rafters in place.
- They raise materials to the roof, equip the Mauerlat. An attic in a wooden house is built directly on the walls, without a Mauerlat.
- The rafter system is being installed. The nodes are fastened by means of a metal angle and self-tapping screws or by means of threaded rods with a diameter of 8 mm or more.
During installation, be sure to use means to accurately maintain angles and levels. Use laser and bubble levels, plumb lines.
Lathing, counter battens and waterproofing
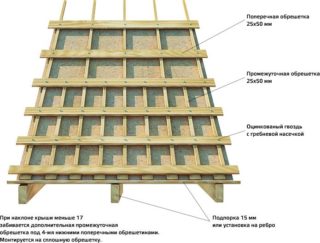
The lathing is made from a board with a thickness of 25 mm, the structure can be solid filling or with a step between the boards.
It is permissible to use plywood, OSB boards, which is important when using soft tiles on the roof.
A layer of waterproofing is laid on top of the crate, which is shot with a construction gun and additionally secured with a counter-lattice.
The counter lattice is used when covering the roof with slate, profiled sheet and similar materials. The gap between the waterproofing and the finish allows air to flow through and moisture from precipitation to evaporate if it has penetrated under the roof.
Installation of roofing material
Depending on the option chosen, the roofing material is fixed according to the manufacturer's instructions. Observe the step of fixing screws or nails.
Installation of windows and ventilation
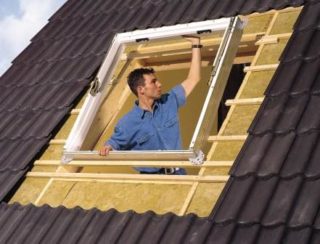
Windows are inserted into the facade walls or special structures are used that can be mounted directly into the roof. For the second case, the frame is made in advance.
For ventilation, ridge or point aerators are used.
For high-quality ventilation of the attic floor, it is better to use forced ventilation systems, since the height difference on one floor is small and sufficient traction is not created.
Internal work
Warming and finishing is carried out with the roof covered.
Between the rafters, heat insulation is laid and fixed. The gaps are sealed with polyurethane foam. Attach a vapor barrier layer. Mount the binder.
The construction of an attic with your own hands is within the power of a master with little skills. The work will require a minimum of tools. An attic is a cheap way to get additional premises in an already built house or when building a new one.


