Plasterboard finishing is becoming a popular method of lining the ceiling. The quality of the ceiling finish depends on the correct installation of the plasterboard frame to the ceiling. The design affects the strength and durability of the decorative finish. When arranging a frame for drywall, you should take into account the features of the marking on the ceiling, the nuances and secrets of the construction of the structure, which you should know about in advance.
Varieties of frame for plasterboard on the ceiling
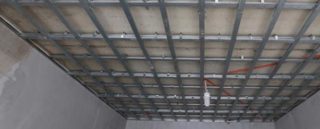
Installation of gypsum board or gypsum board can be done without a frame structure. There are examples of successful glue mounting. The result will be good if the ceiling is hemmed with absolutely flat sheets of plywood, chipboard, does not require cardinal alignment with adjusting the corners and level.
Using a suspended ceiling frame solves several problems:
- hides the defects of the ceiling surface;
- removes slopes;
- forms a free space between the suspension and the ceiling;
- compensates for part of the deformations of the floors during seasonal fluctuations in temperature and humidity.
A plasterboard ceiling frame is made from a different bearing profile. The cornice lattice, depending on the tasks, is made single-level or two-level.
Wooden
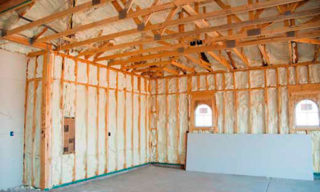
The wooden lattice is assembled in a single-level or two-level version. Such decisions depend on the weight of the drywall, the features of the rough ceiling. For many buildings, a single-row scheme is suitable if the shrinkage of the house is complete, and the ceilings do not have sharp drops.
Timber battens are used in private or old homes with timber joists. Without ceiling insulation, one row is enough. On insulated ceilings, the installation of wooden slats is a priority, since metal is a good heat and sound conducting material.
The use of wooden blocks under the gypsum board is convenient when performing a rough ceiling made of wood or particle boards. In other cases, it is recommended to use metal, because gypsum board and wood have different coefficients of expansion, they react differently to humidity and temperature.
Before assembly, all wooden parts are treated with an antiseptic. This type of finish is not recommended in rooms with a moisture content of more than 12%, otherwise the frame beams will warp from water. When working, it is recommended to leave gaps to compensate for temperature and humidity changes in the material.
Metallic
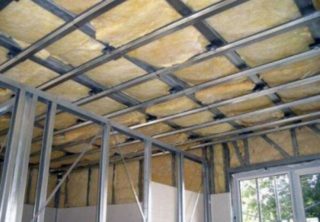
The iron frame is resistant to moisture, temperature changes, microorganisms. With minimal construction skills, it is easy to assemble by yourself. It is convenient to use a metal frame of a suspended ceiling to provide an air cushion, lay insulation, soundproof mats. This is a good way to hide electrical wiring, cable communications, plumbing.
There are downsides:
- a metal suspension takes at least 10–12 cm from the height of the room;
- the construction takes up to half of the budget for refining the ceiling.
A single-level or two-level metal frame is used for GK slabs. From one row it is made from a U-shaped profile. Two-level is made of mutually perpendicular rows of metal guides.
The transverse arrangement of the profile is usually used by experienced craftsmen, in contrast to the honeycomb structure. Ceilings in 2 or more tiers are difficult to perform even when using a metal profile, but they pay off with their original appearance.
Frame device
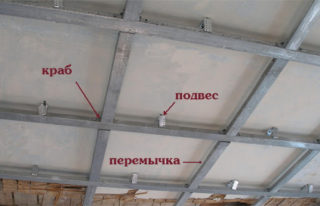
The base for plasterboard sheets made of wood or metal has a structurally similar scheme.
Single row frame:
- Guide profile. With its help, the future base is aligned in the plane.
- Carrying profile. It is sometimes called editing. Fits into the guide rail. The size of the cell depends on the weight of the sewn sheet, figures, shape of niches, boxes.
- Horizontal lintels are short profile cuts between main frame purlins. As a result of their use, a rigid frame is formed.
- Hangers made of mounting tape, docking units - crabs. The tape fixes the profile to the ceiling, the "crabs" connect the profile carrier rails.
In a two-level frame, joints are used to hold the profile levels together. This gives rigidity to the structure, makes it a single whole.
If the distance to the supporting profile sheet from the ceiling is more than 15 cm, adjustable wire hangers can be used to compensate for the sagging of particularly loaded areas.
List of preparatory work
Preparatory work mainly consists in dismantling the old coating. To place the ceiling frame from a profile for drywall, it is necessary to carry out a number of works.
- The concrete ceiling should be freed from whitewash, plaster, in order to notice cracks, mark them on the ceiling, and, if possible, repair. The point of the anchor may coincide with the crack, so the anchor will be loosened. Under load, drywall can pull it out of the gap. When preparing the surface, all spots of mold and mildew are removed. The base surface is treated with an antiseptic.
- Calculate: measure distances, draw up an installation diagram.
- Mark the ceiling.
- Prepare, buy, store materials.
- Cut, mount the profile.
The wooden frame is additionally coated with an antiseptic.
When arranging the base, a diagram is drawn up in advance, a calculation is made. When compiling the calculation, they are determined with the type of profile - wooden or iron.
Wireframe markup rules
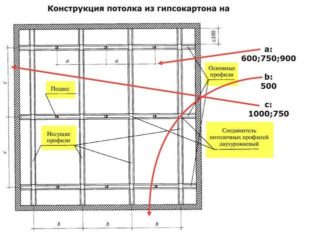
After the preparatory work, they proceed to the markup according to the drawn up scheme. For it, a chopping cord or a painter's thread is used. A previously drawn up diagram is transferred to the ceiling from paper or from an electronic carrier. Places of passage of profiles and suspensions are marked.
The markup itself goes like this:
- Determine the level of the ceiling according to the scheme.
- Scale the deferred level to the entire ceiling with marking of the profile passage points.
- From the first mark in each direction at a distance of 60 cm, they hammer in a nail, observing the level, then - equally along the entire wall.
- A thread is pulled between the marks along the perimeter of the wall, which will be the primary indicator of the level of the rails.
Next, the thread is pulled between opposite points of the marks to create guide lines. It is important to make the correct markings in accordance with the size of the sheet of material. For this, a preliminary drawing of the layout of the sheets does not interfere.
Required tools and materials
To prepare for installation, you will need tools:
- roulette;
- pencil;
- thread or cord;
- bubble or laser level;
- nails or screws;
- hammer, screwdriver.
The profile is cut in advance or in place.
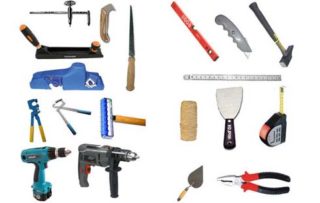
Tools are useful for installation work:
- Perforator for making holes for dowels, fixing guides, hangers.
- Drill with drills for metal. When installing a wooden frame - on a tree.
- Screwdriver.
- Hammer, scissors, hacksaw for metal.
- It is convenient to use a cutter to connect profiles to each other. It fixes metal better than small screws.
Materials to work with:
- bearing and guide profiles;
- fasteners - metal screws, dowels, crabs, hangers;
- mounting or damper tape;
- adjustable suspensions as required;
- drywall sheets.
U-shaped brackets are pre-perforated along the entire length, easily bend at the attachment point.
Quick suspension - adjustable mount, has spokes in the mount. It is fixed by the spacer of two bent plates. It is necessary for connecting parts when it is impossible to use a direct suspension.
The cruciform crab is used in the places of the lintels of the bearing profiles. Attach them at right angles. Fixed with small screws.
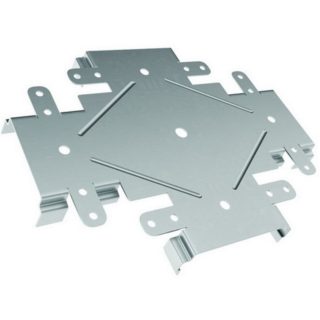
Profile connector - a plate with a repetition of the transverse shape of the rail, connecting its parts for extension. Fastened into grooves, fixed with self-tapping screws.
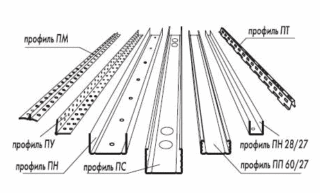
The appearance of the profile is similar to that of wall fasteners. It features several rows of stamped profile to strengthen the bearing surface. In vertical slats, the edges are simply bent inward. The metal on the wall profile is thinner, there are no bent edges on the sides, instead of stamped reinforcement there are only 2 longitudinal grooves.
Some finishers claim that a wall profile will go to fix the sheet, but it is better not to risk it.
Profile designation:
- Ceiling. The name on the Russian market is PP. European version - CD.
- Ceiling guide. The name on the Russian market is PN. The European version is UD.
Structurally, a wooden frame does not differ much from a metal one, it is only used for a wooden rough floor. Selection of material is an important condition. A 40 * 40 mm bar is suitable as a profile, and the frame row, on which the cladding sheet is directly attached, is made from a 60 * 30 mm bar. The first row is fixed to the ceiling with dowels. The second is on self-tapping screws for wood. In the places of intersection, pieces of fiberboard, backing washers are used for lining. With their help, they achieve a perfectly flat surface of the second row of timber.
DIY installation instructions
After preparing the materials and tools, the lattice is calculated from the profile.
- To calculate the number of longitudinal profile, divide the width of the room by an attachment step of 0.5 m. Count the number of beams in pieces.
- The transverse beams are counted with an attachment pitch of 0.5 m. Divide the length by step, multiply by the number of longitudinal stripes. Count the number in pieces. The step of the transverse fasteners can be increased to save materials up to 0.7–0.8 m. On the Internet, you can apply the calculation through the program "Calculator for calculating the GKL ceiling".
- Saw out with scissors, a grinder, a metal saw, the necessary lengths in size.
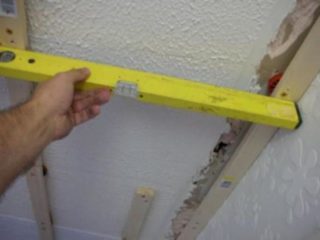
At the end of the figured cutting, they begin to fasten the frame. It should be clearly horizontal. Of the tools, self-tapping screws, a screwdriver, a level, a puncher are used. The profile is prepared: PP 60/27 ceiling, PN 28/27 guide.
Fastening technology of frame ceiling for gypsum board:
- Check the level of the pre-marked fasteners. The frame should hang strictly horizontally.
- Along the perimeter, observing the level, the guide profiles are fixed with dowels into the prepared holes.
- The fastening of the longitudinal profiles is started. To do this, pull the thread between the marks of the future base, mark the attachment points of the suspensions on the ceiling.
- Suspensions are fixed with dowels into the holes made - U-shaped plates from a perforated profile. Fastened strictly along the marking thread, which indicates the position of the frame for attaching the gypsum board.
- The profile is screwed onto the U-shaped mount with self-tapping screws. Observe the level along the thread: it should not be pulled by the material. Check the evenness of the suspension with longitudinal, transverse threads. Next, the rest of the profiles are attached. The primary framework is ready.
- Proceed to fastening the crossbars with crabs. Crabs are drilled to the profile with self-tapping screws and a drill.
- At the end, check the evenness by pulling the threads along the marks. They should not be stretched. If necessary, correct individual areas. The frame is ready.
Fastening of gypsum board and gypsum fiber boards is carried out mainly across the bearing profiles. For the convenience of puttying, the edge adjacent to the wall is trimmed. For fastening, GKL sheets are installed according to the project using a telescopic lift or props. Then they are screwed to the frame with self-tapping screws with final adjustment in place. Fastening the sheet close to the edge is not allowed due to possible cracking.
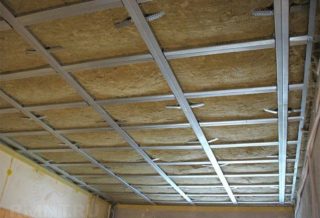
The installation of heat and sound insulation is carried out simultaneously with the installation of each sheathing sheet. The thickness, weight of the insulating layer is taken into account when calculating the load. Adjacent sheets are fastened at a distance of at least a step of the bearing profile. From the ends of the plates at the joints, a chamfer is removed by 2/3 of the sheet thickness. Sheets of material are fastened with self-tapping screws with a spacing of 150 mm.
Attachment distance to the edge of the sheet:
- For gypsum board - not less than 15 mm from the cut edge, not closer than 10 mm from glued with cardboard.
- For gypsum fiber materials - 10 mm from the edge.
Gypsum fiber boards from 12.5 mm can be fastened with a large pitch of 200 mm. Building boards are fixed to the frame with TN screws, and fiber boards - with MN self-tapping screws.
During the installation phase, the wiring for the lighting fixtures from the nearest junction box is prepared. A profile with holes for electrical wiring is required for the wiring device. Or they are done on their own.


