Sheets of metal tiles from rolled steel are protected from corrosion with a polymer layer, steps and waves are stamped on the surface. The material is used as a high performance roof covering. During installation, the technology is observed, the overlap of the metal tile is taken into account in length, width, in order to protect the surface from leakage.
Material fastening rules
Lay the sheets from right to left, putting the first two elements. The first panel is fixed at the bottom right, while the bottom must coincide with the edge of the sheathing. The second is placed on top, overlapping the capillary groove.
Metal tiles are mounted according to the rules:
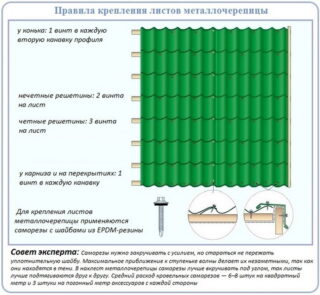
- screws are attached to the lower part of the wave; hardware cannot be placed on the top of the ridge;
- the lower edge and the area near the wind bar are fixed with nails in each wave;
- the fit is achieved by displacing the centers by 55 mm in the superimposed waves in the direction of the overlap of the upper sheet and along the line from the overlap for the lower one.
Self-tapping screws without seals are not used; it is impossible to hammer in nails with a hammer. They step with their foot in the lower region of the wave at the location of the rails when walking on the roof for installation. Slices of sheets and damaged areas are immediately painted over with the same color composition from a spray can.
Fixing to the crate
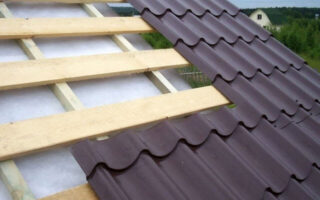
The supporting frame is assembled from lumber of the same section, more often boards with a width of 120 - 150 mm are used. They are installed on the rafters at the same distance so that the laths coincide with the pitch of the concave rows of metal tiles.
Fixing rules to the crate:
- On the slopes, self-tapping screws are screwed along the line, which is 120 - 150 mm below the stamping line between the ridges of the roofing material.
- With a properly executed lathing, the hardware is attached to any suitable place, and there is always a wooden lining there.
- The sheets are placed so that there is no technological gap between them and the boards - this way, deformation can be avoided.
- The fasteners are always placed in the shade of the ridge, so they provide reliable fixation and the hardware is not visible.
Another option for the base for fastening metal tiles is a continuous sheathing layer made of OSB boards.
Installation of metal tiles in difficult places
When arranging the valley under the cover, a solid base is made of boards at a distance of 450 - 500 mm from the center of the line. The lower part of the valley is fixed with clamps so that from the edge of the sheet to the bottom is 100 mm. The top covering of the valley is placed on the metal tile, fixed at 200 - 300 mm intervals.
Other places:
- The pediment is mounted with the closure of the upper wave profile of the material.
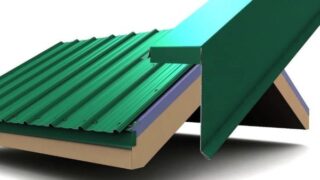
- The elements of the ridge strip are joined with the overlap of the adjacent part by 100 mm. For fastening to the crate, self-tapping screws 80 mm long are used, and the sheets are fastened together with hardware 35 mm long.
When tracing the chimney, roofing material is removed by 150 mm to the pipe walls. To install a galvanized strip in the pipe, make a groove 15 mm deep.
A decorative apron is placed after installing the metal tile, fixed with roofing nails with a gasket.
Installation of a wall profile
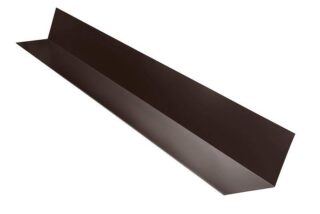
The element is mounted in the places where the roof covering approaches the wall, the sides of the dormer windows. The profile is placed on top of the tiles, fixed to the walls.
The work is done in this order:
- Place the bottom wall profile on the wall. First, the cuts are marked for chipping with a grinder.
- The upper bent part of the lining is laid in the groove, the vertical wall is pressed, fixed with self-tapping screws with a seal, the parts are overlapped (150 mm).
- The main roofing material is mounted on top.
Decorate the junction with a decorative wall strip, which is placed at the end of the installation of the coating.
When installing the bottom panel of the metal tile, a thin galvanized sheet is placed from the pipe to the eaves overhang.
Width overlap
If the sheets need to be cut, decorative overlays are used, they are mounted in the bottom-up direction. Sealing gaskets between the tile and the part are not used, and the components are installed with an overlap of 100 mm or more. Self-tapping screws are used with rubber pads to prevent damage to the top layer.
The end plates are also fitted with an overlap, which is always greater than 20 mm. The size of the wave is adjusted to the width of the roof slope so that the crest of the wave does not appear on the pediment. The eaves plank is placed with an overlap of 100 mm on the sheathing board, to which it is fixed with nails.
Length overlap
Manufacturers do not recommend working with strips of metal tiles that are more than four meters in length in order to avoid forced deformation during installation. If the slopes are larger in size, you have to join the metal tile along the length.
Connection organization rules:
- Docking is done by means of a lock. The lower sheets are made longer than the upper ones, they are cut off from the top of the step by 50 - 100 mm, depending on the pattern. The first one modular standard sheet is 500 mm.
- On the second sheet, add 350 mm to this dimension, then the second two modular sheet of 850 mm will come out.
With a tight joining above the lying and bottom sheet, a lock is obtained. The joint is not visible on the roof plane, it does not affect the tightness, and it is more convenient to work with short panels. The locking joint along the length is made in one line along the entire length of the roof slope.
Sheets are mounted from bottom to top from right to left according to a certain pattern. When calculating the length, the overhang of the metal tile on the eaves of the roof is taken into account.
If the roof slope is less than 14 °, the longitudinal and transverse joints are additionally sealed.
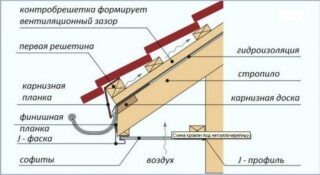
Eaves overhang of metal roofing
Installation rules:
- cornice strips are joined with an overlap of 50 - 100 mm, fixed with self-tapping screws with a flat head;
- the overhang is sutured with a profiled sheet, facade panels, siding, strips of material are placed perpendicularly or along the bottom of the wall;
- the end parts are decorated with a frontal board;
- for laying the eaves in the rafters, recesses are provided;
- there are depressions on the cornice board for the passage of the gutter fasteners.
For filing, a crate is used, and ventilation gaps are provided between the lining parts. The cornice board is fastened with a stretch so that it does not make noise in the wind.
Choice of snow guards
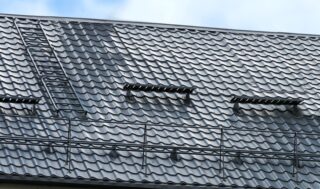
Elements provide a gradual snow melt, prevent the simultaneous collapse of the entire mass.
Snow holders are used in several types:
- tubular;
- lattice;
- corner.
The pipe is fixed along the entire slope, fixed on the metal roofing in those places where the load-bearing wall passes. Snow guards must not be attached to the eaves. On a sloping roof, the elements are placed in several rows.
Lattices are produced in different heights, usually they are installed on the lower part of the roof.There are models with or without supports. Corner ones are made in the form of a thin profile covered with polymers on the metal surface. The budget option is fixed with self-tapping screws at the top of the wave.
Dormer windows with gable
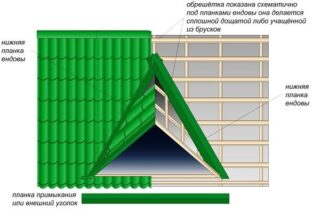
The triangular structure is similar to a multi-gable roof. The slopes of the window roof are joined with the main slopes to form gutters (valleys).
The scheme of sheets is calculated so as to take into account the exit of the valley to the roof slope. In this place, a horizontal lock is made using an additional sheet of 450 - 500 mm in size. In another version, a lock is made in the place of the valley protrusion on the slope.
In these places, they put a solid crate - add another board between the standard elements. On the cornice of the window, a cornice strip is mounted, and the adjoining strip to the side of the window is cut 200 mm above the exit of the valley.
For precise adhesion, quarters are cut out, and the cavity under the valley is protected with a windproof film. A part is made from the abutment bar to protect the horizontal line from precipitation.
Installation tools
For marking the roof mounting scheme, cutting sheets, use a tape measure, a pencil, a square. The correctness of the installation is coordinated with the help of a building level, a plumb line.
Other tools for the job:
- screwdriver, drill, perforator, grinder, circular saw;
- scissors for iron, hacksaw for metal;
- hammer, pliers, construction knife with spare parts.
The metal tile cannot be cut with a grinder, so as not to violate the integrity of the protective layer on the surface. Use a circular saw with a disc to work on iron. A screwdriver is chosen with a limiter in order to press the screws to the correct depth.

