Siding protects the surface of the slopes from wind, sun and rain, and also creates a complete design of the opening. In manufacturing, the boards are shaped so that the vertical area of each of them stands at an angle to the wall or slope. The horizontal protrusions of the next panel overhang the previous ones. Water drains away without getting into the framing seam. Siding outside window decoration refers to the frame type of cladding.
Advantages of siding in the design of slopes
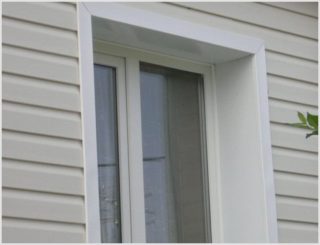
The technology of the siding finishing device involves the use of a ribbed, extruded profile. The coating turns out to be interesting and original, panels of different colors and textures are produced. The boards imitate natural materials in the form of stone, expensive wood.
Siding is popular due to its positive characteristics:
- high resistance to sunlight;
- withstands heating up to 85 °;
- the strength of the surface and attachment points (joints do not weaken throughout the entire period of work);
- does not react to alkaline and acidic components in the atmosphere;
- in the event of a fire, it self-extinguishes in the absence of an ignition source;
- does not emit components hazardous to health into the ambient air.
In the construction market, the material has an acceptable cost, therefore, finishing window openings with siding is common in private construction. You can sheathe the slopes with a profile with your own hands. Windows with such a cladding are distinguished by even outlines, they look stylish and neat.
For protection against corrosion in the production process, metal panels are coated with polymer compounds, which form a protective layer on the surface. Wood siding is also treated with impregnations to increase its resistance to humid climates. The standard version is overlapped, so there is no need to install a windproof membrane.
Varieties of siding
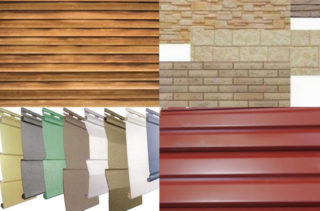
Sheathing material is produced in the form of long panels with a corrugated surface, which, when assembled, form a uniform coating. Strips with fastening strips along the edges are made by stamping, which imitates the selected texture, logs, boards, stones, bricks.
Different materials serve as the basis for siding:
- plastic: acrylic or vinyl;
- metal: copper, steel, aluminum.
By purpose, the material is divided into front and basement. The first variety is used to trim the window when siding the entire facade and get a uniform coating. They produce panels that are located vertically or horizontally, for private buildings they use the second type.
Regardless of the type, the material contains similar structural elements. All strip types have mounting holes at the edges to fix them to the base. The width of the panel is made from 10 to 30 cm, length is 2 - 6 m. The thickness of the profile is 1 - 8 mm. Distinguish between a double profile, for example, the texture of a ship board, or single (herringbone).
Vinyl
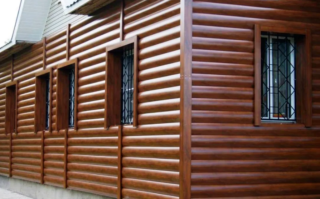
The PVC material (polyvinyl chloride) contains 80 - 82% of the total mass, the rest is represented by modifiers and stabilizers to improve technical characteristics, coloring pigments are also added.
Varieties of additives:
- Titanium dioxide in the upper layer occupies 10%, stabilizes the structure and ensures the durability of dyes, increases the resistance to UV rays, and retains the external color.
- Calcium carbonate makes up 15% of the mass of the reverse side, fills the gaps in the structure.
- Divinyl (butadiene) is contained in the amount of 1% and increases the service life of the panels, increases the resistance to wear.
- Impact enhancement additives.
- Lubricants to increase slip during production and to prevent strips from sticking during transport.
- Paints and pigments for color.
Acrylic siding is an improved version of vinyl panel, the only difference is in the choice of raw materials. Acrylic polymers in the outer layer, organic, crystalline, inorganic substances (ASA additives) are added to the PVC base. Substances increase quality characteristics.
The PVC and acrylic profile transforms the house beyond recognition, the material is not afraid of water, does not absorb moisture and household vapors. The variety tolerates frost and heat, does not collapse when temperatures change. Easy to put in order by washing with a hose, while the jet removes dust, dirt, splashes. The material will serve on windows for 20 years without losing its original qualities.
Metal
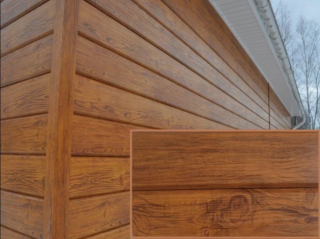
Previously, metal siding was used to cover warehouses, production halls, supermarkets. Modern steel panels are produced in such a shape and color that the finished surface is difficult to distinguish from a log cabin or elite brickwork.
In the course of manufacturing, an anti-corrosion composition is applied to the surface of the boards, which significantly extends the life of the panels as part of the finishing layer. Steel planks do not lose their elasticity when heated or cooled.
Main positive qualities:
- easily mounted around windows, does not require professional installation skills;
- due to the long length of the panels, fewer joints are obtained;
- differs in a low price compared to the materials that he imitates;
- unpretentious in cleaning and care;
- qualitatively protects the slopes and areas around the windows from atmospheric influences;
- masks the flaws in the installation of windows, closes the joints.
The disadvantage of metal siding is that it puts unnecessary stress on the foundation. If a dent or scratch appears on the surface, it is almost impossible to mask the defects.
Required tools and accessories
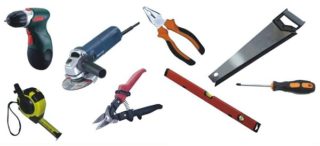
Finishing window slopes outside with different types of siding occurs using a similar technology, therefore, devices and tools are used similar. The difference lies in cutting the profile to size. Plastic siding is cut with a hacksaw for metal with small and frequent teeth, an electric jigsaw, and for steel strips, tools are used that do not form jags in the grooves. Take a hacksaw or iron scissors, use a hand circular saw or an electric circular saw. According to the instructions, you can not cut with a grinder with a circle for metal. The abrasive coating leaves a ragged mark that corrodes the iron. A punching shear is used to form the holes.
Required tools:
- tape measure 5 m, pencil, construction square, level, protractor;
- drill, puncher, screwdriver;
- screwdriver, hammer, pliers, knife, punch.
Platbands, ebbs, initial and final strips, window moldings from the siding system are prepared as components. The set is made up, having before the eyes a specific version of the window that needs to be sheathed.
Instructions for decorating windows outside do it yourself
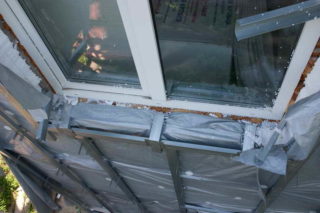
Fastening of frame elements is required to trim windows. To do this, a rail is installed along the perimeter of the opening at a distance of 10 mm from the window frame for the installation of accessories. Additionally, a beam is placed for the near-window molding or the installation of an external corner element.The slats are fixed to the wall with dowels with self-tapping screws, wooden bars are fastened together with screws, and the galvanized profile is connected with a self-tapping “flea” screw.
The material of the frame is chosen by the owner. Use a wood lath treated with linseed oil with a section of 25 x 50 mm or a galvanized profile CD-60 and UD-25. To level the area of the frame, ES brackets are used, the length of which is 90, 120, 200 mm when folded.
Before starting, the window opening is prepared, the interfering elements are dismantled. They remove cashing, slopes, sill strips from the outside, remove the ebb. The surface of the slopes is cleaned of layers, rising paint.
The existing cracks are sewn up, they are sealed with a solution of sand and cement. For small ones, use a starting putty for outdoor work. After applying the solution, let it dry, sand the surface and primer with deep penetration compounds.
Finishing windows without slopes on the wall
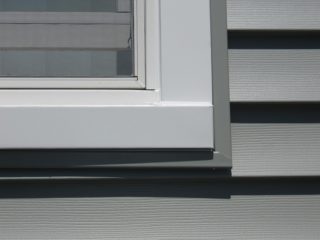
Sometimes trim is done around the window, which is flush with the outer wall and does not have deep slopes. In this case, a structure on a crate resembling platbands is made from siding. The starting and ending strips are fixed to the frame from the rail. The starting one is placed in the lower part under the window, and the finishing one is mounted at the top and on both sides.
Step-by-step procedure:
- measure the dimensions of the opening in width and height;
- installation starts from the bottom bar, on which marks are made at 45 ° from both ends and the bar is cut in the form of a trapezoid;
- side parts are made in a similar way, the difference is that the corner is cut off only at the top, this is done on the opposite platband;
- the upper part is placed without beveled sidewalls, its length is equal to the width of the window opening plus the width of the casing.
Symmetrical cuts on the sides of the window should be the same length and at the same angles. The elements are attached to the lattice with self-tapping screws or glued to liquid nails. Sometimes the edging strip is taken in a contrasting color.
Decorating windows with slopes
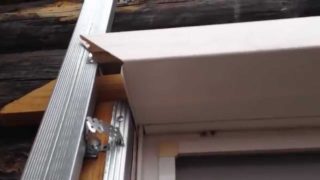
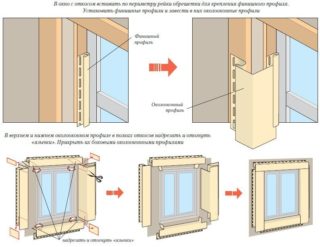
Along the outer contour of the frame, a starting strip is mounted on the slope, which is placed with the help of a square and a level so that the sheathing falls into its edge when sealing the area.
The second step concerns the starting strip, which is attached to the contour of the window frame. Installation is carried out in such a way as to observe the exact geometric dimensions and take into account the symmetry of the lateral planes on both sides. Horizontal and vertical sections are joined at an angle of 45 °.
Next steps:
- measure the dimensions of the slopes obtained between the installed strips, transfer them to the siding strips and cut them off;
- the parts are wound with their ends in the gap of the initial strips, each one is snapped to the previous segment and screwed to the bar with self-tapping screws;
- for the upper section, cut out a horizontal strip or pick it up along the length with transverse fragments.
When performing work, take into account that vinyl siding can expand at different air temperatures. It is impossible to put the elements back to back, so that gaps do not appear and there is no swelling of the profile. In the final strip, locks are cut to fix the strip, for which a punch is purchased. If this device is not available, carefully cut through the sections with a knife so as not to destroy the body of the panel.
Features of the work
Manufacturers of individual siding brands bake special components for their system. When buying, they are interested in such elements from the seller in order to purchase the most suitable option.
Features of the installation:
- use only high-quality fittings of the brand that is installed;
- so that there are no gaps between the parts, cuts are made at an angle of 45 ° from the lateral ends of the siding boards;
- measurements are performed carefully, sometimes a protractor is used to correctly transfer the angle to the surface of the material;
- use galvanized screws, nails and screws, and screw them at right angles to the installation area;
- when installing the siding, arched slopes are edged with a J-profile, which is attached near the frame, and an external corner is used along the outer contour;
- each subsequent piece of sheathing is cut out after installing the previous one, and all the pieces are not cut at once.
The galvanized profile is better suited for outdoor use. The metal elements of the frame have a verified geometry, which makes it easier to expose a flat surface. Before use, the wooden strip is dried in the shade under a canopy, spreading it over the surface and pressing it down over the entire area. Dry material is treated with linseed oil heated to 60 °.


