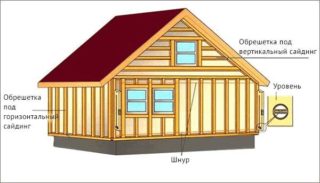
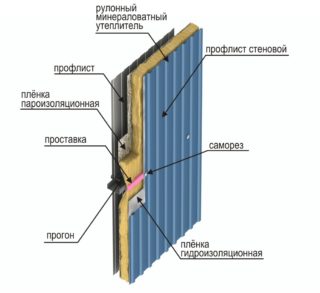
The cladding of the house is made on a frame made of strips or a metal profile, which is mounted on the surface of the wall with a certain step. The lathing for siding aligns the plane and serves as the basis for installing strips. The result is a ventilated facade, where insulation, vapor barrier and a protective film from moisture are attached between the frame elements.
Types of battens and their features
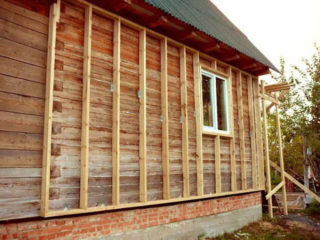
The trim can be mounted on a wall without lathing if the vertical fence is made strictly level and does not have protrusions and depressions. Usually, an external insulation is installed along with the panels, so an air gap and installation of the frame are needed. The protective layer gets wet and becomes a conductor of cold without a ventilated gap.
Materials for wall lathing:
- wooden slats;
- metallic profile.
For fastening the frame elements to the wall, ES brackets are used, which are used to install the steel system under the drywall. Depending on the removal of the lathing, a length of 90, 120 or 150 mm is used, they are mounted under the bars and metal. The insulation is fixed with dowels with large caps (mushrooms). The waterproofing is pulled onto the slats and fixed with a stapler (wood), self-tapping screws (steel).
Wood
Bars with a cross section of 50 x 50 mm are used or slats with a size of 40 x 50 mm are used. Choose dry wood with a moisture content of no more than 12 - 14%. Various species are used, but coniferous material is preferable, which contains resinous substances in its composition.
Wooden slats are rarely perfectly flat, unlike metal elements, so there is a certain difficulty in making a perfect area for supporting the strips. During storage, the bars dry out, so they get bent and twisted, minor deformations interfere with work. For storage, the slats are laid out in an even layer under a canopy and pressed with a load over the entire plane.
The bars are treated with heated linseed oil or antiseptics are used against decay, moisture and the reproduction of bugs. Antipyretics penetrate deeply into the body of the wood and provide reliable protection. They are applied with a brush or roller.
Metal
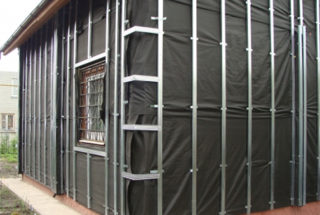
Use special profiles of the plasterboard finishing system. To increase the rigidity in the frame of the sheathing, transverse jumpers are placed under the metal profile siding.
Profiles are used:
- guide strips type UD;
- CD stands;
- connecting elements for racks;
- cross joints for crossbars.
Metal profiles are durable materials, more often they are produced with a zinc coating. The configuration assumes stiffening ribs, bends are provided on the sides for attaching to brackets. Metal is placed on concrete, cinder block, brick, wooden walls. The purlin thickness ranges from 0.45 to 0.5 mm.
Connectors are installed if the walls of the house exceed 3 or 4 meters (standard length of profiles). Optimal dimensions allow erecting a frame without waste and economical use of space.
Pitch standard for profile installation
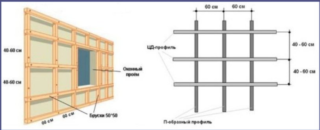
The step between the profiles is chosen at the level of 40 - 50 cm, the exact value depends on the severity of the material. A gap of 25 - 40 mm is obtained to the wall, the distance is determined by the curvature of the vertical fence. The staples are placed at a distance of 40 - 50 cm.
The disadvantages of marking in the form of protruding edges of the profile will certainly manifest themselves on the front of the siding, so you need to be careful about the calculation. The profiles are set so that they are located in a plane along their width (60 mm) and do not turn out when fastened in a bracket. To do this, pull the thread and make sure that the profile touches it with both edges.
DIY installation features
Prepare the necessary tool:
- Bulgarian, iron scissors;
- hammer drill, electric drill, Phillips screwdriver;
- measuring devices;
- hammer, pliers, hacksaw with a blade for metal and wood.
Peeling plaster is removed, cracks on the walls are repaired. In stone, a solution is used, and wooden cracks are clogged with tow. On high walls, a metal crate is mounted from a scaffold or scaffolding.
Wooden lathing
Hanging brackets for vertical bars are marked and mounted. The racks are installed starting from the corner, while double sheer elements are attached on different sides to make the base for the installation of the corner element of the siding system.
Next steps:
- after the vertical fastening of the bar to the opposite corner, several cords are pulled along the height of the wall, along which the remaining bars are mounted;
- fasten along the length using plasterboard profile connectors (if the width is suitable) or use metal side plates;
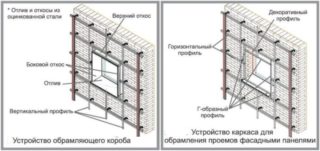
- frame window and door slopes with slats under the initial siding strips.
Insulation is placed between the slats and attached to the wall. A waterproofing membrane is pulled over the plane of the wooden lathing.
Metal crate
Operating procedure:
- make markings for fixing the staples and drill holes with a puncher;
- fix the holders for the stands, pull the fishing line;
- the vertical parts of the frame are fixed to them, checking the horizontal and vertical level;
- between the racks, a heater is fixed to the wall;
- put steam and waterproofing.
They use various hardware when installing the lathing from a metal profile. To a wall made of brick, concrete, adobe, the staples are most often fixed with a dowel with a self-tapping screw, more often they take a size of 8 x 120 mm or 10 x 150 mm. Self-tapping screws are used on surfaces made of aerated concrete and wood. Metal profiles and staples are fastened together with a self-tapping flea.
For basement siding
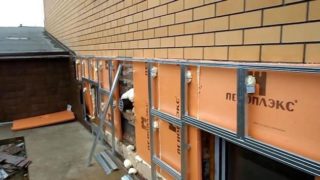
For the basement or balcony of the first floor of an apartment building, metal or plastic siding is used.
Installation order:
- They fix the staples with dowels, use a punch or drill, depending on the material of the walls.
- Expose vertical posts and horizontal pads under the framing of the basement protrusion in order to subsequently fix the wall ebb.
- Check the correct direction vertically and horizontally.
The plinth is located in the immediate vicinity of the ground and the frame material absorbs soil moisture, therefore, it is preferable to install a crate from a profile than from a wooden bar.
For corrugated board
The step between the profiles for fixing the corrugated board is made 50 - 60 mm, since the material has rigidity, thanks to the corrugation protrusions on the surface. In places around the windows, a continuous crate is made of chipboard panels or moisture-resistant plywood, by analogy with a frame for a profiled roof sheet. It is not allowed to mark the holders so that the fastening hardware gets into the masonry mortar (seam).
With insulation
Sometimes the thickness of the insulation is increased due to climatic features, for example, up to 100-150 mm, and the length of the U-shaped bracket (80 or 100 mm) is not enough. If the projection of the rail is not enough to install the insulation in thickness, lining is made in the form of short bars for fastening the suspension.
Work order:
- the material is cut into pieces;
- a heater is placed between the vertical posts;
- fix the cotton wool to the wall with dowels;
- stretch a film of a wind barrier, a superdiffuse membrane.
The film protects the insulation against condensation and moisture. The vapor barrier retains water from the outside and releases household vapors from the inside.
Tips & Tricks
When installing corner profiles or slats, a distance of 10 cm from the corner is left. Usually this is enough for attaching rotary siding elements, but their dimensions must be taken into account so that the screws do not fall into the void.
Before choosing the step of the racks, measure the width of the insulation strip and take a gap of 2-3 cm less than half of the roll. The hardware is calculated so that there is one holder per 0.4 m of the rail or profile, therefore, 2 self-tapping screws.
Before installation, the roots and nearby growing plants are removed so that they do not damage the frame and reduce its strength and rigidity.



A very useful site.