The fencing of the plots is designed to ensure the safety of the owners and at the same time be an adornment of a residential building or summer cottage. Improper installation of fence posts will soon make the fence dangerous due to the possibility of falling, spoil the appearance of the structure. The type of supports and the installation procedure depend on the composition of the soil, the mass of the filling material, and climatic conditions. All this must be taken into account already at the design stage.
Materials for self-construction of a fence
The fence will turn out to be reliable and beautiful if you choose the right materials for all structural elements, and compliance with the installation rules will exclude the influence of wind loads and heaving soil.
The most common building materials suitable for making uprights are wood, metal, concrete and brick.
Wood
Wooden poles are used to make the simplest fences, for example, for picket fences, chain-link netting, wattle fences.
Material advantages:
- low price;
- availability for sale;
- ease of handling and installation.
With all the advantages, the tree has a significant drawback - it quickly deteriorates in the open air from exposure to sunlight and moisture. Therefore, when installing the supports, special attention is paid to protecting the wood from decay. The underground part of the pillars is treated with open fire, impregnated with antiseptics or resinated with natural or chemical compounds. The ground part is annually painted or covered with protective varnishes.
The flammability of wood is the second important drawback, which can be corrected by impregnating the material with fire retardant mixtures. This must be done annually, since the composition eventually loses its ability to withstand an open fire.
Methods for installing wooden supports:
- By hammering. The lower edge of the timber is sharpened with an ax or a plane. Striking the rack with a hammer, they hammer it into the ground.
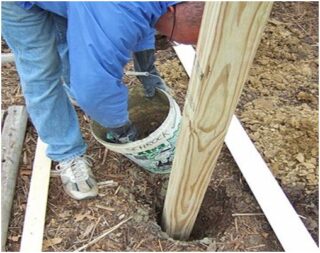
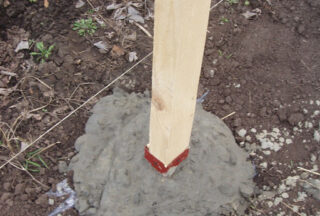
- By concreting. Tear off a hole with a diameter of 150 mm and a depth of 600 mm. A pre-treated pillar is placed and the concrete is poured.
- Installation in a thermowell. It differs from the concreting method in that the post is placed in a pipe made of plastic, metal or a box made of boards. The space between the post and the sleeve is concreted, and the outer space is covered with earth and rammed.
The first method is used for temporary fences, so the service life of the supports rarely exceeds 4–5 years in this case. After that, the wood will rot or break from the wind load or be squeezed out in heaving clay soils.
Concreting increases the life of the fence up to 10 years.
Metal
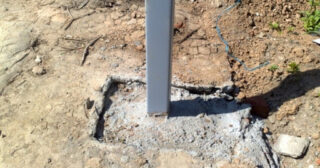
Metal posts are universal and are suitable for fences made of wood, corrugated sheet, polycarbonate, chain-link, steel pipes or round fittings.
Brick supports are also laid around an iron pipe or rod.
Advantages:
- ease of installation;
- versatility;
- low price;
- durability.
To fasten the logs, you will need a welding machine or a drill, which makes it difficult to carry out work in a non-electrified area.
Despite their durability, the poles require maintenance during operation - timely painting will increase the service life.
Metal racks are mounted by hammering, concreting with butting.
Concrete
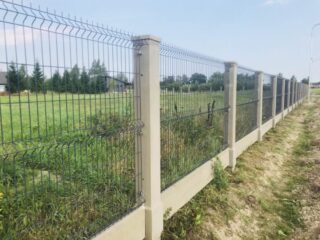
You can install a fence using ready-made or homemade concrete supports. The material is durable, not afraid of dampness, strong. Finished posts can be decorated with decorative elements.
A variety of fences made of any materials are installed on concrete pillars.
Among the disadvantages are the high price of factory products and a large mass that makes it difficult to work - an assistant will be needed to put the fence.
Brick and natural stone
Fences made of these materials give the impression of monumentality, and their strength allows you to make any kind of filling. At the same time, the mass of materials makes increased demands on the arrangement of the foundation. On heaving soils, a weak foundation can cause the fence to tilt or fall, and dismantling and erecting a new structure will require considerable financial and labor costs.
The laying of brick posts is carried out around a concreted steel pipe or reinforcement, the diameter of which can be from 32 mm. Bookmarks for wickets or gates, as well as a reinforcing inter-row mesh, are welded to the pipe.
For pillars made of natural stone, formwork is prepared, which is gradually filled with stone and the joints are poured with cement-sand mortar. As the height of the masonry increases, the formwork is raised.
Installation instructions for fence posts
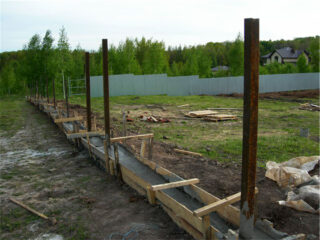
It is better to consider the methods of mounting supports using the example of metal structures, since the methods are universal and suitable for other materials.
Installation of fence posts made of steel pipes is carried out in several ways:
- driving in;
- concreting;
- butting;
- by concreting into a strip foundation.
The order of work is reduced to the implementation of sequential activities:
- Site preparation.
- Carrying out measurements and drawing up a diagram.
- Calculation of the required number of pipes and consumables.
- Terrain marking.
- Placing pillars relative to the vertical, strengthening the elements in the ground.
Depending on the chosen method, the technology of the work changes.
Site preparation
To simplify and speed up the work, the site for the future fence is prepared in advance. They remove construction waste, weed the grass, uproot trees and bushes. The width of the free working area must be at least 1 m, in this case the probability of accidental falls is reduced.
It is necessary to mark the line for mounting the posts with a construction cord. Mark the exact locations for the supports. Be sure to adhere to the construction plan of the site so as not to occupy the adjacent territory or a neighboring site.
The distance between the posts is chosen no more than 2.5 m, and for the chain-link no more than 3 m. In this case, the fence will withstand wind loads and will not squint.
Tools and materials
Based on the measurement results, the required amount of rolled metal and consumables is calculated: cement, sand, crushed stone, etc.

When calculating, it is taken into account that the pillar is deepened into the ground by 1–1.5 m. If you do it less, in the off-season the fence may tilt, as the soil will become wet and will not withstand the load. On heaving lands, shallow pillars can be squeezed out and lose verticality, destroying the fence.
Depending on the installation method, you will need:
- bayonet and shovel;
- container for mixing concrete;
- trowel or trowel;
- level or plumb line;
- rammer;
- brush, anti-corrosion primer and paint for outdoor use;
- welding machine or drill;
- sledgehammer or headstock for hammering.
For work, they provide for the supply of electricity and the supply of water, if concreting is carried out. The supports are pre-treated with an anti-corrosion primer and painted in 2-3 layers.
Driving in pillars
It is impossible to hammer a pillar into the soil with boulders. For clayey lands, you will need a mechanized tool. Clogged poles are unreliable and do not last long in wetlands.
The advantages of the method:
- low labor costs;
- no need for cement, sand, crushed stone for concreting;
- hammered supports are suitable for securing a chain-link or picket fence;
- easily dismantled.
The driving method is chosen when the diameter or cross-section of the posts does not exceed 50 mm. Other disadvantages include possible deformation of the upper part of the support from shock loads, deviations from the vertical level and relative fragility.
You can drive in pipes in several ways:
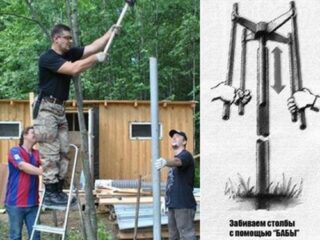
- With a sledgehammer. To protect the head from deformation, a wooden block is laid between the sledgehammer and the pipe.
- Using the headstock. An emphasis is attached to the post, and blows are carried out with a grandmother. It is important to keep an eye on the vertical. It is customary to use headstock for posts above 3 m.
- Perforator. A crown is used to make holes for the rosettes. suitable size or welded to the shank a homemade design.
- For a large area, specialists and mechanized copra are attracted.
The installation begins with the corner supports, between which the cord is then pulled to break the level.
Butting
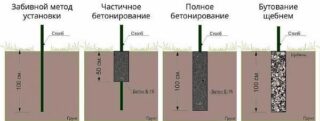
Dry concreting (butting) is one of the fastest and most economical installation methods.
The advantages of the method:
- versatility, suitable for most types of fences;
- crushed stone performs a drainage function;
- there is no need to mix the concrete solution, which reduces the cost of materials, physical labor and time.
Among the disadvantages are the repeated ramming during the first year of operation and the need to dig in the pillars to a depth greater than when concreting.
Step-by-step instruction:
- They mark the site.
- Dig holes 15–25 cm deep below the pipe installation level.
- A layer of 15–20 cm crushed stone is poured in, rammed.
- A pipe is installed, which is fixed in a vertical position with the help of spacers.
- Crushed stone is poured with a layer of 10-15 cm, sand is poured, which fills the voids between the stones, the layers are rammed.
The top layer is covered with a slide around the column so that the water can drain. It is advisable to concreting the outer layer.
Concreting
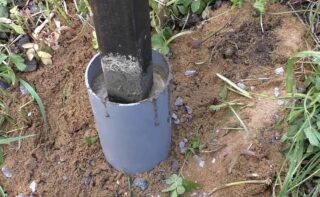
Pouring the pillars with concrete allows you to get the most durable base for the fence.
The advantages of the method:
- simplicity;
- the ability to work alone;
- versatility, you can make any fences;
A large amount of manual labor for moving cement, sand, crushed stone and mixing concrete is one of the disadvantages of concreting. In addition, possible dismantling will take a lot of time and effort.
The sequence of work differs little from butting:
- The site is marked.
- Dig holes.
- Set and fix the supporting ones. The pillars must be positioned strictly vertically.
- The hole is poured with concrete, rammed every 10–20 cm layer.
There are two ways of concreting: full and partial. In the first case, I put a pillow of sand and gravel at the bottom of the pit, on which a pillar is installed. This is followed by concreting. With a partial method, a 50-60 cm post is driven into the ground, and the rest is concreted.
Pillars in strip foundations
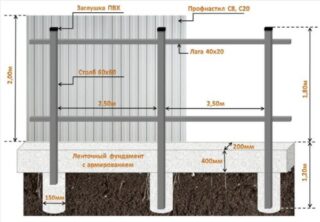
For fences with stone supports, strip foundations are most often poured. The same method is used to exclude a tunnel under the wall.
Step-by-step instruction:
- Prepare the area, the site should be flat, free of vegetation and debris.
- Markup is carried out.
- They dig a pit 50–60 cm deep and 15–20 cm wide.
- Reinforce the recess with metal or polymer rods.There should be at least 2 longitudinal lines in the vertical plane.
- Pillars are erected if the reinforcement steel elements are welded.
- Arrange the formwork 10-30 cm above the ground surface.
- For pillars made of bricks in the places where the pillars are installed, the formwork is expanded to 38 cm so that one and a half bricks can be laid.
- The foundation is poured with concrete.
The work will require a lot of materials and physical labor, but the result is distinguished by durability and increased strength.
Fence posts can be delivered independently or entrusted with the work of specialists, if the amount of work in the estimate is large. The main thing is to correctly determine the purpose of the fence and choose the option for mounting the supports. If everything is done correctly, the fence will last a long time, withstand weather changes and wind load.

