The first impression about the quality of any building is formed when looking at the quality of the entrance group. Correct and beautiful finishing of the slopes of the front door speaks of the wealth of the owner of the house or apartment. The work can be entrusted to specialists or performed independently. It is important to choose high-quality building material and find out the nuances of the work.
The concept of slopes and requirements for them
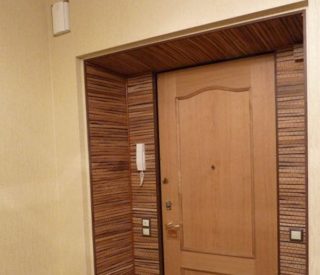
In construction, it is customary to call a doorway element a slope, which is a frame of a door outside and inside the premises.
If the thickness of the wall and the door is the same, it is sufficient to use platbands for facing. In most cases, the door frame is thinner than the walls, so finishing the door slopes is necessary.
There are two types of framing: plaster and plasterboard, plastic panels, MDF or wood.
Slopes are designed to serve several purposes:
- eliminate drafts between the door frame and walls;
- protect the room from moisture penetration of precipitation;
- to prevent the entry of cold outside the room and the outflow of heat from the inside during the cold season;
- improve sound insulation;
- improve the appearance of the front door, hiding the foam, anchors and the door frame.
Also, slopes are called the left, right and upper sides of the doorway, if the installation of the door is not provided. Sometimes such openings are called portals; they are also decorated with decorative materials.
Varieties of doorways
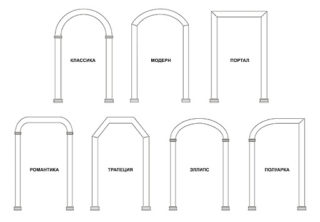
The configuration of doorways may differ depending on the designer's intention, as well as on whether the doors are to be installed.
Allocate forms:
- Rectangular, best suited for door installation. The option for finishing the slope of the entrance door can be very diverse: plaster or an invoice made of any materials. Finishing is within the power of a home craftsman; accuracy and accurate calculation are required.
- A classic arch is usually finished with plaster or elastic materials are used. It is rarely used for door installation due to its unusual shape and small assortment of joinery.
- The figured type is the most difficult to design and is rarely used for independent production.
- False arches are ordinary rectangular openings, the upper edge of which is equipped with an arch made of plasterboard or cut-out panels of laminated chipboard, MDF.
Thresholds and ceilings adjacent to the door frame of the wall are subject to finishing.
The procedure for installing the door and finishing the slopes
Depending on the configuration of the opening and the finishing method, the order of operations may differ, but in general it is the same:
- Measurement of the opening and selection of the door leaf with the frame.
- Jamb and door installation.
- Threshold decoration.
- Sheathing (plastering) of slopes.
- Surface finishing.
- Installation of additional elements - platbands, corners.
All finishing work is carried out after installing the door frame and door leaf.
Door assembly
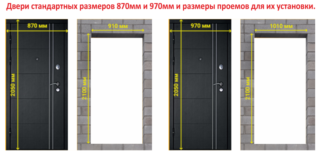
Domestic enterprises manufacture doors, taking into account GOST 6629-88b or the European standard DIN 18100. The geometric dimensions of the opening for which the door is intended are indicated in the designation of the door.The marking is carried out in decimeters.
The box should be 5–6 cm below the opening in height and 4–5 cm narrower in width.
Fastening the box to wooden walls is carried out with self-tapping screws, less often with nails. Brick and concrete are drilled with a perforator. Fasteners are carried out with screws through dowels or anchors.
Pay special attention to the lower crossbar of the box. After finishing, the brace should not protrude above the floor surface.
In damp rooms, in kitchens and in bathrooms, a gap of about 1 cm is left between the floor and the door leaf, through which air will enter the room for ventilation.
After hanging the canvas, the gap is foamed, which will make the structure stronger, better sound insulation.
Plaster finishing
To work you will need tools and accessories:
- container for mixing the solution;
- hammer drill for making plaster mix and fixing vertical planks;
- trowel (trowel);
- plumb line or any level;
- rule or flat board;
- mixer nozzle, screws, dowels.
For plastering, they purchase ready-made mixtures based on cement or gypsum, putty, deep penetration primer.
In order to save money, if there is cement and sand, the mixture is prepared independently. Proportions for mortar: cement: sand = 1: 4. The amount of water is selected based on the convenience of work.
As a rule, no additives are required in river sand. A plasticizer is added to the solution with quarry or washed sand. From available tools, you can apply a glass of oily clay to a bucket of solution or 3-5 grams of liquid soap.
For foam blocks and walls made of gypsum parts, you will need special plastering compounds or remnants of the glue on which the masonry was carried out - homemade sand-cement mixtures are not used.
Work algorithm:
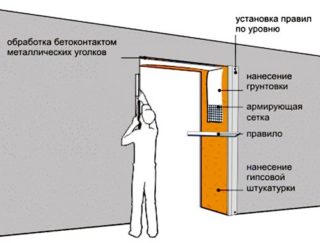
- Focusing on the position of the door jamb, a guide bar is attached to the wall, which will limit the angle of the wall.
- The surface of the wall is treated with a primer, which will bind dust and prevent water from the solution from quickly absorbing into the wall.
- After the primer has completely dried, the first layer of plaster is applied. The maximum thickness of one layer is 4–5 cm.
- A plaster mesh (if necessary) is sunk into the solution, the surface is leveled.
- Remove the level bar.
- The second layer of plaster is applied after 24 hours, at the same time a metal or plastic corner is installed to obtain an even cut. Experienced craftsmen, instead of a corner, carry out smoothing with a special tool - a corner.
- Carry out priming and putty of slopes.
Finishing is carried out by painting or wallpaper.
For plastering metal corners, they are pretreated with concrete contact.
Slopes from the side of the street are trimmed with mixtures for outdoor use.
Drywall
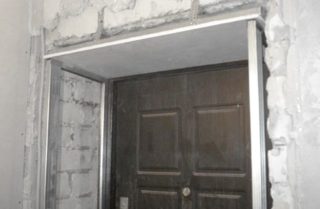
Plasterboard finishing speeds up the work and does not require special skills.
There is moisture-resistant drywall on sale, but in outdoor conditions, the service life will be short.
Material advantages:
- speed and manufacturability of work;
- relative cheapness;
- precise alignment of the walls;
- the availability of a variety of finishes;
There are two ways of attaching drywall sheets: glue and self-tapping screws. In the first case, you will need a knife or a hacksaw, a plumb line or a level, a container for an adhesive mixture, a spatula.
Adhesive mounting algorithm:
- The walls are cleaned of the remnants of dirt and dust, the influx of cement is chipped off with a hammer.
- The surface is primed.
- The sheets of the required size are measured and cut off, a control fit is carried out.
- A special assembly glue for drywall is kneaded, the required amount of the composition is applied to the wall.
- The sheet is pressed tightly to the base, fixed and kept for the time specified in the instructions.
- Allow the glue to dry, prime the surface.
- The slopes are putty with a coarse layer, and after it dries with a finishing compound.
- If necessary, grind the surface with sandpaper (mesh).
- Paint drywall or wallpaper.
Installation on a prepared frame is distinguished by the first operations:
- A frame made of a metal profile is mounted, and suspension brackets are used for this.
- The brackets are attached to the wall with self-tapping screws and dowels. To mount the profile on the brackets, self-tapping screws with a drill tip or blind rivets are used. The distance between the profile is chosen from 40 to 60 cm.
- The drywall is measured and cut into the required sheets.
- Fasten dry plaster to the frame with self-tapping screws with a fine thread pitch, recessed heads.
Further finishing consists in filling the sheets with the installation of corners.
Instead of a metal profile, it is permissible to use wooden blocks. In this case, self-tapping screws with a large pitch are chosen for fastening drywall.
PVC panels
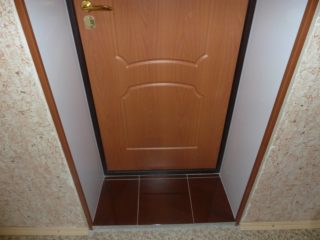
It is necessary to choose PVC panels very carefully, paying special attention to strength.
Among the advantages of the material:
- ease of installation;
- cheapness.
At the same time, PVC panels are more suitable for the slopes of window openings. In doors, material is often damaged by being hit by bags or other objects. Soft sheets can be dented by just touching them.
Installation is carried out on a pre-fabricated frame. Fastening is carried out with glue or self-tapping screws. In the second case, it is necessary to take into account the dimensions of the decorative corner, the sides of which must hide the heads of the fasteners.
Finishing processing of PVC panels is not required.
Repair of PVC door slopes after installation is impossible - it is necessary to dismantle and sheathe the slope with a new finish.
Overlays that can imitate stucco molding are stylistically combined with PVC panels. The elements are fixed with special glue.
Clapboard decoration
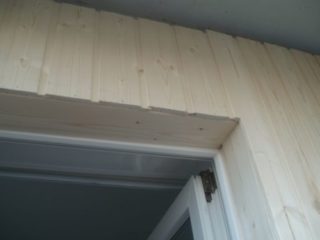
Wooden or plastic lining is a popular material with which you can sheathe slopes. The order of work with each material is different.
To install a wooden lining, you must:
- Fill up the gaps between the door frame and the walls. Use tow or polyurethane foam.
- Remove peeling plaster or masonry mortar with a hammer or perforator.
- Install the lathing from wooden planks.
- Mark, cut and install the required pieces of lining. For fastening, nails and clamps of a suitable size are used.
- Make out the inner corner of the junction of the slope to the door and the outer corner of the wall and the slope with additional corners.
Installation of plastic lining differs in that the joints and corners are hidden by pre-nailed starting strips and an outer corner. For fastening, a construction stapler or clamps are used. The choice depends on the characteristics of the lining.
MDF panels
Products have a thickness of 4 to 20 mm, they are installed in different ways, depending on this parameter. Plates of 4 mm are mounted in the same way as lining: I mount the frame, sheathe it with sheets cut to size. Joints and abutments are ennobled with universal corners. The piece is folded with a finish inward or outward and is used for an inside or outside corner.
When buying MDF, you need to purchase corners from the same seller. The shade and pattern may differ from different manufacturers or in different batches of goods. After a short time, it will be difficult to find the right angle.
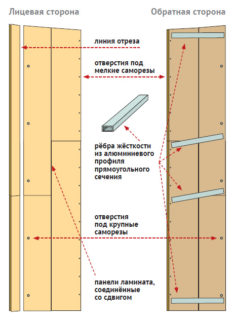
MDF sheets with a thickness of 10 or 20 mm are mounted according to a different scheme - a finished box is made, which is fixed in place. The sequence is as follows:
- The dimensions of the future facing of the slopes are precisely measured.
- Mark out MDF sheets by size. You should get 2 sides, an upper and a lower side.
- Before cutting, masking tape is glued along the cut line - the steel sole of the jigsaw in this case will not leave scratches on the panel.
- Collect the box.Self-tapping screws are used to fasten the panels. Before installing them, holes are drilled, which will protect the part from cracking.
- Install the box, align the vertical and horizontal with spacers. Use 4-5 bars on each side.
- Measure, cut out platbands.
- The platbands are attached to the spacer bars.
When installing MDF using the box method, the floor is carefully leveled. At each passage through the door, the weight of a person will act on the lower part and there should be no gap between the panel and the covering.
Decorating slopes with your own hands is not difficult, but requires a responsible approach to the quality of the work performed. It is worth assessing your strength and the estimated time for work. If in doubt, you should contact a specialized organization, which will help avoid mistakes and unnecessary spending on the purchase of materials.



The threshold must be fastened not from above, but from oneself to the end!