Clapboard decoration inside the house is one of the most popular options for a country cottage or summer cottage. The material is diverse, practical, and creates a feeling of comfort. The cladding is easy to handle and install.
Varieties of lining for house cladding
Lining - lamellas made of wood, plastic, MDF, even fiber cement. The dimensions are characteristic: length - from 100 to 300 cm, much exceeds the thickness - from 5.5 to 12 cm. According to its purpose, the material is a kind of facing board, but thanks to its device it is easier to lay it. On one side of the lamella there is a groove, on the other - a thorn. During installation, they are bonded to each other, forming a solid surface.
The lining is produced for interior and exterior decoration. The first option is usually thinner and does not exceed 12-15 mm. For it, materials are used that are more attractive in appearance, lighter, less durable. It is recommended, especially for a wooden building, to choose products made of vapor-permeable materials such as wood or MDF.
Wooden lining
Which clapboard is better to sheathe a house or cottage inside depends on the material of the walls. For a log house or a house made of timber, wood trim is best suited:
- Pine is the cheapest material, varied and of high quality. It will not be difficult to buy boards from pine of category "A".
- Aspen is very resistant to moisture, it is chosen for the kitchen, bathroom and bath.
- Birch is a very beautiful material with a silky sheen. Such cladding requires maintenance, since birch is prone to warping: the lining is periodically treated with oil and wax.
- Oak is a noble, very beautiful tree. Adds solidity and elegance to any room.
- Spruce - resistant to moisture, durable. It is not always suitable, since it has not only a characteristic texture, but also includes a large number of knots and spots.
- Linden - has a mild color and aroma. Not afraid of high temperatures and humidity.
Wooden lining is also chosen for quality. The latter is determined by the number of knots, dark spots, defects.
- "Extra class" - impeccably clean lamellas, without defects. It is better to collect them on clamps so as not to damage the material.
- "A" - roughness and captive knots are allowed - 1 per 4 running meters.
- "B" - there may be black knots, rare dark spots, shallow cracks.
- "C" - is more often used for finishing household premises. Here on 1 running meter there can be knots falling out and through cracks.
The quality of the board depends not only on the category, but also on the wood. Larch includes knots, so it is almost impossible to find "extra class" lamellas from this tree.
Other materials
You can sheathe the cottage with clapboard and other material:
- MDF is a high density wood chip material. Its main advantage is dimensional stability. MDF has good vapor permeability, is not afraid of water or steam, and is easy to install. MDF lamellas are quite suitable for finishing a wooden building.
- Polyvinyl chloride. Very lightweight boards, as they are hollow on the inside, imitate wood finishes of any quality and color. However, plastic lining is vapor-tight and fragile. It is quite suitable for finishing the kitchen, since it is not afraid of water, but it is inconvenient in living rooms.
When using plastic lining, you need to pay attention to ventilation.
Types of cladding by shape
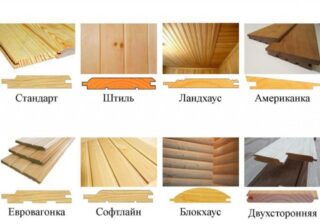
- Standard - flat, smooth boards, profiled.
- Block house - imitates a log, the outer side has a hemispherical shape.
- Soft-line - it is distinguished by smooth outlines and a wide spike.
- American - a board with a beveled edge. It is heavier than usual and is installed on a metal frame.
Many other options are produced, for example, a landhouse, where the surface of the lamella includes decorative recesses of various shapes.
Interior decoration instructions
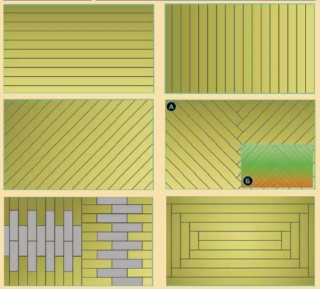
Finishing with eurolining inside a summer cottage or house begins with the choice of the installation method. Installation affects the interior:
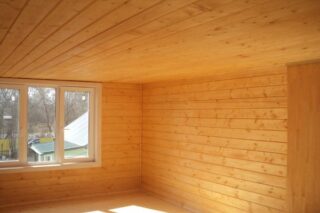
- horizontal - visually expands the room;
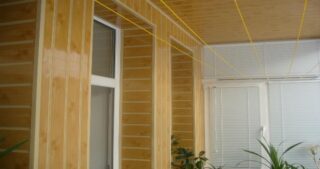
- vertical - visually raises the ceiling;
- diagonal - does both, the greatest effect is manifested when looking in the direction of laying;
- mixed - different methods are often combined to create a more complex effect;
- artistic - in this case, the material is cut to length, lamellas of different thickness, wood, texture are selected.
The more complex the installation scheme, the longer the repair takes.
Wall cladding with clapboard includes several stages:
- Preparatory work - cleaning the base walls, removing old finishes, surface treatment with antiseptic primers and impregnations.
- Installation of the frame - most often a wooden frame is chosen for a wooden house. However, in the kitchen or in the bathroom, metal structures are often installed, since they are more durable and can withstand heavy loads.
- Sheathing with boards - according to the chosen scheme.
- Plinth or decorative molding - it hides the gaps between the wall and floor, wall and ceiling.
Sometimes the cladding includes additional finishing work, for example, opening with varnish, staining, complex or simple staining.
Installing the frame
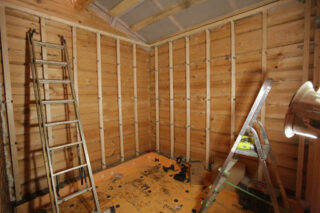
When installing the frame, 2 main conditions should be met: the frame slats are installed opposite to the direction of the future cladding; the frame should form a perfectly flat plane, since the lamellas do not have high flexibility.
- First of all, markings are performed on the wall. Usually the slats are placed at a distance of 50-60 cm from each other. Secure with self-tapping screws.
- The first slats are mounted in opposite corners. The distance to the corner should be at least 1–2 cm.
- A fishing line is fixed between the slats so that the remaining slats are set at the desired level. You can check the verticality with a construction plumb line.
The frame on the wall forms a convenient structure for insulation, if necessary. Suitable material - mineral or basalt mats, polyurethane foam or foam boards are placed in the cells between the planks. They are attached to the ceiling with special dowels. When mounted on a wall, the insulation does not need fasteners: the material is held by its own weight and finish.
It is recommended to pre-treat the timber for the frame with antiseptics or a primer.
Lining installation rules
It is better to dry the boards beforehand: leave them in the room where the finishing will be done for several days. This is how the material adapts to the operating conditions.
The sequence of the phased assembly is as follows.
- Installation can be started both from the floor and from the ceiling. Better the second option: the lamellas will most likely have to be cut, and it is easier to hide this with a plinth.
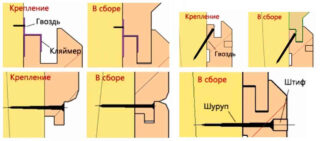
- The board is fixed in position with the spike down and fixed with a clip or a bracket to the rail. You can fix the lining with ordinary nails through the thorn. The first option is more aesthetically pleasing.
- The next lamella is inserted with a groove into the tenon.
- Boards can be fastened close to each other or with some gap to emphasize the texture of the wall.
The assembled lining can be varnished or painted.
Pros and cons of clapboard house cladding
Clapboard decoration has many advantages:
- even the most expensive option costs less than panels;
- produce material of any color and with any wood pattern;
- lamellas weigh little and do not constitute a load on the wall;
- the material is environmentally friendly and safe, even the plastic sheathing is completely hypoallergenic;
- installation takes a minimum of time and does not require effort.
The disadvantages of the lining are associated only with its role in the interior. Lamellas create a rigid geometric texture that does not match the classic style, baroque, hi-tech, techno.

