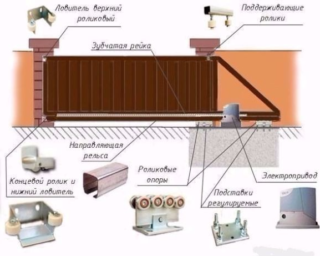
Sliding gates are compactly placed in the fence of the site, the structure does not require space in front of it to open the doors. The canvas moves on roller supports along the fence, while a person does not apply much effort. Home owners make do-it-yourself sliding gates to save money. The design protects the area from intrusion, regardless of mechanical or automatic opening.
- General information about sliding gates
- The principle of the structure
- Advantages and disadvantages of sliding gates
- Drawings and diagrams
- Standard sizes
- Nuances of design
- Selection of materials for sliding gates
- Necessary tools for the job
- DIY instructions
- Installation of pillars
- Laying the foundation
- Sash manufacturing
- Installation of the structure
- Operating rules
General information about sliding gates
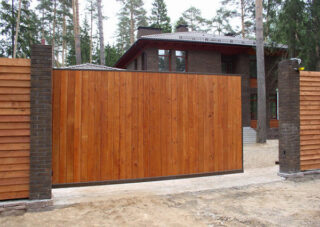
Travel is organized using a metal frame with a decorative insert or stitching. Two support beams are placed in the foundation, a gate structure with a profile girder (bearing) at the bottom of the frame is brought on to them.
The wheels are completely hidden in the lower channel, so the product looks neat from the inside and from the front side. The canvas moves sideways to the left or right along the fence. There is a design of sliding gates, when there are 2 canvases moving away from the center.
Opening methods:
- mechanical - the owner pushes the sash manually;
- automatic or electric - there is an electric drive on the structure, the web is controlled by a button on the base station or a remote control.
There are systems with the installation of upper rollers. The sash moves along the cantilever girder, which is located above the opening. Lack of the scheme in limiting the height of passing vehicles.
The principle of the structure
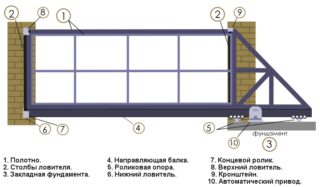
Roller carriages are securely fastened by welding or bolting to a load-bearing beam concreted in a pit. You can place a wicket in the canvas or provide it separately in the same style as the gate. The shank is rectangular or triangular. The first type is sewn up similarly to the visible canvas, so the sash looks like a solid rectangle.
This form is used for wide gates with an opening of 4 m. The drawing of sliding gates with a rectangular shank provides for the installation of a double set of supporting wheels from above.
Advantages and disadvantages of sliding gates
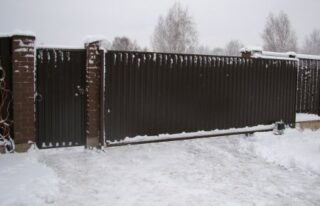
The exit structures are stable, since there are no horizontal and vertical loops for which the load is calculated. The weight of the web is transferred to the foundation, so the reliability does not decrease over time, regardless of the negative factors.
Other benefits:
- compact opening;
- independence from snow drifts;
- ease of movement and noiselessness;
- maintenance of wide openings;
- the ability to use any stitching inside;
- uncomplicated maintenance during operation.
The disadvantages are that wide and high canvases have a high windage, so the structure is made with a margin of safety. This is achieved by arranging a powerful base and installing a power frame. The lack of strength of these structures reduces the reliability of sliding gates.
If errors are made in the calculations, the sash will sag or skew.
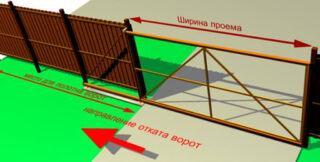
To move the canvas along the fence inside, you will need 5 - 8 meters of free space without objects, buildings and plantings.
Drawings and diagrams
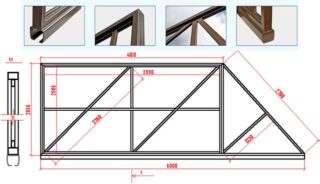
There are many step-by-step instructions on the Internet with drawings for do-it-yourself sliding gates, but it is better to complete an individual scheme applicable to specific conditions, material, flight.
Information specified in drawings and diagrams:
- a sketch of the location of pillars, foundations, sashes with a binding in width, height;
- enlarged joints and joints;
- dimensions of all structural elements;
- ground marks, edges of the base, racks, top of the canvas;
- materials of all parts, racks, rails, canvases.
With the help of the diagram, at any time during the assembly, you can clarify the location and ratio of the elements, correlate their sizes, see how to make a joint. The dimensions in the drawing help to calculate the amount of materials for the manufacture of the gate, to draw up an alternate list of works.
Standard sizes
They attach great importance to the width of the passage, therefore, the calculations are performed correctly in order to avoid distortions and not spend money on the purchase of unnecessary building materials. The optimal width is not too different from the size of the span that they should cover. For example, if the width is 4 m, another 200 mm is added to this parameter. To create a counterweight, add 1.5 - 1.6 span lengths.
Sizes are popular: 3.0; 3.5; 4.0; 5.0 and 6.0 meters. The maximum width of the passage that has been manufactured reaches 12 meters. There are no particular restrictions on height, but the weight of the structure should be taken into account. The sash weight affects the choice of automation, the more powerful the device, the higher its price.
The weight of the door leaf on a span of 6 m is about 600 kg, the indicator fluctuates depending on the material. The minimum weight of a 4 m sliding sash will be in the range of 300 - 400 kg. Such indicators are taken into account when choosing the power of the rollers, automatic devices.
Nuances of design
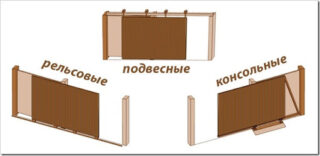
There are several types of rollback systems:
- suspended;
- console;
- exit.
The first type is the simplest, with a guide beam with wheels for moving the canvas over the span. This type of propagation scheme was not received due to height restrictions.
On exit models, the gate rollers run on the channel on the ground. The scheme is reliable, but it involves regular cleaning of the track from snow, debris, ice.
In the cantilever system, the guide is attached to the frame so that it does not limit the height in the span, and the sash moves above the ground. The rollers are placed in a profile, which is fixed on the sash itself inside. For sewing, they design corrugated board, metal, wood.
Selection of materials for sliding gates
The gates protect the inner space of the courtyard from encroachments, so the lining material must withstand impacts and other loads. The frame of the canvases is made of a metal pipe; struts and diagonals of the sash are made of a similar material. For filling, use metal at least 2 mm thick or put profiled sheets with a zinc coating or painted with polyvinyl compounds.
From accessories you will need:
- profile for the guide beam;
- videos;
- carriage for wheels;
- catchers;
- end roller;
- gripping device;
- stub;
- set of automatic control.
The filling can be wooden boards, sandwich panels. As a roller run, use a channel, Tavr, I-beam, corners.
Necessary tools for the job
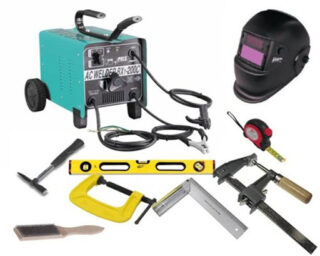
Almost everyone who is engaged in construction work has devices for the manufacture and installation of metal structures, otherwise they are rented.
Tool kit:
- scrap, bayonet and shovel shovels, trowel, buckets, stretchers;
- grinder with a circle on steel and a cleaning disc;
- concrete mixer;
- welding and consumables for it;
- screwdriver, drill;
- stepladder;
- level, plumb line, construction square, tape measure from 5 m;
- hammer, pliers, core.
A trench tool is needed to prepare a pit for a foundation, a trench for laying electrical wiring. They are poured cement, sand and crushed stone into a concrete mixer.
In each specific case, the list of devices can be increased. For example, if there are roots of bushes or trees in the ground, you will additionally need an ax.
DIY instructions
The designs, like the stages, may differ, so the recommendations are agreed upon for specific conditions.
The main phases of the work:
- design, drawing up drawings, diagrams;
- counting and purchasing materials;
- excavation;
- concreting;
- cantilever system and frame welding;
- assembly of the door leaf, cleaning the seams;
- installation of ready-made gates and hinge fittings;
- installation of automation.
All work on the assembly of sliding gates on rollers can be done with your own hands, except for welding parts. When choosing the length of the blade, take into account that a small shank will lead to the fall of one side of the blade in the open state. It is impractical to burden this part with loads. If a large distance is made between the carriages, the load on the wheels will increase, the guides are deformed or their shelves may bend.
Installation of pillars
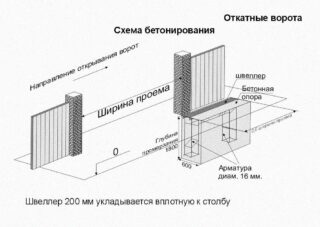
Pits for racks are dug to a depth of 1 - 1.2 m, but the depth of soil freezing is taken into account. When digging, the walls crumble, so formwork is made from any boards. A crushed stone bedding is laid at the bottom, spilled with water. At the same time, wires for automation are brought in and laid, they are hidden in a water pipe at a depth of 60 - 80 cm. The upper end of the pipe with protruding cables is covered with polyethylene.
For pillars, use a square pipe 80 x 80 or 100 x 100 mm. For resistance to the underground part of the rack, pieces of reinforcement with a length of 20 mm are welded with a cross, which is then concreted. The top of the pillar is covered so that no water flows inside.
Laying the foundation
Phased division of work:
- preparation of land at the construction site (garbage collection, leveling);
- digging a trench from one to the second pillar;
- sand and gravel bedding (10 and 15 cm, respectively);
- welding or knitting of the reinforcing cage;
- pouring concrete.
Cement, sand and crushed stone are placed in concrete in a ratio of 1: 3: 5, respectively. When laying the mixture, trowels, shovels are used to distribute the mass between the reinforcing bars.
Concrete will gain full strength in 28 days, but the structure can be assembled in 7 to 10 days. The concrete surface needs to be looked after - cover with sawdust and watered with water 2 times a day.
Sash manufacturing
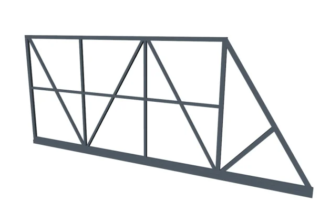
Cut the blanks of the steel tube for the frame. Pieces that join at the corners are cut at 45 °, and those that join in the form of a T are cut at 90 °. Such nuances are taken into account when cutting. The sections are cleaned of rust, they are laid out in accordance with the assembly diagram.
When welding, a continuous seam is not used, but a connection is made with dots so that the frame does not lead. After checking all the parameters, they are welded with a solid seam.
Welding places are grinded with a grinder with a grinding wheel, the metal is covered with soil against corrosion. At the welding stage, the frame is reinforced with perpendicular elements.
Gussets are used at the corners of the joints - steel rectangles or triangles of their sheet metal. The shank on one side of the frame is reinforced with a stiffener so that it forms a bisector of a right angle.
Installation of the structure
The console is welded to the bottom of the frame.Rubber plugs are placed on its edges so that leaves and debris do not get inside. The dimensions of the run depend on the length of the gate, the thickness must be taken by calculation. Check the rail for flatness to ensure easy running.
The gap between the guide bar and the roller must be 1 mm. Greater play will cause the blade to "peck" when moving, while a smaller play will cause it to jam when working. A cover strip made of a corner or channel is attached to the support gate post.
The lower and upper catchers are fixed to the strip. Rollers (supporting the carriage) are put on the embedded beam in the foundation. A cantilever run is put on the carriage, the work of the catchers is regulated. Then fittings are mounted, automatic control is installed and connected.
Operating rules
If during operation there are extraneous sounds, rattling, stop using the sash and understand the reasons. When opening the canvas, they do not make much effort, they move it evenly, without jerking. Make sure that when driving in the coverage area there are no people or animals, as well as foreign objects.
The runners, along which the rollers move, are regularly cleaned, the icy beams are used after chipping off the plaque. Do not touch the moving parts of the gate during movement or when stopping with the power on. The rubbing parts of the mechanism are lubricated in a timely manner, the gate is inspected once a year.
If there is a wicket in the curtain, an additional safety device must be provided, which will exclude the movement of the sash at the time of the passage of people. Before using the automatics, make sure that the lock, gate valve is open and does not impede movement. Do not keep the blade from sliding mechanically - actions will lead to breakage or injury.

