In the absence of protection of the foundation of the house from the effects of moisture, you should not start improving the building from the inside. In the general case, the problem is solved by the construction of a protective edging (blind area) along the entire perimeter of the erected structure. Structurally, it is a waterproof concrete strip adjacent to the basement of the house, which provides water drainage due to the slope directed away from the house. Decorative finishing of the blind area has gained wide popularity, for which various types of tiles, paving stones and other materials are used. At the same time, such an edging, in addition to its main purpose, allows you to equip a beautiful and comfortable track.
Design and functionality

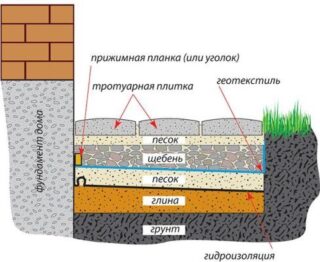
The blind area is one of the elements of the adjoining drainage system. Structurally, it is a multi-layer "cake", which includes:
- substrate - a dense underlying layer of clay or sand;
- drainage layer - pebbles, crushed stone, gravel, coarse sand;
- waterproofing layer - film material;
- heat-insulating layer (if necessary) - protects the soil near the foundation from freezing and swelling;
- covering concrete covering - protects the foundation and the basement of the building from water penetration.
The geometric dimensions of the blind area depend on the characteristics of the soil around the structure and the length of the eaves overhangs. Thickness:
- sand pillow - 10-15 cm;
- crushed stone layer - 6-9 cm;
- concrete layer - 7-2 cm.
The slope of the blind area should start from the foundation. According to the current regulatory documentation, it depends on the width of the track and should not exceed 10%.
A properly equipped blind area provides:
- the integrity of the foundation throughout the entire service life of the structure;
- protection of the base from excessive moisture absorption;
- insulation of the foundation and basement located in the basement of the house;
- drainage of precipitation into the storm water system;
- reduction of heat losses during sudden temperature changes, etc.
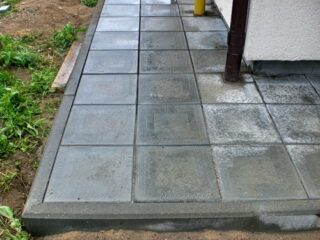
Many homeowners choose to decorate their concrete cover with paving slabs. This turns the blind area into a convenient walkway. You can make a blind area of paving stones around the house with your own hands.
The choice of finishing material
- paving slabs;
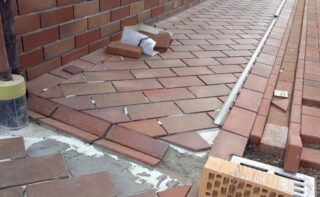
- clinker paving stones;
- stone paving;
- polished stone slabs;
- pebbles, rubble or cobblestones;
Recently, new materials have appeared on the market that can be used to decorate the blind area:
- green blind area - a material that is a roll lawn, which is laid on a prepared surface;
- crumb rubber - a material that forms a non-slip surface, is durable, moisture resistant and original appearance;
- polymer sand tile - has a low weight and clear geometric dimensions, is environmentally friendly and has a high degree of moisture drainage; disadvantage: the tile lends itself to high temperatures - it expands when heated.
Modern finishing materials are distinguished by a high price and require the involvement of highly qualified specialists due to the use of a more complex installation technology.
Tile blind area

Paving slabs and paving stones are the most common type of finishing for concrete framing. Materials have an affordable price and are not inferior to natural stone in terms of their performance parameters.
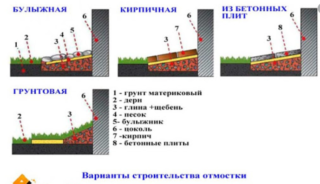
Blind area options
There are two ways to decorate the blind area around the house with tiles:
- using the existing concrete edging;
- on a specially prepared concrete base.
Both options are simple to perform, which allows you to do this work yourself.
Required materials and tools
To lay high-quality tiles around the house, you will need:
- brick-like tiles (paving stones) with a thickness of 40-60 mm and dimensions: width from 60 to 120 mm, length - 100-280 mm;
- waterproofing film or roofing material;
- oily clay with a small content of various impurities;
- sifted sand;
- cement;
- crushed stone of fraction 20-30 mm;
- border (if necessary).
In the case of the arrangement of utilities and drainage, it is also necessary to purchase the corresponding pipes and collectors.
You need to have at hand:
- grinder with a diamond disc;
- shovel;
- Master OK;
- building level;
- container for the preparation of a construction mixture.
Having prepared the necessary materials and tools, you can start decorating the blind area around the house. The work itself does not take much time and depends solely on the area of the house. In this case, its main part will be preparation of the base and tamping.
Laying tiles on existing concrete edging

Before starting work, it is necessary to assess the condition of the existing equipment and eliminate all defects on it. Small cracks are sealed with cement paste (1 part water, 1 part cement), larger defects will require the use of standard concrete mortar. Areas of delaminated concrete are removed and new concrete is poured in their place.
Next steps:
- Install curbs, the height of which should rise above the existing frame by at least 100 mm (40 mm finishing layer + 60 mm tiles).
- The restored framing surface is primed, for example, with Ceresit CN-17 mortar.
- A finishing substrate is formed using a cement-sand mixture or cement mortar.
- Lay the tiles, carefully adjusting the individual elements to each other. Minimum clearances are obtained using cross-shaped plastic inserts.
The seams between the tiles are rubbed with cement mortar.
After finishing the work, it is better to cover the path with plastic wrap, this will protect the jointing layer from blurring in the first days of operation.
Laying tiles on a specially prepared base
- cleaning the perimeter from construction debris and plants;
- marking and shaping the surface for the track in accordance with the requirements of SNiP;
- digging a trench 25-30 cm deep and removing soil from the territory.
Attention:
- The width of the track must be at least 60 cm.
- The contour of the path relative to the edge of the roof must be offset by at least 30 cm.
- The working surface of the track should have a slope of no more than 10%.
The main scope of work:
- Mount the formwork or install and cement the curbs instead.
- Pour a 5 cm layer of sand and make a hydraulic lock from oily clay.
- Lay a layer of waterproofing material, such as roofing material.
- Lay a sand-crushed stone pillow up to 15 cm thick and tamp it well.
- Lay the reinforcement grid (if necessary).
- Pour in mortar, ensuring the slope of the path to the outside.
Paving with tiles is carried out on a cement-sand mixture for dry laying of paving slabs or directly on a finishing substrate made of cement mortar.


