Modern construction and renovation technologies require a perfectly flat surface for laying parquet boards, laminate and ceramic tiles. The permissible load on the floor slab must not be exceeded if the leveling is carried out with strong but very heavy concrete. An excellent option for solving this problem is a semi-dry floor screed with your own hands. Self-performance of the work will save on materials and services of specialists, and the quality of the final result will meet all building codes and regulations. To do the job correctly, you need to familiarize yourself with the properties of the materials used and the procedure for their application.
What is a semi-dry floor screed
Semi-dry floor screed is a technology invented in Germany, characterized by high efficiency and low financial costs. This is an excellent solution for property owners who do not want to spend extra money on its renovation, but also put reliability at the forefront.
This method of leveling the slab is based on reducing the volume of water added to the container when mixing the solution. Just as much liquid is introduced as is required for the hydration of the cement molecules and the formation of strong crystalline bonds. Since the amount of water is minimal, the time of its evaporation and hardening of the board is reduced, the mixture drying out and the formation of cavities in it is excluded.
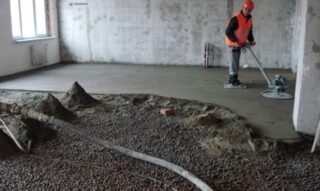
Since the solution has a high density and low fluidity, it is imperative that devices are used to compact and level it. With a well-organized work, you can achieve the creation of a perfectly smooth surface that can be used as a finished industrial floor and a base for laying the top coat.
Application area
In modern construction, craftsmen constantly have to look for a compromise between quality, reliability and speed of construction. The criteria for the timing of the creation of the screed directly depends on the composition of the material and the efficiency of the equipment used.
The screed can be manufactured for the following applications:
- leveling layer on the floors of private houses and apartments;
- lightweight bearing plate as a base for walls for residential and auxiliary buildings;
- industrial floor in warehouses, garages, hangars and other household facilities.
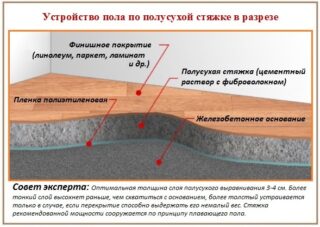
A dry screed can easily be installed on prefabricated and monolithic concrete foundations, on well-compacted soil and even on a wooden base. In all cases, a number of rules apply regarding the preparatory, executive stage, as well as the maintenance and finishing of the poured mixture.
The composition of the mixtures and the thickness of the screed
Depending on the conditions and purposes of the repair, the solution can be made from the following components:
- cement M600;
- sifted and washed river sand;
- expanded clay, when a lightweight plate is made;
- granite chips;
- reinforced fibers;
- plasticizer;
- water from the central pipeline.
The minimum fill thickness is 30 mm and the maximum thickness is 80 mm. It is not recommended to make it thicker, as this is fraught with the formation of cavities and the appearance of cracks.In addition, thick slabs take longer to cure and require more effort to maintain proper curing.
Advantages and disadvantages of a semi-dry screed
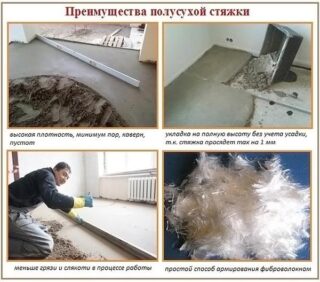
Semi-dry screed has the following advantages:
- Small amount of water added to the mixture. Its penetration into the ceiling is almost completely excluded. EFFECT: reduced weight of poured material.
- Reduction of setting time and complete drying. Ability to continue working without a long break.
- Creation of a perfectly flat surface at the stage of formation without the use of self-leveling solutions and additional leveling.
- Reducing to a minimum the likelihood of cracks and shrinkage after the mortar has cured. No risk of internal voids formation.
There are also disadvantages to this method:
- Inability to do without special equipment. It is essential during the preparation, distribution and compaction stages of the mixture.
- Difficulty filling inside corners. You have to spend time and effort on this, patching up such places by hand.
- Restriction on the minimum thickness of the slab. It is 30 mm, provided the compaction is carried out with a powerful pneumatic layer.
- Quick setting. On the one hand, this is a plus, and on the other, a minus, since the solution can harden without sticking to the base.
Despite the same ratio of positive and negative sides, dry technology continues to be popular, since there are many ways to eliminate difficulties. The only question is their cost.
Necessary equipment and materials

The method of making a semi-dry screed is quite specific; the usual set of homemade tools will not be enough here.
For work you will need:
- concrete mixer;
- vibrating plate;
- pneumosupercharger;
- puncher;
- mallet, hammer;
- hacksaw for metal;
- level;
- putty knife;
- shovel;
- rule;
- roulette;
- paint brush;
- scissors.
- marker.
From the materials you need to purchase:
- sand and cement;
- plasticizer;
- waterproofing (polyethylene, roofing felt, waterproofing);
- sealant;
- deep penetration primer;
- self-tapping screws and plastic dowels;
- corner perforated profile;
- polypropylene insulating tape;
- reinforced fibers;
- pigment dye (if necessary).
Since filling is a dusty, dirty and even dangerous process, work should be done in rubber boots, a respirator, goggles and gloves.
Laying a semi-dry floor screed with your own hands
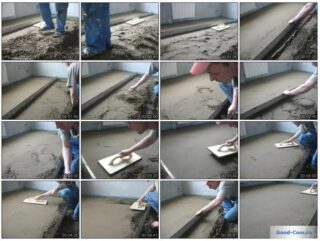
Step-by-step instructions for making a semi-dry screed includes a number of sequential steps.
The first is the preparation of the foundation, which is carried out as follows:
- Cleaning the surface from foreign objects, debris and dust. Inspection of the base to identify defective areas.
- Removing loose fragments, opening cracks and crevices. Sealing the holes with sealant.
- If construction is carried out on the ground, it is carefully compacted.
- Treatment of the slab with an antiseptic and a deep penetration primer.
- Laying thermal and waterproofing. Fastening around the perimeter of the damper tape.
- Carrying out markings, setting the zero level along the perimeter of the walls.
Then beacons are installed:
- At the zero level, longitudinal shafts are made 1 cm above its passage. The interval is taken to be 30 cm less than the length of the rule.
- The workpieces are cut from the corner perforated profile, applied to the rollers and pressed until they are aligned to the zero level.
- It takes time for the solution to set well.
The next step is to fill the slab:
- Mixing the solution. First, a dry mixture is made, then water is added to it in a ratio of 1/5 to its volume.
- Material supply to the base. The procedure is performed with a shovel or blower.You need to start from the corners, then along the perimeter, end in the center of the room.
- Leveling the surface with a rule and a spatula. Surface treatment by tamping.
At the end of the pouring, grout is carried out after 2 hours. It is carried out manually or using technology - a helicopter or a grinder with special attachments. The quality of work is controlled by level and rule. The permissible height difference is 1%. During grouting, the top layer is smoothed and compacted.
The next step is to cut expansion joints at intervals of 150-200 cm, depending on the thickness of the slab. This measure helps to relieve internal stresses, prevents the appearance of ruptures and cracks. Seams are filled with sealant, which is flush with the surface of the board.
The term for laying the topcoat depends on its composition. Tiles can be laid after 2 days, linoleum - after 5, and laminate - after at least 21 days. During this time, the stove must be wetted every 12 hours.

