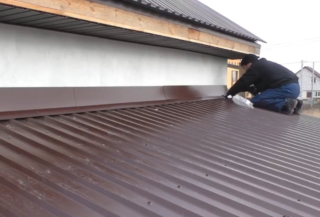
In the process of erecting buildings with half-hip roofs, attaching verandas, garages and other outbuildings to the house, it becomes necessary to make the roof adjoining the building wall. These areas are classified as high-risk areas for moisture and debris penetration under the roof. It is necessary to adhere to proven technologies when planning and arranging such places. You can do this yourself, you just need to choose the right materials and methods of their use.
The need to adjoin the roof to the wall of the building

The need to connect two surfaces arises in such cases:
- Construction of a half-hip roof, when the end slope is below the truncated gable. The deck is at a right or obtuse angle to the vertical surface. The joint is clearly visible and should have a perfect appearance. Similar requirements apply to balconies.
- Arrangement of a visor over the front door. The shape of the canopy can be any - flat, gable, arched, pyramidal. The abutment of the roof to the wall should be adjusted to the configuration of the structure. If the joint is closed, more attention can be paid to the effectiveness of the joint, leaving its aesthetics in the background.
- The presence of smoke and ventilation pipes on the roof. The place of their passage is in contact with the flooring and is in plain sight. Here you need to try to ensure that the docking station combines practicality and accuracy in performance.
- Parapet around the perimeter of a flat roof. If it is used as a recreation area, the roll covering is not displayed on top of the fences. Docking is carried out at a height of 10-20 cm from the floor. Thus, tightness is achieved and the aesthetic component of the design of the structure is preserved.
The purpose of roofing materials is to seal the roof surface and give it a specific design, shape and color. Quite often, structures are erected, where, according to the project, a soft, hard, even and curly coating is adjoined to the wall.
Vulnerability of landings
Roof and wall joints are potentially dangerous places in several directions at once. Their vulnerability lies in the likelihood of the appearance of such negative factors:
- Leaks. The water flowing down the facade washes away the paint and is absorbed into it, causing the material to weaken and deform. Plus to this - damage to home furnishings and things.
- Stagnant moisture. The consequences are quite unpleasant - partial destruction of the structure, the appearance of fungus, mold and an unpleasant odor.
- Debris getting into cavities. It is saturated with moisture, expands when freezing, which is fraught with deformation of the flooring and rupture of waterproofing surfaces and units.
- Insect colonization. Even a small gap or hole in the place where the visor adjoins the wall can become a home for a colony of ants or a swarm of wasps.
There are several ways to make butt joints for vertical and inclined surfaces. The choice is determined by the architectural style of the building and the characteristics of the roofing materials.
Types of abutment strips
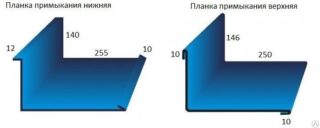
- Upper. Stacked on external surfaces to be joined. Fastening is carried out on self-tapping screws with a silicone washer, all cavities and cracks are sealed with a sealant.
- Lower. Placed under the flooring, joining the wall with the upper side. Most often they are used as an auxiliary element to provide support for the upper bar.
- Straight. They are used for joining flat floorings with gables and facades. Mates are made at different angles to connect the roof with one or another slope.
- Corner. Designed for attaching slopes running at an angle to the wall of the building.
- Curly. They are used for sealing of arched canopies and canopies.
The installation of the strips is carried out in such a way that the water falling on the flooring is removed from it at the desired angle, without reducing the drainage rate. This is achieved by additional insulation of the joint.
Joint sealing materials
During operation, roof elements are exposed to changes in temperature, humidity, moisture, solar radiation, chemicals and mechanical pressure. All these factors place high demands on insulating materials for sealing joints.
The following means are considered the most practical:
- Silicone sealants. They have excellent adhesion and elasticity, the service life is at least 10 years.
- Aluminum and copper corrugated tapes. The products are flexible, they are distinguished by the possibility of stretching, which makes it possible to lay them in accordance with the relief of the roof.
- Polyurethane and bituminous mastics. They are used for sealing small gaps, as a filler for assembly tapes and nets, including during the repair of soft roofs.
- Polymer and rubber seals. Designed to fill irregularities arising from the joining of vertical and horizontal surfaces. They are used together with sealants and mastics.
For each type of junction node, its own method of joining is selected, which meets the design features and conditions of its operation.
Junction options
There are such options for abutting the flooring from various materials:
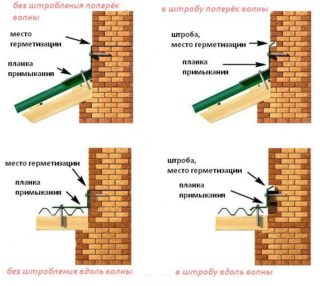
- The roof is made of metal profiles or metal tiles. The tiles are attached to aerated concrete and brick with shaped parts that repeat its profile. When the flooring has a large area, a cut is made in the wall and sheets are already inserted into it. The recess is then insulated and closed with a strip or tape. If the house is wooden, a plank is nailed over the joint, which completely covers it.
- Soft roof. Since bituminous tiles are laid on a solid base, the best solution would be to use the top plank in conjunction with corrugated tape and mastic. To prevent sagging and tearing of the edges of the tiles by the wind, they are fixed with a wooden strip, which is inserted into the connecting groove. A tape is glued on top of the plug, which, after the sealant has hardened, is painted to match the color of the facade or pediment. The joints on the soft roof are insulated to prevent the formation of a cold bridge.
- Roll roofing. At the top edge, the roofing strips are held together with flexible metal tape and hot bitumen sealant. There can be several options for fixing planes. The first is a wooden plank that is screwed to the base. Another involves the use of one top or two strips, gaskets and sealants.
All methods are easy to perform and can be performed even by a novice wizard. The main thing is to carry out the work in a planned way and observe the technology at every stage.
Flashing method
The sequence of arranging the docking areas:
- Inspect the working area. Identify weak points, protruding fragments and areas with depressions.
- Level the facade surfaces, treat it with primers and primer. If a soft coating is used, a strip 20-30 cm wide is cleaned from its edge from the powder.
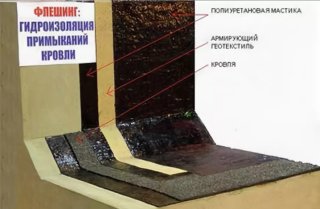
- Cut geotextile fabric into strips 50 cm wide. Expand it so that you can conveniently and safely take the sections for quick styling.
- Apply mastic to the wall and flooring using a wide paint brush.
- Apply a strip of reinforcing fabric to the smeared area, smooth it so that there are no folds or sagging. Wait 3-6 hours until the mastic hardens.
- Apply a second coat, paying attention to the joints of the geotextile.
The completely hardened coating remains to be treated with a primer and painted in the desired color.


