The choice of a sliding system for entering the courtyard saves valuable space and makes the process faster, more convenient and safer. The minimum set, consisting of a drive, a toothed rack and limit switches, already allows for travel without the use of physical force. But for this you need to get out of the car, walk to the switch and back, then repeat all this. Do-it-yourself installation of automation on sliding gates will significantly expand the capabilities of the mechanism, making the opening-closing process as convenient as possible.
Scheme of operation of automatic sliding gates
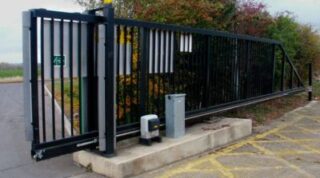
Manual and mechanically operated roller gates have a long history of operation. But even the presence of a motor did not create the proper level of comfort in using the structure, since it required attention and reaction when the canvas stopped. A breakthrough in this area was the introduction of electronics.
The scheme of the set of equipment:
- The radio signal is fed through the remote control to the receiving device, where it is recognized and processed.
- The command goes to the control system, which drives the drive mechanisms. The signal lamp comes on, and in some models also the sound indication.
- The rotation of the electric motor with a gear flange clings to the gear rack.
- The blade moves along the frame. When a certain mark is reached, the sensors are triggered, the gate stops.
Modern equipment is controlled from a remote control combined with a car alarm, which is convenient and reliable in all respects.
Elements and components of the gate
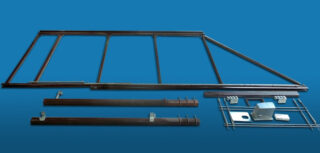
Automatic swing gates have a simple design, which ensures their reliability and trouble-free operation.
The system consists of the following units and mechanisms:
- Profile beam fixed to the fence posts. Serves as a base and support for stationary and moving parts.
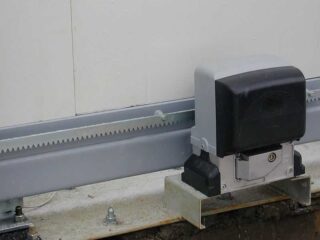
- Electric motor for 220V or 24V. Drives a worm or serrated bar.
- Toothed bar. Serves as a guide and a connector between the blade, motor and frame.
- Roller blocks. On them the gate travels over the frame.
- Signal lamp. Installed on one of the supports. Works until the blade is fixed in one of the extreme positions.
The automation system consists of the following parts:
- remote control;
- radio receiver with antenna;
- Control block;
- signal repeater;
- photocells.
The control and safety unit is designed to stop the movement of the web when a predetermined position is reached, as well as emergency locking of the motor when foreign objects appear in the alignment - people, animals, vehicles.
The wiring for sliding gates consists of cables and wires that are passed through plastic channels to protect them from mechanical damage. To enable the use of the equipment in the absence of current, the motor blocking can be reset and a mechanical lock and handle (lever) installed. An overload cut-off system is installed on the drive in the event of a failure in one of the functions.
Basic recommendations for performing the work
Installation of automation for sliding gates is not particularly difficult, it can be performed by any person, even without the appropriate education. First you need to make a sketch, take measurements, purchase equipment. To install it correctly, you need to create a detailed and detailed drawing under the attached diagram.
In the future, you need to assemble the equipment, taking into account the following features:
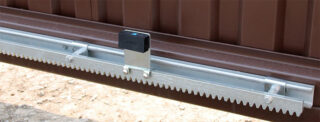
- Rack motor connection. One meter lengths are purchased in the kit at the rate of one more than the length of the gate. The drive is screwed to a stand, which is made from a 40x60 mm profile pipe. The rack is attached to its outer gear in such a way that it passes in the middle of the frame. After carrying out test openings and closings, the final fixation of the parts is carried out.
- Limit switches connection. Brackets with magnets are screwed to the toothed rack in such a place that in the extreme positions they come into contact with the sensors inside the drive. In this case, before installation, you need to check the polarity of the magnets so that it matches the designations on the diagram. After that, the operation of the switches is checked by starting the drive. If no stop occurs, they swap places.
- Checking the jumpers on the power plate. Their installation is carried out in accordance with the schematic diagram. The difference is determined by the selected opening method - with a remote control, buttons from a support, from home, by phone. After the connection, the correctness of its implementation is checked.
- Power supply. Connection to a common house network is carried out with open junction boxes without final insulation of the connections. In this case, the switch must be in the off position. The wires are connected to the corresponding connectors, after which the switch is activated. If everything is working correctly, the power is turned off, the connections are isolated.
- Remote control programming. This procedure is carried out in order to be able to give signals to the electric drive. To do this, press the sync button and hold until the green diode lights up. Then the opening, closing and locking functions are set. Each operation ends with a ripple and damping of the diode.
- Connection of photocells and lamps. It is better to mount the sensors at a height of up to 40 cm above the ground so that they do not react to snow drifts, but fix children, dogs and the hood of a car. The elements are placed exactly opposite each other to ensure that the beam is interrupted. It is better to put the lamp where it will be clearly visible from the street and from the yard. The wires are connected to the board where the Light terminals are located.
When performing each operation, you should carefully check the diagram and double-check each action. The slightest deviation can lead to incorrect operation, breakdown of mechanisms, combustion of electronic parts.
Common mistakes and how to avoid them
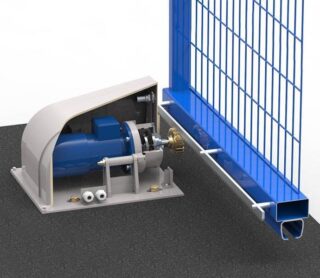
Installation of automatic gates is a multi-stage procedure, starting with the design and ending with connecting the assembled equipment to the network. Each phase of the process should be carried out in accordance with the recommended technology, without simplifications and ignoring seemingly insignificant nuances. Otherwise, time and effort will be wasted; at best, everything will have to be redone.
Installation of a drive for automatic gates
Even knowing how to properly install the motor on a sliding gate, many approach this stage, having a whole set of previously committed mistakes in the load.
The most typical:
- Purchase of equipment, the capacity of which does not correspond to the weight and size of the gate.
- Failure to comply with the curing period of concrete, which is used when pouring support and embedded elements.
- Distortions in the manufacture of the mounting base.Violation of distances between parts.
- Welding the motor until the end of the adjustment of the drive mechanisms.
- Ignoring soil properties, climatic features, and equipment use intensity when calculating.
As a result, sliding and stationary elements can bend, collapse or jam. During operation, loud squeaks, clicks and jamming are possible.
Connecting the sliding gate drive
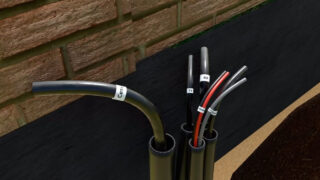
Sliding gates must be installed so that the electrical wiring is reliably protected from mechanical stress.
Errors during self-assembly:
- Laying the cable in a trench without using plastic or corrugated tubing.
- The use of wires with an insufficient cross-section of conductors, which leads to their heating, melting of insulation and a short circuit.
- Combination of cables with aluminum and copper conductors. This causes corrosion, arcing and contact failure.
- Ignoring grounding. The doors are operated in a humid environment and protection will save you from electric shock in case of a short circuit to the case.
- Installation on a live line. Careless movement can result in injury or damage to equipment.
Some craftsmen let cables through the air or screw them to the gate. This is a gross violation of safety precautions.
Installation and connection of the signal lamp
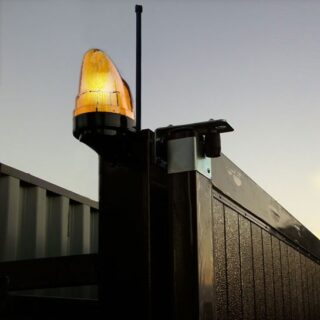
The signal light is not included in the sliding gate kit, but it allows you to increase the level of comfort and safety when using the equipment
When installing the product, the following errors are made:
- Placement on an external support, which creates the prerequisites for its theft.
- The use of a low-power lamp. Because of this, the situation in the area of travel is practically invisible.
- Fixing the device to a plastic plug in the post. Unstable and unreliable.
- Passing wires over the surface of the support.
Quite often, the cheapest goods are purchased, which shine weakly, do not work for long.


