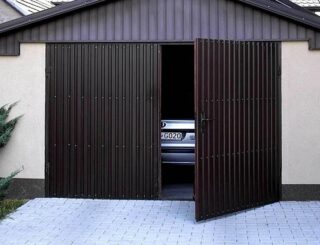
Anyone, even a novice master, can make swing metal gates for a garage with their own hands. With the right approach, a home-made design will not yield in functionality to ready-made factory options for a sectional or lifting type.
Advantages and disadvantages of profiled pipes
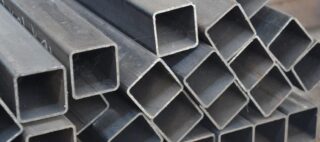
The profile pipe has the following advantages:
- Simulation variability. At home, you can make a frame-type canvas with subsequent sheathing with an iron sheet or a frame structure filled with panels.
- Simple device. Lack of complex assemblies, the ability to design, assemble and install alone.
- Sufficient bending and impact strength. Opening a gate from a rectangular profile is possible only with powerful battery equipment.
- Possibility of arranging a gate. This option is not always available for lifting type products.
Disadvantages of products from a professional pipe:
- Tendency to deform. Profile designs are more flexible than circular counterparts.
- The need for experience in design, compliance with the accuracy of marking and assembly. The permissible error is 2 mm.
- It takes quite a lot of free space in front of the garage in order to fully open the doors for exit and entry. Difficulties in clearing the area from snow.
The disadvantages are not critical, therefore, an increasing number of motorists are making garage doors from a profile pipe with their own hands.
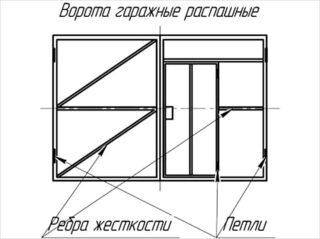
Drawings and calculations
There are modifications of the blind type or equipping one of the leaves with a door wicket. The second option is more convenient, more practical, but more complicated in execution, plus additional costs for metal. Here you need to look from a practical point of view. If the garage is used only for parking a car, there is no point in wasting energy, time and money on an option that will not be used. It is quite another matter when the room serves as a workshop at the same time or is equipped with a place for rest.
The minimum distance is 50 cm between the width of the opening and the vehicle. Better more for safety, convenience and for the future, if a bigger car appears.
The height for a passenger car is 200 cm, and for an SUV - 250 cm.
To avoid skewing of the sashes, vertical locks should be provided at the top and bottom of the canvases. These parts will also ensure a tight fit of the structures with each other. In any case, there is always a gap between the leaves, wickets and openings. To keep warm, protect the building from dampness, insects and drafts, you need to use a sealant.
The result of the measurements, calculations and reflections is a detailed drawing. Based on this document, a calculation of materials, preparation of tools and a step-by-step work plan are drawn up.
Required materials and tools

To make swing metal garage doors with your own hands, there is enough arsenal of equipment that every motorist has.
List of tools:
- puncher;
- Bulgarian;
- welding machine;
- electric drill;
- screwdriver;
- screwdrivers;
- spanners;
- metal brush;
- paint brush;
- roulette;
- level;
- square.
Materials:
- corner or profiled pipe 40x40 mm for the frame of the shutters and wickets;
- bolts and nuts;
- channel for creating a frame;
- anchor bolts;
- insulation;
- glue;
- anti-corrosion primer;
- acrylic paint.
To ensure your own safety, you should use a mask, respirator, goggles and heavy gloves.
It is recommended to purchase materials with a margin of 10-15% based on errors, damage during transportation, possible upgrades along the way.
Insulation is required if the garage is built of bricks, foam blocks or profiled sheets with internal thermal insulation. The gaps between the profiles can be filled with foam, mineral wool or polyurethane foam.
Step-by-step instructions for making a gate
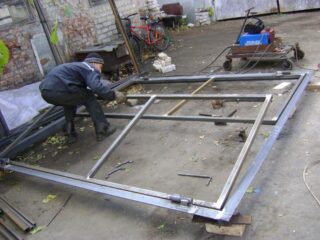
The first step is to make the sash frame. This step can be neglected if the garage is built from profiled pipes, when vertical posts and horizontal cross members can be used as a basis for fastening.
Frame assembly sequence:
- Cut the profile to size.
- Make grooves in the walls.
- Make holes, fasten the channel with anchors.
- Check the dimensions of the box vertically, horizontally, and diagonally.
- Weld the corners of the frame.
It is advisable to reinforce the corners on the inside with jumpers. This will prevent the box from skewing and will not allow the seams to disperse from the load.
Then you should start assembling the sashes. First, you need to prepare an even base, which is larger in area than the dimensions of the canvases. You can use a concrete pad or several sheets of asbestos.
Then you need to perform the following actions:
- Apply with chalk on the basis of the contours of the future product.
- Saw and lay the workpieces on the site.
- Align the profiles, grab them in the corners.
- Measure again, carry out final alignment.
- Secure the corners with a continuous seam. It is necessary to weld gradually, avoiding strong overheating of iron, which can lead to high temperatures.
- Install jumpers. To achieve sufficient rigidity, a distance of 50-60 cm is taken between the horizontal and vertical fragments. It is better to fit it to the format of the insulation.
- Welding the outer sheet. Its thickness should be within 2-3 mm. The cladding is fixed with welding points on the inside of the sashes.
The next step is to weld the hinges. Better to focus on internal bearing models. Hinged-type products are cheaper, but more difficult to operate. Moisture and dirt get into them, in winter they can freeze and work only after warming up. You need to cook very carefully, taking a break for cooling after each point contact. Continuous long seams should not be done, as this may cause the product to warp, and the grease in it will burn out. Better yet, screw the hinges with bolts, grabbing them from the head with spot welding.
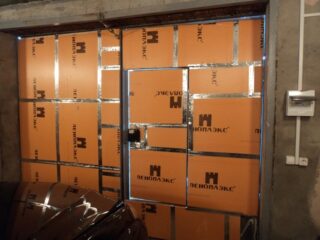
As a result, gaps should remain within 5 mm from the bottom, 2 mm from the top and 4 mm between the canvases.
Further actions should be carried out after the gate is hung on the hinges. It is better to glue the insulation to the inner side of the sheathing so as not to violate its integrity. If the foam and foam do not require insulation, then the mineral wool should be sealed with polyethylene or a membrane. It is better to sheathe them inside with light, but durable material. Galvanized sheet is an excellent solution. After cleaning the surfaces from dirt, rust and scale, they are treated with a primer and painted. Apply at least three layers of liquid using a brush, roller or spray gun.
For overhead locks, the lugs are welded onto horizontal struts.Internal locks are installed mainly in the wicket, and overhead bolts are installed on the sashes from the inside in the upper and lower parts of the frame.

