Private households save money by building fences from sawmill waste. To divide the plots, zoning the territory, the owners make a fence from the slab with their own hands. The fence looks decent, lasts a long time if the boards are treated with antiseptics and protective impregnations. After installation, the plane is decorated in various ways to get a beautiful fence.
- What is a croaker
- Pros and cons of using a slab
- How to choose quality raw materials
- Building material processing
- Site marking
- Calculation of the amount of material
- What is required to make a fence
- Fence options
- Do-it-yourself fence installation in the country
- Installation of supports
- Fastening girders and lag for a fence
- Slab installation
- Decorating the finished fence
What is a croaker
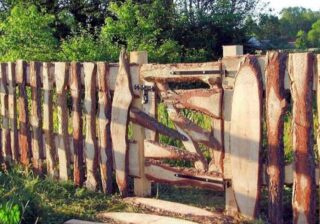
Lumber is a piece of a side of a log, one side of which is sawn through as a result of making a square bar from a round trunk. The bars are produced by the waddling method or by the bar technique, as a result of which, from one log, respectively, 2 or 4 lateral slabs are obtained.
There are types of slabs:
- wood-burning;
- business.
The first is represented by small-sized scraps that go to chips, raw materials for pressed plates, fuel for furnaces. The second type refers to building materials, the elements are large in size and sufficient thickness.
Pros and cons of using a slab
The material differs from high-quality sawn timber by its low cost, therefore it is widely used for temporary fences, light fences. Original fences with a unique design are made from it.
Slab advantages:
- the small mass of the fence allows you to abandon the tape base or make it with minimal dimensions;
- debarked planes have an attractive appearance;
- the boards are easy to assemble and handle, the fence is assembled in a short time.
A quality slab is not easy to find, as organizations with sawmills often throw away raw materials. They sell edged elements without sorting, so when using them, rejection of the boards is necessary. The planks are selected when installing in length, width, which increases the construction time.
How to choose quality raw materials
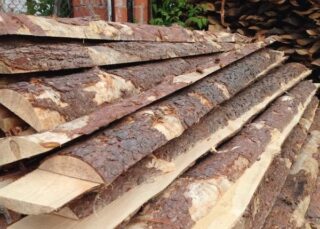
The quality is largely determined by the breed. Expensive cuttings from maple and oak serve for a long time, and pine wood is cheaper, but deteriorates faster in outdoor conditions. There are no special requirements for the type of wood, but you should not use birch (it quickly deforms) and poplar (absorbs water and rots).
The appearance of the fence is determined in advance. Peeled boards look more beautiful, but bark beetles multiply under the outer layer, so you need to remove it, grind the surface. Obapol is often sold raw; before installation on a fence, it should be laid to dry under a canopy.
Choose a croaker per piece at the place of purchase, if possible. The popular width of fence boards is in the range of 20 - 27 cm, wider ones crack over time.
Building material processing
The bark is cleaned from the trunks with a bayonet shovel, ax, scraper (steel strip with two handles). The boards are placed vertically with an emphasis at the bottom, the bark begins to be removed from above, trying not to touch the wood. After that, the knots protruding on the sides are cleaned with an ax or a plane. The treated surface is sanded with emery, or an electric tool is used.
Special deep penetration antiseptics are applied.On the plane, a film is obtained to protect against moisture, harmful microorganisms, insects. For protection against fire, flame retardants are used. After processing by any means, they wait a day for everything to dry.
Site marking
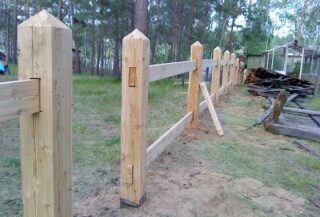
The boundary of the building is marked with pegs and a cord, and the places for installing the pillars are determined. The gap between the supports is 2 - 2.5 m, the distance depends on the height and massiveness of the fence. On the line, mark with stakes the location of the wicket, the gate, if any. Pay attention to the twists and turns of the fence.
Pay attention to the marking of the fence from the slab for a summer residence or house, if the structure is located on a mountain slope or relief terrain. In this case, each section will be on a separate level. The spans between the posts and the length of the segments are determined on site, taking into account the prevailing circumstances.
Calculation of the amount of material
To count, measure the perimeter, count the number of pillars, taking into account the selected interval. The gate is taken 1 m wide; 2 pillars will also be needed to hang it. Consider the support for installing the gate. If the wicket is located in the gate leaf, wood is added for it to the support frame in the leaf.
The perimeter is multiplied by the height of the fence to get the area of the fence. Divide the square by the conditional area of one slab board (sellers will tell you the value), and calculate the approximate number of elements. The material is taken with a margin so as not to buy boards. It is known from practice that the resulting number is multiplied by a factor of 1.2 to take into account the processing of knots, trimming to size.
What is required to make a fence
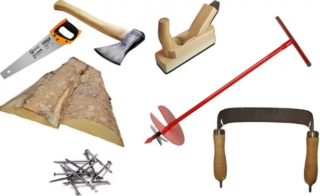
Of the materials, you need a slab in the calculated volume, support elements, longitudinal logs. The pillars are made of metal, concrete, wood, brick. For concreting, you will need cement, sand and aggregate (crushed stone, screenings, broken stone). Boards are fastened with nails, screws, bolts.
Prepare tools from:
- ax, saw, sander, emery;
- drill, screwdriver, screwdrivers, pliers;
- tape measure, level, pencil.
For digging the foundation, you need bayonet shovels, scrap. The solution is kneaded in a trough or take an electric concrete mixer.
Fence options
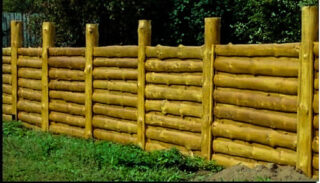
The fence is trimmed with a croaker on one or two sides. In the second case, the fence looks beautiful from the outside and inside, the yard space is not visible. The disadvantage is the increased material consumption.
The boards are installed in two ways:
- Horizontal. The elements are nailed to the support pillars, while the racks are located at a distance of the slab length. Material consumption is minimal, but the strength and stability of the fence decreases.
- Vertical. Visually resembles a picket fence. Longitudinal logs are attached to the support posts at a level of 20 cm from the top and bottom. With a high fence, set the middle run. Material consumption increases, but the work involves the use of a slab of different thicknesses and widths.
In both cases, the boards are mounted with gaps or back to back.
Do-it-yourself fence installation in the country
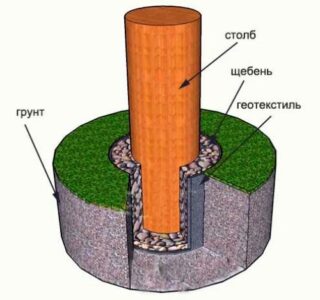
If the fence is low and the slab is thin, concrete pillars under the supporting elements will be enough. In another case, a trench is dug under a tape concrete monolith.
Installation steps:
- digging in and concreting of supports;
- installation of runs and lags;
- slab attachment.
The final finishing and decoration is used to embellish the natural material. The plane is painted to protect it from destruction.
Installation of supports
The lower part of the wooden posts is wrapped with roofing material or coated with bitumen. The pillars are concreted in pits, pre-aligned vertically. Concrete pillars are also dug into the ground, the space around is additionally clogged with solid material, poured with mortar.
The metal supports also protect the bottom from moisture by wrapping or grease.For them, pits are made with a garden drill along the diameter of the pillar, concreted at ground level. For brick or stone supports, a separate concrete foundation is made on which the masonry is performed.
Fastening girders and lag for a fence
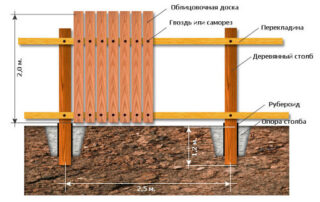
For the girders, a long slab is taken, a rail of the same section, approximately 50 x 30 mm, is cut out of it with a saw along the length. The longitudinal beams are fixed to the supports with self-tapping screws. If the slab runs horizontally, additional sections are made of vertical slats of the same section.
Runs are treated with linseed oil heated to 60 ° C, impregnated with antiseptics. Hardware is taken with a galvanized layer so that they do not corrode in rain and frost. In brick and concrete pillars, steel plates are laid to fix the longitudinal girders.
Slab installation
The slab is placed vertically with the flat or convex side outward, if the boards are fastened with gaps. For a continuous covering, the elements are placed with a convex side inward at intervals, then they are covered with boards, which are placed with a protruding plane outward. They alternate the narrowing to the top with the narrowed part at the bottom, the knots are hung with an ax or left for picturesqueness.
When fastening horizontally, the upper board is overlapped by about 10 mm above the lower one in order to obtain a solid and original surface.
Decorating the finished fence
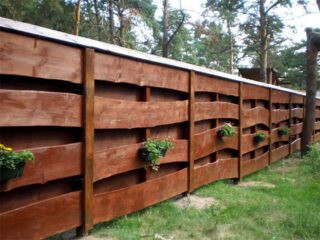
Often a slab fence is covered with a shed or gable roof made of slats, boards, the same lumber. The cover additionally protects the fence from snow and rain. Often the roof is made only above the entrance group, while it can be arched or lancet in shape.
Other options for improving the fence:
- hooks are placed along the fence, on which flower pots and pots are hung;
- use overhead chopped elements or threaded parts;
- round pennies are cut from the trunks across, and nailed from the outside in a certain order;
- before installation, the croaker is figuratively sawn, an interesting combination is selected.
They make varnishing, tinting or brushing the surface of the fence. The boards are painted with oil, acrylic, latex compounds several times. Choose one color or use several. Before varnishing, the wood is impregnated with wood stain to show the pattern, burned with a blowtorch until characteristic burn marks appear. Brushing means rough brushing until the fibers fall out, then tinted and covered with three coats of varnish.


