When carrying out repair and construction work, attention must be paid to achieving perfectly flat surfaces of walls and ceilings. Quite often, they are so crooked that leveling with a putty is impossible or economically impractical. In such cases, gypsum boards and steel profiles are used to create the frame. It is not difficult to make a wall of drywall with your own hands, a prerequisite is the correct choice of finishing material, components and adherence to the technology for performing the work.
Varieties of plasterboard profiles
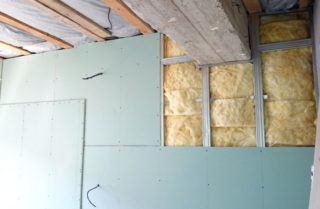
Externally, a flat and smooth plasterboard wall has a multi-level spatial arrangement:
- suspensions - U-shaped parts that are attached to the wall;
- guide strips - serve to accommodate plates;
- GKL - form flat and curved surfaces;
- external finishing - a thin layer of plaster covering the technological seams and holes;
- fasteners - screws and dowels for connecting all parts into a single structure.
A reliable steel frame is a prerequisite for creating a flat and solid surface. The structure is assembled from profiles of different sizes, configurations and purposes. To make a drywall wall, you need to use the best quality material from trusted manufacturers.
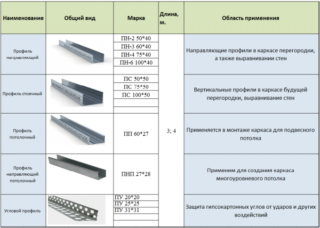
The following types of profiles can be used in the work:
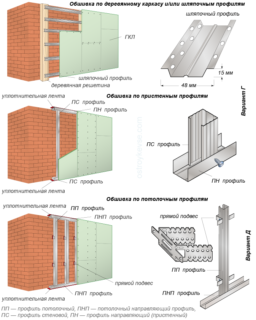
- Rack. Needed to create the load-bearing part of the frame. The planes are used for fixing sheets. CD profiles are produced in sections 250-400 cm, 60 mm wide and 27 mm high.
- Guides (UD). Installed along the perimeter of the plane, which is designed to close the gypsum board. Nailed to ceilings, walls. They are 300 cm long, 27 mm wide and 28 mm high.
- Ceiling. Designed for mounting bearing profiles at a specified distance from the base. Standard products have a length of 30 cm, up to 100 cm are available on request. Extension cords are used if necessary.
- Corner. Made of plastic, aluminum and iron. Serve to close the corners in order to give them a smooth and finished look.
- Arched. They have cuts in the shelves, due to which they bend along a certain radius. There are convex and concave models with a length of 50-500 cm.
- Beacon. Products are designed to set the desired level when leveling surfaces with mortar. Provides projection in the range of 5-10 mm.
The profiles are made by cold rolling followed by zinc coating. The thickness of the sheets is 0.4-0.6 mm.
When installing the frame, various auxiliary products are used. You can quickly and firmly fasten profiles using two-level and single-level connectors. The parts should be screwed on with self-tapping screws for metal 19-60 mm long.
Tips for choosing drywall sheets
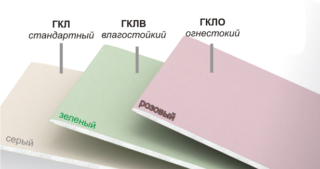
The erection of walls, ceilings and partitions can be carried out in rooms with different operating conditions in relation to temperature, humidity, and the specifics of the activity.
Drywall models:
- Ceiling. Differs in lightness and small thickness up to 9 mm. The risk of damage to the ceiling is virtually eliminated, so thin and inexpensive slabs are used.
- Wall. They have a large thickness of 10-12 mm, high strength. Some types of sheets are reinforced with polymer reinforcement.
- Refractory.A special impregnation prevents the possibility of fire on contact with an open flame or in case of strong overheating.
- Waterproof. They are used for finishing rooms with high humidity. Such plates do not bend. Only flat and angular structures can be made of them.
The industry produces gypsum boards in the format 120x250 cm and 120x300 cm. When buying, it is recommended to check the availability of a certificate, instructions for use, and only then check the condition of each sheet. It should be clearly visible and free from bends, cracks, chips, stains and abrasions.
Advantages and disadvantages of walls from GC
Plasterboard structures have their pros and cons, determined by the characteristic properties of the material and the peculiarities of installation work.
- Ecological cleanliness. The boards are made of gypsum and cardboard, which are completely harmless to health.
- Versatility. Due to the wide range of composition and size, the sheets can be used for decoration of any type of premises. There is an opportunity for the implementation of typical and non-standard solutions in the interior - niches, arches, curved structures.
- High construction speed. With proper planning and organization of work, the house can be sheathed from the inside in 2-3 days. The slabs are large, only a few are enough to cover the wall from ceiling to floor.
- The space of the frame can be used for placing insulation, laying communications, installing lighting and control devices.
- Ease of construction. Fixing parts does not require professional skills and expensive tools.
- Ease. The GKL partition is not considered a capital wall and does not belong to the redevelopment category.
When installing the walls with the frame method, up to 10 cm of usable space will be taken from each side.
The material is brittle, it cracks and breaks even from a weak blow. The frame is not designed to support heavy home furnishings.
After installation, the boards must be covered with plaster.
Methods for mounting drywall to the wall
- With a profile. It is used when the surface to be trimmed has large differences in levels or it is impractical to level it with a solution. This approach is applied to brick and concrete walls, ceilings assembled from several panels. The frame is assembled from profiles so that it has support and fastening on four sides of the room. The reduction in the area of the room is compensated by the possibility of using the space behind finishing.
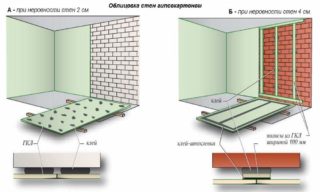
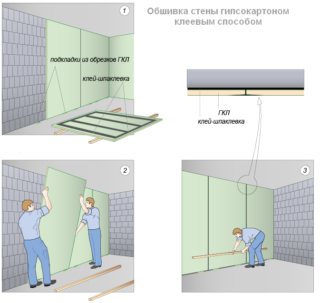
- No profile. The decision to glue the boards directly onto the walls is made when the surfaces are perfectly flat or not strong enough. Aerated concrete may not withstand the weight of the gypsum board and crumble. But if you stick sheets to it, this will not happen due to the distribution of the load over a large area. If you set the level correctly, you get a perfectly flat plane. The advantages of this method are its simplicity, speed and preservation of useful space. You don't have to buy profiles and components.
The choice of the surface cladding option is made based on the inspection, measurements, assessment of the condition of the bearing surfaces and the entire building as a whole.
DIY installation instructions
For work you will need:
- level, plumb line, square, tape measure;
- scissors for metal;
- screwdriver, puncher;
- a hammer;
- paint brush;
- a set of spatulas;
- serpyanka mesh;
- primer, plaster.
To protect the eyes, breathing and head, it is necessary to use a construction helmet, gloves and goggles.
Regardless of the chosen method of fixing the gypsum board, load-bearing surfaces should be prepared.They need to be cleaned of dirt and dust, to separate unstable fragments. If there is mold, it must be removed, and then treated with an antiseptic.
Sequence of installation of the frame system:
- Marking up. Lines are drawn along which the starting profiles will be attached. Suspensions, vertical posts and horizontal struts are installed. The end result is a lattice with a mesh of 60x100 cm, in order to screw sheets with sides that are multiples of this value to it.
- Installation of drywall canvases. First you need to install the gypsum board against the wall, fix it with 19 mm self-tapping screws, then put the next panel. Fastening is done in 10 cm increments with mandatory screwing in the corners. The heads of the hardware are recessed into the cardboard by 1-1.5 mm so that it does not break. The last slab is trimmed in width and attached to the wall with the cut.
- Seam sealing. A putty or a special mixture is used. To exclude the occurrence of cracks in these places, they are additionally reinforced with a plastic mesh. The depressions from the heads of the screws are also smeared over.
- Plastering the surface. It is pre-coated with a primer for strength and moisture protection. The mortar is applied with a thickness of 2-3 mm. After drying, the putty is trowelled and primed again.
The final stage is the finishing of the plasterboard wall.
- Measurements, determination of the horizontal and vertical base.
- Cleaning the working area from foreign objects, leveling it, if necessary.
- Treatment of walls with antiseptics, drying and applying a primer.
- Marking. Preparation of material for work. Installation of beacons to maintain the desired distance between the base and the coating.
- Kneading the glue. Applying it to the wall so that the mortar is in the middle and in the corners of the masonry fragment. Another option is to grease the slab with glue. Here, each master chooses for himself how it is most convenient for him.
- Grouting. Plastering and other actions are carried out in the same way as those listed in the description of the frame method.
The choice of the method is determined by the tasks and conditions in which the installation and further operation will be carried out.

