The basis of any structure is its foundation, and the roof is considered to be the protection of all bearing and support systems from moisture. The construction of the roof is carried out at the final stage of the construction of the building, but it is at this time that the basis for its strength, comfort and durability is laid. If you make a roof of a house with your own hands, you can save an impressive amount on the services of specialists. To do this, you should study the device of existing structures, the rules for their selection and assembly. Subject to compliance with building codes and work technology, you can build a roof that is practical, reliable and presentable.
The main elements of the roof
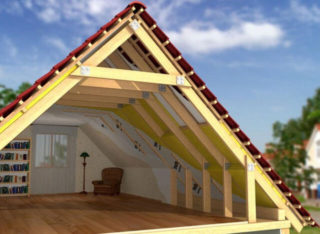
You should make a roof yourself only if you understand the conditions of the upcoming task and have a competent, well-thought-out project in all respects.
A pitched-type structure consists of the following elements:
- Rafter system. It is interconnected beams of different sizes and sections, forming a spatial frame that sets the shape of the upper part of the building. Depending on the complexity of the project, the system consists of a Mauerlat, rafter legs, puffs, stops, struts, ties, struts, ridge girder, and wind beams. When making a roof with your own hands, layered and hanging type systems are used.
- Insulation. It is used to create a temperature barrier between the attic and the street. The material is placed between the rafters so that it does not protrude beyond them. In private construction, mineral and ecological wool, polystyrene derivatives, polyurethane foam are used. Bulk materials such as sawdust, straw, perlite, expanded clay, penoizol and styrene foam are also used, but rarely.
- Vapor barrier. It is used in cases when basalt and cellulose wool ventilation materials are selected for insulation. Provides steam removal from the premises to the street. Installed on both sides of the rafters. You should choose a branded membrane film from trusted manufacturers.
- Interior decoration. It is selected based on the purpose for which the roof of the house is made with your own hands. The dwelling is sheathed with clapboard or drywall, the utility room - with plywood, siding, plastic panels or chipboard. In the future, paint, whitewash or wallpaper is applied.
- Roof covering. Protects the interior from precipitation, debris, insects and animals. Roll and solid materials are used - roofing material, slate, metal and ceramic tiles, corrugated board. Fastening to the frame is carried out with nails, self-tapping screws on the locks and by fusing.
- Gable. Structurally, they are a continuation of the walls, filling the gap between adjacent slopes. They are made of timber, boards, bricks or panels on the frame.
Flat roof construction is much easier. The maximum is dense insulation and roll roofing.
Factors influencing the choice of roof
To build a roof, it is necessary to take into account a number of factors when drawing up drawings, the neglect of which is fraught with unpleasant consequences.
The choice of roof is influenced by the following conditions:
- Ethnic situation in the region. We are talking about traditions and customs in the field of construction.Ignoring them can be a reason to create an uncomfortable psychological environment.
- Purpose pursued. If the roof is conceived as an object of protecting the building from precipitation, you can choose the simplest and most inexpensive option. Another thing is when you need to impress or equip a functional room in the attic. Here you should think about complex structures.
- Precipitation level, especially in winter. If the snow does not slide off the roof, under its mass it bends, cracks and breaks the coating, the rafter system deforms and collapses. The right choice in such an area is structures with steep slopes.
- The strength of the wind. High roofs have a lot of windage and can not withstand strong wind loads. Low roofs with wide overhangs are also vulnerable to extreme air currents. It is necessary to adhere to the parameters recommended by building codes and manufacturers.
- Weight and fastening methods of the selected coating. For each type, the minimum and maximum slope levels are determined. It is required to calculate the cross-section of the elements for the frame.
Designing a house is a complex and responsible process, where every nuance must be taken into account.
Roof varieties
Private developers have a wide range of roof designs available for residential and auxiliary buildings and annexes. The decision is made after evaluating the aesthetic and practical aspects of the buildings, their skills and financial capabilities.
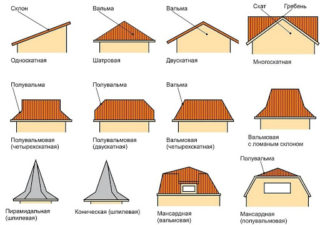
According to the shape, the roof is divided into the following types:
- Smooth. It is a monolithic or prefabricated plane covered with dense weldable material. Such a roof is made with your own hands when a recreation area with furniture, a pool and other furnishings is set up on it. The disadvantage of this solution is that snow, water and debris accumulate on the surface. Smooth crumb should be cleaned regularly and often.
- Shed. It is the simplest design, where the minimum amount of materials is used. This is where the benefits end. The space of the attic is extremely limited, the slope must be oriented towards the prevailing winds. The aesthetic side leaves much to be desired. Such roofs are more used for utility structures and outbuildings to the house.
- Gable. It is the most popular for residential buildings. The installation of such structures is rather complicated, but has several advantages. These include the possibility of equipping a full-fledged living room in the attic and a presentable appearance. The pediment can be used for the installation of observation and panoramic windows.
- Four-slope. They are chosen less often, since they differ in the complexity of design and construction. They are subdivided into hip-roof and hip-type projects. Such roofs are characterized by the best air tightness, wind and snow resistance. We should not forget about the presentability of the design. It looks beautiful, harmonious and rich. There are no problems with installing windows. Products of an inclined type are installed, which make it possible to ventilate the attic and supply natural light into it.
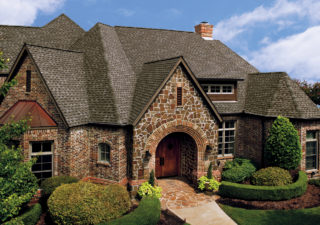
- Combined. The structure looks original, unusual and representative. Consists of a combination of complex shapes with kinks and protrusions. The steepness of the slopes allows you not to worry about the accumulation of snow, the large volume of the attic makes it possible to use it for a wide variety of purposes. The downside is that the layout of such structures is very complicated. You can compose it with the appropriate education or experience in such work.
You need to choose the shape of the roof taking into account all the details, not succumbing to emotions and ambitions. In this case, its construction will take place without complications, the final result of the construction will be of high quality and attractive.
Preparatory stage
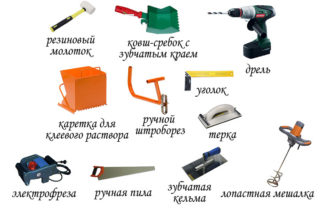
Each phase of construction requires consistency and adherence to the technology of execution. One of them is preparation for installation. First of all, you need to collect tools and equipment.
For work you will need:
- roulette, level;
- hammer, mallet, sledgehammer;
- hammer drill, grinder, screwdriver, wood drill;
- planer, cutter;
- hacksaw;
- paint brush;
- spanners;
- self-tapping screws, anchor bolts;
- antiseptic, hydrophobic agent, fire retardant;
- ladder, mounting belt and insurance.
To ensure safety, it is necessary to work in goggles, seals and a helmet.
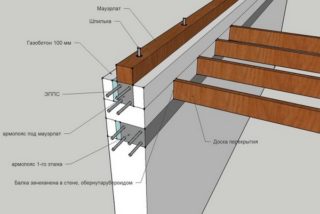
The preparatory stage is carried out as follows:
- Measurements. Compilation of calculations, drawings, determination of the amount of required building materials. You need to take them with a margin of at least 15%. There is always a risk of damage and damage to the goods during transportation, storage and use.
- Arrangement of an armored belt. Reinforced concrete tape is installed on brick and aerated concrete walls to secure their shape and prevent deformation under the pressure of the rafter system. The height of the armored belt is 20-30 cm with the condition of fastening to the walls with pins, anchors or mortgages.
- Waterproofing. Several layers of roofing material are laid on an armored belt or a bearing plate. To prevent the strips from moving during further installation, they should be glued to the base with hot bitumen, glue or mastic.
This concludes the preparation. Further work should be started immediately, without waiting for inclement weather.
DIY step-by-step instructions for building a roof
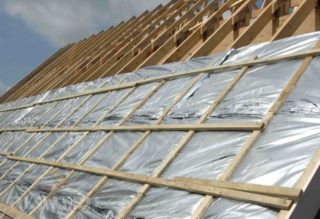
It is necessary to involve at least two assistants with minimal experience in such work in the installation of the roof.
Step-by-step instruction:
- Laying waterproofing. The strips are attached in the places where the support beams will be located.
- Mauerlat installation. A bar with a section of 15x15 cm and more is used. It is attached along the perimeter of the building with self-tapping screws, anchors or embedded parts.
- Construction of the truss system. Girders with a thickness of 5-10 cm are used. The fragments are fastened in a nesting way, followed by fixation with nails, self-tapping screws, strips and corners. The interval between the rafter legs is taken in the range of 80-160 cm. This indicator is determined by the shape of the roof, the parameters of the roofing and insulation.
- Build the battens. It is made of rack for piece coating and solid flat for roll coating.
- Fastening waterproofing. The film will protect the wood from dampness coming from the street.
- Roofing laying. The work is carried out in accordance with the manufacturer's instructions attached to it.
- Installation of insulation. The material is glued, inserted, sprayed or poured into molds. All cracks are blown out with polyurethane foam.
- Conducting vapor barrier. The membrane fabric is attached to the rafters and covers the insulation.
- Interior decoration of the premises. The choice of material is determined by the purpose of the room. For living rooms, lining, drywall, paint and wallpaper are used. Household premises are simpler - chipboard, plywood or plastic panels.
In conclusion, decorative profiles are installed, the overhang is sewn up and the drainage system is assembled.


