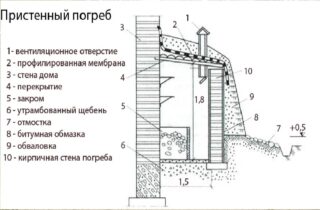
Preserving the harvest of vegetables and fruits in a residential building is not always possible due to the difficulty of maintaining the optimum temperature. You can build a cellar with your own hands in different ways. In order for the work to be done not in vain, it is necessary to observe the rules for arranging the storage facility, to choose the optimal design and materials.
- Varieties of designs, their advantages and disadvantages
- Ground option
- Wall-mounted
- Earthen
- Semi-recessed
- Basement
- Instructions for the construction of an underground cellar
- Design
- Arrangement of the pit
- Pouring the foundation
- Floor
- Building walls
- Overlapping
- Ventilation
- Ladders, doors, hatches
- Wiring
- Interior decoration
Varieties of designs, their advantages and disadvantages

A cellar is a structure buried in the ground, designed for year-round storage of food. The building can be detached, attached, located under a residential building or utility block. Sometimes a cellar in the country has to be built above the ground, for example, in the case of high groundwater.
All options for buildings are usually classified according to their location in space, the degree of deepening and the materials used.
By location, structures are distinguished:
- terrestrial;
- semi-buried;
- underground;
- freestanding;
- wall-mounted;
- intra-house (basement).
For the construction of floors, walls, ceilings, concrete, wood, brick, slate and clay are used. The walls are insulated with mineral wool, expanded polystyrene (foam), natural materials.
When choosing a storage layout and materials, climatic conditions and groundwater level are taken into account.
Pay attention to the availability of materials at hand and the level of prices.
A cellar in a private house should be convenient for maintenance and visits in the winter.
Ground option
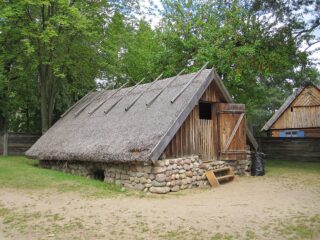
On loamy heaving soils, near a reservoir or with periodic exposure to the surface of groundwater, the arrangement of a ground cellar is optimal.
The advantage of aboveground structures:
- water does not flood the room;
- no need to dig a pit and dispose of excess soil;
- there is no overlap, which simplifies the design, reduces the cost;
- the structure looks like a small house, which can be given a beautiful look;
The disadvantages include the need for additional heating in cold weather.
Above-ground type of storage is located separately or attached to the wall of the house.
Construction features:
- the pit is made no deeper than 0.5 m;
- the floor is poured with concrete or covered with waterproofing materials;
- walls are built from ceramic (red) bricks, expanded clay concrete foam blocks, treated with wood preservatives;
- the door is located on the north side so that it allows less heat to pass through in summer.
The structure is given the shape of a hill or dugout. A layer of filled soil from 70 to 150 cm provides the temperature necessary for storing the crop.
Wall-mounted
The structure of the structure is similar to the above-ground version, since the foundation of the main building does not allow to dig a deep pit. The advantage is that the wall where the building is located will be relatively warm in winter.
Construction algorithm:
- They dig a pit no deeper than 50 cm.
- They equip a pillow of sand and crushed stone about 10-15 cm high. The layer will serve as drainage.
- Prepare the formwork for the foundation of the walls flush with the ground.
- Arrange the place for the outflow of water from the pillow.
- The foundation is poured with concrete of the M150 – M200 brand.
- They arrange a concrete screed or lay wooden floors on logs. Boards are used not grooved so that there is a gap between them, so the moisture that has got into the cellar evaporates faster.
- Walls are erected from ceramic bricks or concrete blocks. It is possible to use OSB panels or boards. In this case, a frame is made, and insulation is placed between the inner and outer layers.
- They are covering the cellar.
- They insulate and waterproof the walls and roof from the inside and outside.
- The hood is mounted - a pipe with a valve or a removable cover.
- Arrangement of the degrees is carried out, which should be under the visor.
- Install and insulate doors.
- Additional insulation can be carried out by embanking the walls.
Cellars are built in a similar way on the first floors of residential buildings. Sometimes it is possible to use the balconies on the ground floor for storing workpieces all year round. In this case, the entrance is equipped from the apartment, and the small cellar itself is covered with a floor.
Earthen
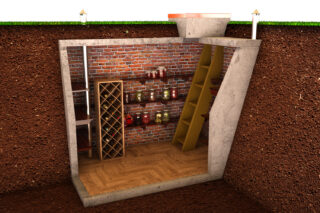
A cellar completely built below ground level is considered ideal:
- the room maintains approximately the same temperature all year round;
- on the roof covered with earth, you can arrange a recreation area or parking;
- if the entrance is arranged from the house, then outsiders will not know about the cellar.
At the same time, during the construction, it will be necessary to carry out a large amount of earthwork, and resolve the issue of soil disposal.
In areas with periodically rising groundwater, caissons are used - large-volume containers with a narrow inlet-hatch in the upper part. Modern factory-made caissons are installed. Eurocubes and barrels (plastic or metal) are used for primitive storage facilities.
Semi-recessed
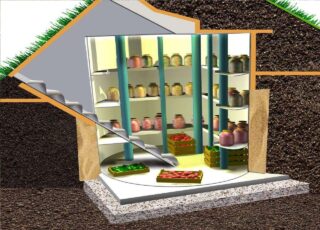
The design combines the advantages of earthen and aboveground cellar options.
Important features when building:
- pit depth from 1/3 to half the height of the structure;
- small amount of earthworks;
- the price is lower than that of a fully buried cellar;
- reliable insulation of floors and walls will be required;
- stairs or steps are usually arranged from the side of the street in order to free up internal space.
Increases the cost of waterproofing the floor and walls of the structure.
Basement
This option is suitable for country houses with a cold subfloor.
In multi-storey residential buildings, a cellar dug in the basement or basement will be ineffective, since the temperature in the premises is kept around 15-16 ° C and it is impossible to keep vegetable stocks and fruits for a long time.
Instructions for the construction of an underground cellar
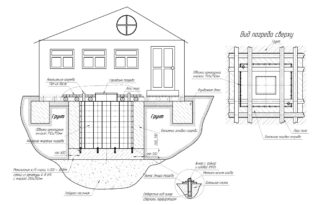
The construction of a separate earth storage facility is no different from the construction of a residential building.
There are several stages of arranging the cellar with your own hands in the ground:
- design - choice of location, layout of premises, building materials;
- arrangement of the pit and drainage system;
- pouring the foundation;
- laying the floor;
- construction of walls, floors, blind areas;
- internal and external waterproofing and finishing;
- electricity supply;
- manufacturing and installation of ventilation systems, doors, stairs;
- equipment of premises with storage places.
Design
To build a cellar on the site, you need to choose the right place:
- it is preferable to build in the highest place of the territory;
- the door is located on the north side;
- the distance to the toilet and the shed with animals is 12 m, to the compost heap, bathhouse, shower - 8 m, to fruit trees - 10 m;
The amount of precipitation is taken into account so that in winter the approach paths have to be cleaned less and the entrance is not covered with snow.
The minimum cellar area is at least 8 m², and the ceilings must be made higher than 2 m.
Arrangement of the pit
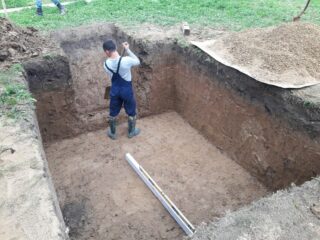
They work in dry weather when minimum precipitation is expected.For an area with a high level of groundwater, it is better to dig a pit in July-August, while a minimum of moisture will appear.
If the soil on the site is loose, then the pit is dug 50-60 cm wider than planned, and the walls are strengthened with temporary formwork.
For large cellars, it is advisable to use the excavator service.
Pouring the foundation
If it is not planned to fill the floor with concrete, then a 30x30 cm recess is dug around the perimeter of the pit. A sand cushion 10 cm high is poured, spilled with water, rammed.
Reinforcement is carried out and the foundation is poured with concrete of the M200 brand.
Another option is to pour the slab foundation. In this case, a hard waterproof coating and a base for the walls are simultaneously obtained. Before pouring, lay the waterproofing and sand cushion. The reinforcement is chosen with a diameter of 10 mm, and the grid spacing is 15x15 cm.
After hardening (2-3 weeks), start laying the walls.
Floor

In the cellars, earthen, clay, wooden, concrete or brick floors are arranged.
An earthen foundation costs a minimum of labor. The surface is leveled, cleaned of debris, roots of perennial trees. Ram if necessary.
The basis for the clay floor is a pillow made of sand, crushed stone and clay. The composition is kneaded in water and allowed to brew to soften the clay. The mixture is spread with a layer of 10-15 cm, leveled. After drying, roll waterproofing is laid, for example, roofing material.
A new portion of clay is mixed with sand and water and a finishing layer of 5 cm is applied. After hardening, the cracks are sealed with a lime-clay mixture.
The brick floor is arranged on a sand pillow, which is covered with 2 layers of roofing material and again covered with 5 cm of sand. Then, ceramic bricks are laid on a clay or cement-sand mortar, maintaining minimal seams. You can use paving slabs.
Building walls
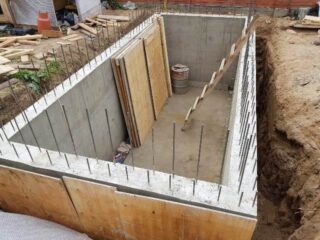
Foam concrete blocks and silicate (white) bricks are not suitable for walls in the ground. Boards are also poorly suited. Larch round timber can be used from wooden products, but it is very expensive. The best choice is ceramic bricks or concrete blocks.
Piece products (bricks, blocks) must be tied up in rows and reinforced.
Strong walls are obtained from precast concrete or cast in monolith.
Overlapping
The roof of the outdoor cellar is covered with concrete or slabs. Alternatively, use wooden beams, sheathed with boards.
Before filling the soil, it is imperative to carry out waterproofing with roll or floating materials.
Slate is used only if the cellar is not covered with soil.
Ventilation
Ladders, doors, hatches
For safe descent into the ground, it is preferable to use stationary concrete, brick or wooden stairs.
With a small cellar area, in order to preserve the cellar space, ladders are made from profiled metal, fittings, and a corner.
The main requirement for doors and hatches is to reliably protect the cellar from cold air. To do this, they are insulated with polystyrene, penoizol and similar materials. A heat-shielding cord, rollers are mounted along the contour, or self-adhesive pads are used.
The minimum size of the hatch is 80x60 cm, otherwise it will be difficult to get into the cellar in winter clothes. For ease of use, the hatch should open outward.
Wiring
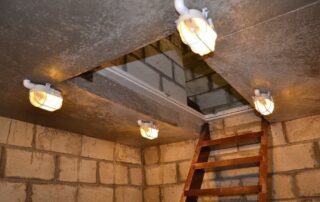
According to the rules of electrical safety, basement lighting is carried out with a voltage not exceeding 36 V AC or 42 V DC. Luminaires are used in a sealed design.
The switches are located outside the cellar.
Electric heaters are selected with a degree of protection of at least IP 54.
Interior decoration
To combat rot, to protect against the formation of fungus, the walls are covered with antiseptic agents.
Some scrap materials are popular, for example, slaked lime is considered a good option, which is used to paint over the walls from the inside. For decorativeness, you can add blue or soluble pigments for water-soluble paints to the composition.
To store stocks, chests are built from boards, metal. Banks with blanks are stored on shelves. The tree is treated annually with antiseptics.

