Pull-ups on the horizontal bar help develop the muscles of the arms, shoulders and back. You can make an outdoor device in the country or a compact (for example, collapsible) device for home use. If you have welding skills, you can build a 3-in-1 horizontal bar with your own hands.
What is a horizontal bar
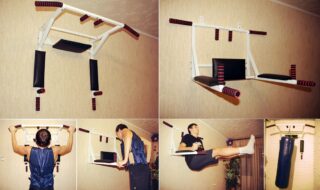
Variations in grips and pull-ups help target different types of muscles and ligaments. Different types of grips increase the width or thickness of the muscles. The exercise is multifunctional - it develops several muscle groups at once. On the wall horizontal bar 3 in 1 you can train:
- biceps;
- brachioradial muscles;
- rhomboid muscles;
- press;
- most of the large dorsal muscles, including the lats.
Exercise is also beneficial for the spinal column, promoting flexibility and posture. You can do it in the gym or on the sports ground, in the courtyard of your own house, by installing a horizontal bar with do-it-yourself bars on the site. A small projectile can also be placed inside the dwelling.
Pros and cons of a homemade horizontal bar
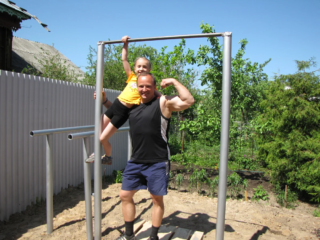
Classes on the horizontal bar are types of physical activity available to people of all ages and skill levels. By installing a 3-in-1 horizontal bar of suitable sizes in the yard, you can teach children to regular gymnastics.
Its support properties allow other projectiles to be attached to it, such as a punching bag, rope or basketball hoop. You can practice on a homemade horizontal bar at any time of the year.
The main disadvantage is that special skills are required to make a projectile. In particular, the master must be proficient in welding.
Types of horizontal bars
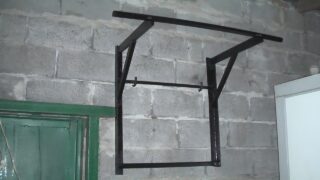
The dimensions of the 3-in-1 horizontal bar depend on where it will be located - on the street or in the home. Usually even a small area has enough area to equip a projectile there.
A horizontal bar for home use can be made simple, lightweight and small in width. Such a projectile can be stored in a closet or on a mezzanine, taking out only during classes. However, some people prefer to mount a crossbar in the hallway for the entire width of the opening. This option is good for its simplicity and conciseness, but it allows you to perform a limited range of exercises compared to more complex structures. The projectile can also be attached to the wall.
The simplest outdoor horizontal bar consists of two horizontal supports and a crossbar located between them. It is also possible to organize a more complex scheme - for example, several racks arranged in a row and connected by crossbars installed at different heights. This design can be used by people of any height and age. You can also organize a complex with a Swedish wall.
Selection of materials and preparation of tools
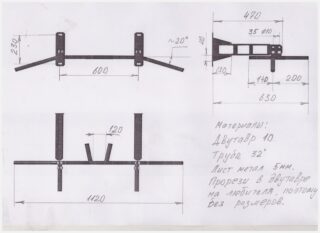
Before starting work, you need to prepare a drawing of a horizontal bar 3 in 1. It should show the main structural elements and their dimensions. You can use ready-made drawings or design the projectile yourself.
Structures made of steel (including stainless steel) are distinguished by the greatest strength. A well-made projectile can withstand a weight of up to 200 kg. Fragments of pipes and corners are well suited for its manufacture. In this case, the master will need to master the skill of welding or invite a professional. The strongest horizontal elements are obtained from pipes with walls more than 3 mm thick and 3 cm in diameter.
Rectangular and square bars are stronger, but round bars can also be used. Pipes are also suitable for guides.
There are restrictions on the use of stainless steel. First, you cannot take its food options: they have thin walls and bend easily. Secondly, products made of this metal often have a very smooth sliding surface, so it should not be used if the horizontal bar is designed for people with a low level of physical fitness. The required length of the bar can be determined by stretching the arm to the side while standing and calculating the length of the distance from the end of the middle finger to the shoulder of the second hand.
You can build a projectile using wooden parts. Vertical elements are made of timber with a diameter of 15 cm. Grooves are cut into them, corresponding to the cross-section of a horizontal metal pipe. The latter is fixed with fasteners with clamps.
It is not worth using a wooden crossbar: due to the heterogeneity of the structure, this material can behave unpredictably during sudden jerks.
Vertical guides can also be made of polypropylene pipes with walls no thinner than 0.5 cm. The voids of the supports after their installation are filled with concrete.
You can cut pipe fragments to the desired size using a grinder. Also from the toolkit you will need an electric drill, a welding machine, a stapler for furniture, a torch. To achieve a snug fit of round and rectangular pipes, a semicircle is sawn in the last grinder, which is then processed with a file.
Creation of a combined horizontal bar
Work begins by cutting the pipe for the crossbeam in accordance with the given dimensions. Also, 6 fragments are prepared with a length of 0.2 m, from which the handles will be made. A round pipe is used for them. From a square profile, 2 fragments are made that perform the function of beams (0.8-0.85 m long) and 2 more that support the crossbar (0.6 m each). You will also need a pair of braces (length 0.4 m) and ties between the bars and fasteners (0.7 m each).
The sequence of welding will be as follows:
- 0.2 m is measured from the sides of the crossbar, marks are applied and then the edges are bent by 190 degrees. A pipe bender is suitable for this.
- The crossbar is fixed at the ends of the spider fasteners, bored with a round file. It is necessary to ensure that the fasteners form right angles with the tube. The resulting structure should have a U-shaped appearance.
- The handles are filed. Then they are welded to the middle of the cross member. The distance between them should be 0.25 m. These elements are needed for a narrow grip.
- The bars are being strengthened. Then, to fix each element, holders are welded between the braces (the edges of which must be cut in advance to the desired angle) and the beams.
- Details that look like the letter G are fastened with jumpers. One of them should tie the holders, the other - the bars. Reiki is placed at a distance of 0.3 m from the corner. The horizontal bar will be attached to the lintels.
- Then the handles are fixed on the bars and the wall mounts are installed.
To hang the projectile on the wall, two hooks are mounted using anchor bolts. To make the design more reliable, you can use more hooks (up to four). It is important that they form a single horizontal line. The height of the bindings is selected so that the person who will train can barely touch the crossbar with his fingers, rising on his toes.
After the end of the welding process, the seams must be processed with a file and sandpaper. Then the projectile can be painted. Heat-shrinkable tubes are mounted on the handles. To make them sit tightly, they are treated with a hairdryer.


