The laminate layer has good technical and operational characteristics, therefore it is considered as a wall covering. The vertical decor looks original, is practical and durable. The preparation is simple, the material is assembled with your own hands.
Reasons for attaching laminate to the wall
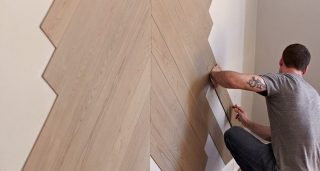
Laminate is a reliable and aesthetic material. It easily withstands impacts that would damage plastic and MDF panels. It is easy to care for the walls, just wipe it with a damp cloth.
Reasons for laying laminate on the wall:
- long term of work as a wall covering, the layer will look solid up to 25 years of operation;
- installation on a frame will allow you to mount insulation, sound insulation;
- you can fix it in different ways, each home owner chooses a suitable one;
- the load on the finishing layer is less, so you can put a class with less resistance, and save money.
The lamellas have a length from 1200 to 1900 mm, the width varies from 90 to 330 mm, and the thickness is 6 - 12 mm. More often they acquire dimensions of 1200 x 190 x 8 mm.
Choice of laminate
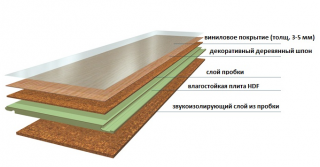
The material is represented by a layered structure in which each part performs specific functions.
Together, the layers make up a durable coating:
- The lower part protects the board from bending and other deformations. Some brands have a sound insulating substrate underneath the stabilizing layer.
- The carrier layer (base) is formed by compressed high-density wood fibers. This layer performs important functions, since a lock is cut out in it in the form of a spike or groove on one side and the other. Moisture-resistant impregnation is added to the composition.
- Decorative paper with a pattern of stone, wood, tile textures is glued on top.
- The cover protects against wear and impact and is made of acrylic or melamine resin.
The top coat determines the grade of the laminate. Modern technologies allow you to make a smooth pattern and apply relief in accordance with the texture of the stone or wood grain.
There are special fasteners for the laminate that facilitate the installation process.
By class and manufacturer
It is generally accepted that the panels of Russian and European manufacturers differ in quality, and it is better not to use Chinese laminate. The latest manufacturers include substances harmful to the body when released. Good lamellas are produced by the USA, but the cost is high and not everyone can afford it.
Division into classes according to EN 13329:
- for housing, class 31 (AC3) is used (before that it was 21-23, discontinued);
- for housing with increased load or offices with reduced traffic - class 33 (AC5 - AC6);
- industrial buildings - class 34.
In the Belgian material, the wear resistance is determined by the AC indicator, and the class speaks of the density and the ability to withstand the load of the main layer of the strip. Therefore, when buying, you need to consider both characteristics.
Chinese manufacturers write class 33, while wear can vary within AC3 - AC5, but the description is silent about this.
By connection type
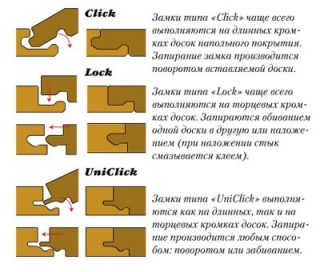
The adhesive connection provides for the installation of a model without a spike and a groove, but the composition is also used for lamellas with curly sidewalls. Modern laminate is joined without glue, connected with a lock.
Types of joining when fixing laminate:
- Constructor. In this case, the assembled row is lifted to join the next strip, which is already joined only in length. This method involves working with an assistant.
- Padding method. The long strip is collected, then joined in width. A difficult way, many manufacturers do not recommend using it in the instructions for the material.
- Docking, in which the width of the assembled plane is fixed with a coupler, while it is not necessary to raise the connected row.
Panels with click docking are used on the frame. The lock has the same groove and ledge, but shaped like a figure. These models create a perfect surface without seams.
Installation methods
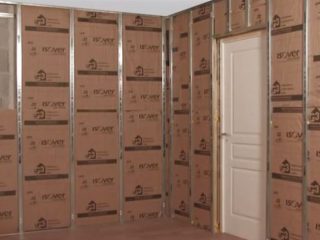
There are manufacturers that provide, along with the material, an assembly system of fasteners, including a frame made of galvanized profiles. The sets are in demand, because they do not match the crate, hardware. The installation technology is described in step-by-step instructions, so you can easily lay out the laminate on the wall with your own hands.
It will be correct to lay the panels on a verified frame, the elements of which are exactly vertical, and the plane is without protruding and falling parts. For the installation of the frame, cords or threads are pulled, serving as a guide, in order to fasten the laminate to the wall.
The distance between the support rails should not exceed 50 cm, there are already holes in them. The seams on the ends of the laminate must not match, so the next row will be fastened, starting with trimming.
On glue
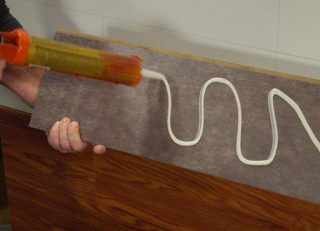
Simple technology requires perfect alignment of the base, while the frame is not needed. If the area has irregularities, over time the lamellas will lag behind it in parts or completely. It is possible to glue the laminate to the plaster if all chips and cracks have been repaired beforehand.
Work order:
- clean the wall surface from old and weak layers;
- the plane is primed with deep penetration compounds;
- putty the surface or plaster with the installation of beacons, sanded, achieve a flat plane;
- glue the first panel, then attach other elements to it using a plastic tie.
Under the laminate sticker, you can level the surface with g / cardboard, chipboard boards to avoid wet works. Glue is applied around the perimeter of the laminate strip, then applied in the center. If the building has curved walls, the finish is flexible laminate.
On the crate
A good way to install laminate flooring if the wall needs to be insulated. An insulating material is placed between the strips. Regular level and verticality checks will help to properly attach the slats.
Types of rails:
- Wooden. They take 50 x 50 bars or put slats with a section of 40 x 20 or 50 x 25. The material is impregnated with drying oil from the action of moisture, insects, mold.
- Galvanized profile. It is very easy to use, does not require preparation, has clear dimensions without distortion.
First, holes are drilled for dowels, then brackets are installed, and the slats are fixed to them. For horizontal slats, vertical supports are placed, and vice versa. The bottom panel is burst with wedges, it must be laid with the groove up and fixed in the corners in the lower part, in the upper center at the edge of the strip. The following slats are placed in the same way.
With the help of kleimers
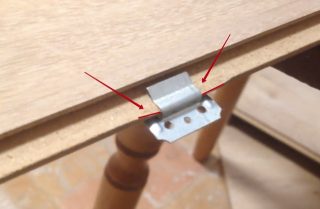
This is a special fastener for the laminate, which is used when installing the material on the crate. The bracket is equipped with a rigid clamp, and holes are provided for hardware. When choosing, you need to try on a kleimer so that it fits snugly against the locking edge, while the bracket should not dangle.
Sometimes the kleimer does not sit down due to the thickness of the locking protrusion, then the site is grinded with a construction knife or chisel. The staple can be unbent with pliers and adjusted to fit. Such methods weaken the fastening, therefore, they are used in extreme cases.
The first board is placed with the comb down, fixed with self-tapping screws to the crate along the bottom.A kleimer is put on the edge of the upper groove, and it is fixed to the frame element. The following lamellas are butted together and fastened using the appropriate method.
Special nails
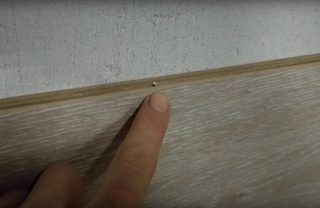
Nails are used to fix the wall laminate in order to properly attach the strips. It is difficult to work with such hardware, since the laminate has a multi-layer texture and can be damaged when hammering in a nail. Chips or burrs remain on the surface of the finishing layer.
Types of nails:
- Construction. Thin and small length options are suitable for laminate (they are called glass).
- Screw. They are used less often, since the spiral surface does not always enter the body of the laminate without damaging the outer layer. The advantage is a more secure fixation when there is a risk of deformation.
- Finishing. They have a head with a minimum diameter, so they are almost invisible on the front side of the panels.
During installation, the lower edge is fastened with nails, and the next one is snapped into a lock and fixed in the same way. An assistant will be required to support the laminate flooring.
Required tools and materials
Apply glue based on polyvinyl acetate for laminated material or on a dispersion basis when joining the thorn-groove. They purchase clamps, nails, screws, depending on the fastening method.
You will need a tool:
- hammer drill, screwdriver, electric jigsaw;
- level, square, tape measure 3 m, pencil, cord;
- spatulas and drill bit:
- screed for laminate flooring.
The hammer is prepared with a wooden or rubber head, you will need a clamp to install the last panel. The gaps at the walls are inserted using spacer wedges.
Mount selection
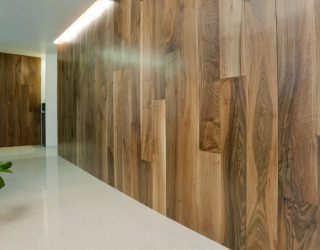
The material is heavy, so attention is paid to the choice of the method of fixation. The battens must be strong and can support the weight of the wall finish.
The hygroscopicity of the laminate is low, but the cellulose in the composition of the laminate can swell in high humidity conditions. In bathrooms, saunas, baths, laminate flooring is not used as a wall covering.
The choice of fastening method depends on the evenness of the walls. If the surfaces have ridges and depressions, the frame will help to perfectly level the surface. Valuable types of laminate are fastened with clamps to maintain a beautiful appearance.


