Vinyl laminate successfully combines the advantages of laminated board and linoleum. It is flexible, resistant to moisture, has a huge range of colors and textures. The universal coating is used in residential buildings and commercial centers. One of the advantages of the material is fast and affordable styling, which you can do yourself.
- Description of vinyl laminate
- Varieties of flooring
- Self-adhesive
- Castle
- Roll
- Quartz vinyl
- Advantages and Disadvantages of Vinyl Laminate
- Substrate surface requirements
- Required tools and materials
- Installation technologies
- Castle
- On glue
- Laying self-adhesive vinyl panels
- Laying PVC laminate with smart adhesive tape
- DIY installation features
- Features of operation
Description of vinyl laminate
The unpresentable PVC tiles in the construction market have been replaced by a technologically advanced and reliable floor covering - vinyl laminate. The upgraded version consists of several layers:
- base - PVC tiles with various additives for strength;
- fiberglass - covers the base on both sides, providing reinforcement that does not allow changing the parameters of the material under the influence of moisture;
- color image - a decorative element responsible for the appearance of the material;
- fiber optic - a reflective layer to give a realistic picture on the panel;
- a protective coating made of polyurethane and other materials - gives wear resistance, prevents scratches, fading under the influence of ultraviolet radiation.
Some models have a thermal insulating backing or an adhesive layer. The new material is not inferior to the popular laminate in terms of decorativeness, and surpasses it in terms of performance. In the lines of foreign and domestic manufacturers, floors imitating various types of wood and types of stone, parquet boards. The surface texture is smooth or embossed (rough, embossed, wicker).
Varieties of flooring
- household (23.31 class) - fit in apartments and private houses;
- commercial (class 32-42) - intended for offices, shops, cafes;
- special (class 43) - fit in rooms with high mechanical stress (gyms, train stations).
The material differs in the degree of wear resistance, durability of operation. This characteristic affects the cost of vinyl laminate.
The coating differs in the way of installation.
Self-adhesive
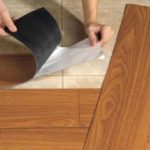
The covering is made in the form of rectangular slats or square tiles. Its difference is the application of an adhesive layer to the base. Before installation, it is protected with a special film. Installation is simple, but high-quality preparation of the base is required.
Castle
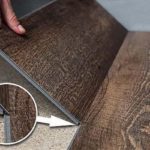
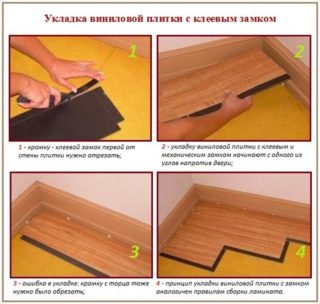
A popular option in which the products are not attached to the base, therefore, fewer requirements are imposed on its condition. The “click” locking system is easy to assemble; it is enough to connect the elements at an angle and lower them onto the plane. The bond is indicated by a characteristic click. The floor can be assembled by yourself, if necessary, the parts can be easily dismantled.
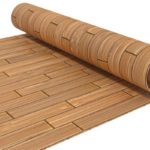
Roll
The roll-up material is designed to cover large areas. Its advantages are durability and affordable cost. The dimensions of the roll are 2 × 25 m. The vinyl floor is attached with special glue. The absence of joints increases the tightness of the coating.
Quartz vinyl
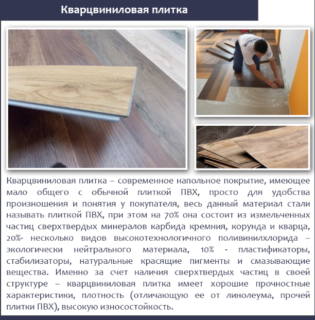
In the production of quartz vinyl laminate, quartz sand (60-80%) is added to the supporting base. The mineral increases the environmental friendliness, rigidity and thermal stability of the material. The coating can withstand increased loads, it is possible to lay quartz vinyl laminate on a balcony or veranda, in places with high traffic.
Advantages and Disadvantages of Vinyl Laminate
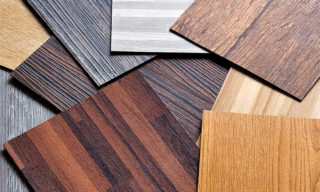
Before buying a material, you need to study its pros and cons. Vinyl flooring has appeared recently, so not everyone knows about its properties.
Material advantages:
- High level of moisture resistance. PVC panels are not afraid of spilled water, they can be laid in the kitchen, in bathrooms, swimming pools.
- Durability and wear resistance. The material has a long service life. Some European manufacturers have a lifetime warranty on residential premises.
- Has sound and heat insulating properties. The floor dampens impact noise, in winter it does not feel cold.
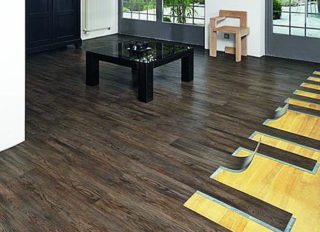
- A wide range of decorative solutions - panels realistically imitate the texture of wood, stone and other floor coverings. They differ in many shades, matte and glossy.
- The tiles are non-slip, scratch-resistant, and static-free.
- Simplicity of styling. Installation of the material does not require special tools and skills. It is enough to carefully study the instructions.
Vinyl laminate can be laid on a "warm floor" system. The panels retain their thermal stability, the joints do not diverge when the temperature drops.
Disadvantages:
- Burning releases toxic substances.
- PVC panels spread chemicals as a result of heating, they should not be laid near fireplaces.
- Dark stripes remain on the surface from contact with rubber.
According to experts, vinyl flooring from European manufacturers is safer, more durable and more reliable than classic laminate.
Substrate surface requirements
- Solidity - cracks and depressions of the screed are sealed with cement mortar.
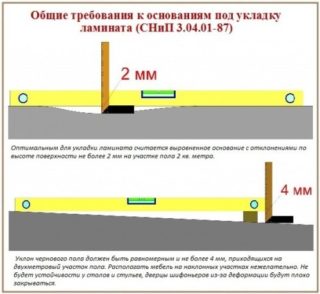
- Horizon compliance - the total slope should not exceed 4 mm.
- Cleanliness - the substrate must be completely free of dirt, dust, chemical liquids, oil stains.
- Strength - deformation, deflection of the surface under load is not allowed.
- Lack of moisture - the surface must be dry, you will need to wait until the screed or leveling compound is completely dry.
The worn-out floor covering (carpet, parquet, linoleum) is dismantled. Strong ceramic tiles can be left without relief, but filled with leveling mortar. The wooden floor is covered with moisture-resistant plywood or chipboard with a thickness of at least 10 mm.
Required tools and materials
For self-styling you will need:
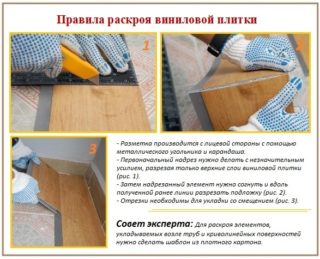
- scissors or construction knife;
- tape measure and pencil;
- special glue (if necessary);
- mallet;
- square;
- restrictive struts;
- Scotch;
- roller for rolling adhesive joints.
Small plastic wedges are inserted between the wall and the tile. They create an expansion joint space, which is necessary to compensate for thermal expansions.
Installation technologies
Castle
Installation technology does not differ from working with a conventional laminate. After assembly, a "floating floor" is obtained. When laying interlocking quartz vinyl laminate, in most cases, fixation to the base is not required. An exception is premises with an area of more than 64 sq. m. The parts are connected according to the groove-comb type. Before laying the vinyl laminate, the base is covered with a polyethylene foam or cork backing.
On glue
Adhesive floors create a seamless finish. For the installation to take place without complications, the preparation of the base is important. Adhesive tiles are thin, so all irregularities affect the quality of work. For fixing, an adhesive composition recommended for PVC tiles is used. It is applied to areas of the base with an area of 3-5 square meters. m, this is enough to attach several elements. When laying quartz vinyl laminate on glue, there is no need to adjust the pattern, but the products are placed in the direction of the arrow on the back. You can use the floor after 48 hours.
Laying self-adhesive vinyl panels
A practical and convenient option when the adhesive has already been applied to the product. Trimming and fitting of parts is performed before removing the protective film. The substrate must be clean and free of dust. The protective layer is removed before laying; for better fixation, the tiles are rolled with a roller.
Laying PVC laminate with smart adhesive tape
There is an adhesive strip on both sides of the panels. Smart tape secures two adjacent parts. This method is relevant for flexible material. It is simpler than a padlock.
DIY installation features
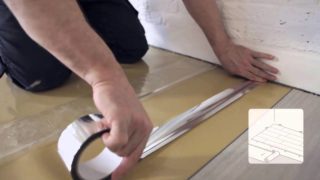
Packages with vinyl laminate are brought into the room 2 days before the start of installation, stored in a horizontal position. The material must adapt to the ambient temperature. If it is planned to lay a warm floor on the system, then the heating is turned off at the same time. The recommended temperature for work is 18-24 °.
Recommendations:
- When installing on a deck, it is necessary to focus on the window, placing the lamellas with the long side perpendicular to the light source. This aspect is not taken into account when mounting diagonally.
- Installation of vinyl laminate with smart tape is done without a backing, lock - with a backing.
- The adhesive is selected according to the type of substrate, there is a special version for absorbent surfaces. The universal composition is suitable for any type.
- Do not put two tiles with the same pattern next to each other.
- Before installing the laminate on the glue, the base is marked.
- Prepare the base, level and clean the concrete screed. Cover the plank floor with sheet material. Sink the heads of the self-tapping screws deep into the plywood, then fill the holes.
- Check the material for defects before installation.
- Cover the base with a backing, securing the canvas with tape. It compensates for unevenness, serves as a shock absorber and additional thermal insulation.
- Installation of PVC laminate starts from any corner of the room. A plastic wedge is inserted between the end piece and the wall.
- It should be noted that the last row should be wider than 5 cm. If the condition is not met, it is necessary to trim the details of the first row.
- The tiles of each row are stacked with an offset, its size is from 30 cm.
- The details of the first row fit tightly, the end locks snap into place without displacement.
- The laminate is connected at an angle of 20-25 ° with slight pressure and the element is simultaneously lowered to the floor.
- For reliability, the parts are knocked together with a mallet, placing a small piece of the panel.
- During the installation process, the linearity of the laid tiles is checked. Spacer wedges are inserted around the perimeter.
- Before laying the last row, the material is marked and adjusted.
After finishing the installation, you can immediately install the skirting boards and start using the floor. Before starting work, you should read the manufacturer's instructions. Different models of vinyl laminate have special requirements for fastening to the base and installation nuances, depending on the type of locking system.
Features of operation
The durability and appearance of vinyl flooring depends on the operating conditions. As a care, dry cleaning with a vacuum cleaner and damp cleaning with detergents that do not contain abrasive particles are allowed. To remove stains, do not use compounds with chlorine and acetone.The use of biodegradable cleaners is recommended. Do not allow prolonged contact of the coating and rubber. The materials react chemically to form black spots on the floor. Manufacturers recommend rubbing vinyl laminate with special mastic to restore decorative attractiveness once a year.

