Garage - a technical room designed to accommodate vehicles. It is rarely heated, since the car does not tolerate temperature changes and it is not rational to keep it in a warm room in winter. But because of this, high humidity is often observed in the garage, which can lead to damage to the car.
The main causes of dampness
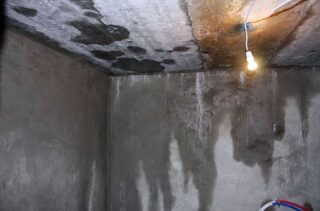
The norm for a garage is a temperature in the range from -5 C to +25 C and a humidity of 50-70%. A moisture meter is used for measurement. In practice, excess moisture often manifests itself as damp spots on the walls, condensation, musty humid air.
Dampness in the garage is caused by the following factors:
- Rainwater on the body of a car or snow on wheels will cause condensation to form in the room.
- Condensation occurs when a warm car drives into a cold garage. Worst of all, in this case, moisture accumulates on the body of the car.
- A high level of groundwater and lack of drainage - a garage is often installed without observing the rules and regulations for the arrangement. This is especially common in lightweight metal and concrete structures that are placed directly on the ground, without a foundation.
- If the garage is installed in the cellar, and vegetables and fruits are stored in the latter, the humidity in the upper room rises.
The main reason for condensation is the lack of ventilation. If the garage is well ventilated, none of the above factors will cause dampness.
Why is it dangerous to increase humidity in the garage?

High air humidity and condensation accumulation lead to the most unpleasant consequences:
- Dampness poses the greatest danger to transport. The car body is protected with special paint, but if chips and cracks appear on it, which is inevitable, water penetrates under the paint layer and the metal rusts.
- Dampness is a good breeding ground for mold and mildew. Mold affects any material: wood, concrete, plastic, matter. Often, food supplies stored in the garage become its victim. To some extent, the fungus is dangerous for humans.
- All metal parts of the building itself are subject to corrosion. With excessive moisture, no primer or paint will save metal and doors, beams, racks, and begin to rust. This is especially dangerous for metal boxes.
- Rotary and locking mechanisms of gates become a victim of corrosion earlier than others. The doors open with difficulty, the automatics jam.
Condensation often remains "invisible" when it accumulates between or inside the wall and insulation. The insulation gets wet and fails, then the finish falls into disrepair and after a couple of years the garage needs to be overhauled.
How to get rid of dampness
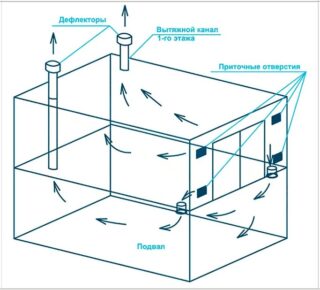
To get rid of excessive moisture in the garage, do the following:
- Insulate the box - thermal insulation allows you to maintain a high temperature inside and maintains a constant temperature regime, reduces the difference between the indicators of external and internal air.
- Arrange ventilation - forced, natural, combined.
- Drain the air - mount a heat gun, which allows you to quickly dry the car body, install a stove for the same purpose.
Installation of heating and electricity supply in the garage will help. However, this method is considered as an additional one; air drying will not replace ventilation.
Natural ventilation system
The garage is a small room, so the easiest way is to organize natural air circulation here. In most cases, it is enough to place air inlet and outlet pipes on the ceiling.
For such ventilation to work, several conditions must be met:
- Air inflow and outflow is possible if there is a difference in temperature. The heated air in the garage is lighter than the cold outside air, so the cold outside tries to get in to replace the less dense indoor air.
- There must be a difference in height of 3 m between the supply pipe and the outlet pipe in order to create a pressure drop.
- The supply duct should be located on the side of the prevailing wind direction. Thus, on the windward side, an increased pressure will be maintained, and on the leeward side, inside the garage, a reduced one. The pressure difference will ensure the flow of air.
Natural ventilation is regulated by means of flaps. In winter, it is recommended to partially block the air duct, since the difference between the temperatures of the indoor and outdoor air must be maintained and the rate of air exchange must be reduced. In summer, the air ducts are opened completely, providing circulation due to the wind.
Forced ventilation
The easiest way is to install the deflector. It is able to increase traction by 20% without other mechanical devices. The air flow bends around the deflector cone to create miniature rarefied air zones. The resulting pressure drop causes the air to move upward through the pipe.
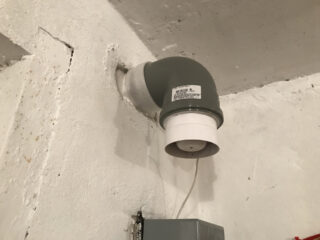
In the most difficult cases, an axial or centrifugal fan is installed in the exhaust blower. Such a device operates on electric current, so a cable must be routed to the hood. The power does not exceed 100 watts.
The fan is mounted in an insulated duct segment, otherwise moisture will condense here.
Combined ventilation
Natural ventilation and a low-power mechanical system can be combined. This ensures good air exchange in any weather. The scheme of the combined version is similar to the natural one, but includes a deflector in the upper part of the hood and an axial fan. To control the latter, it is recommended to set a timer.
In winter, natural ventilation is usually done; in summer, an electrical device is connected.
The inspection pit in the garage is not ventilated. To ensure air circulation here, you need to have separate supply and exhaust pipes.
Installation of waterproofing
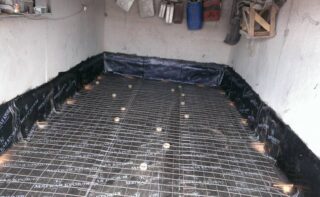
Often, floods or heavy rains are the cause of dampness and flooding of the garage. The steady rise of groundwater leads to dampness of the soil layer directly under the foundation and building. Moisture seeps through the floor and builds up inside.
To remove moisture in a brick or concrete garage, waterproof the floor in the room. The best way is a reinforced concrete screed. It is recommended to lay a pillow of sand and gravel under the screed with a thickness of at least 20 cm.
If it is no longer possible to concrete the floor for some reason, they resort to different drainage methods.
External drainage
The undoubted plus of external drainage with your own hands is the ability to equip it at any time. The scheme is as follows:
- Around the building, trenches are dug 40 cm deep below the floor level and the same width.
- Wells are drilled along the bottom of the pit every 1–1.5 m. The depth of the well depends on the occurrence of a layer of sand in the soil.
- Perforated plastic pipes wrapped in geotextiles are installed in the wells.The pipe should rise slightly above the top edge of the trench. The pipe is closed with a lattice or geotextile, the well is covered with pebbles.
- Geotextiles are laid at the bottom of the pit and a gravel cushion 20 cm thick is arranged. From above it is also covered with a canvas.
- Fill the trenches with crushed stone in layers, carefully tamping each layer.
Such a system removes a very large volume of water, preventing dampness not only of the foundation, but also of the building. However, it is possible to equip external drainage only on a separate building.
Internal drainage
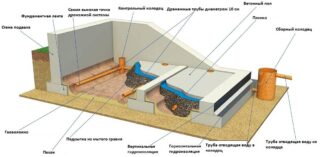
It is more profitable to install the system when building the garage itself. In this case, the pipes that drain the water are laid together with the foundation. In an already built garage, you will have to open the floors.
- The flooring is removed, a trench 40-50 cm deep is dug around the perimeter of the room. The hole is dug at an inclination of 3 mm / 1 m.
- A crushed stone pillow 15–20 cm thick is laid at the bottom of the trench.
- A geotextile is placed on top of the stone, a perforated pipe is placed on it and wrapped in linen.
- The drainage pipe is covered with sand to floor level.
- At the lowest point, a well is dug, the depth of which exceeds the depth of the waterproof layer. The walls are concreted.
- Pipes are brought into the well.
From the storage well, water is distributed into the ground or discharged into the drainage system.
Prevention of mold and mildew in the basement and garage
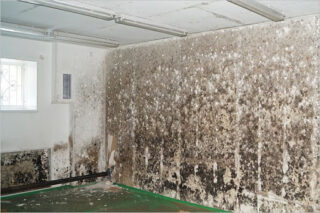
If mold or mildew has already appeared in the room, it must be removed before installing ventilation or installing a drainage system. Drying out a concrete garage is not enough: this way they stop the growth of the fungus, but do not destroy it.
The methods are as follows:
- The classic method is treatment with chlorine-containing agents. Even ordinary "Whiteness" diluted in a 1: 2 ratio is suitable. It is recommended to first clean difficult areas with an emery or iron brush.
- A solution of copper sulfate and lime - 100 g of salt per 1 kg of lime. Water for such a mixture needs 10 liters. If black mold appears, the concentration of vitriol is increased - take 300 g per 10 liters.
- Citric acid is a much safer method, but not as effective. Only local lesions are removed this way.
- Sulfuric smoke bomb - sulfuric smoke has the strongest disinfectant effect. However, you cannot use the garage after processing for 2 days.
- Hydrochloric acid - surfaces are treated with a dilute solution, and not just the affected areas. The remedy is very effective, but dangerous. You need to work in a respirator and protective clothing.
High humidity in the garage leads to damage to the car, the appearance of mold and mildew, and the premature destruction of the building. To get rid of this danger, it is equipped with ventilation, drainage system.


