Garage flooring is used to create a solid, reliable and durable base that can support the weight of the vehicle and equipment, while maintaining an even and smooth surface. Concreting does not apply to an event of increased complexity, but it must be carried out according to the rules regarding the choice of materials and technology for their use.
The main advantages of a concrete floor in a garage
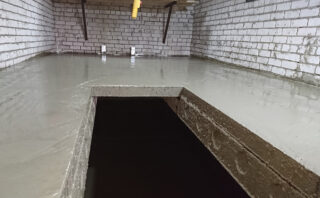
The decision to pour the concrete floor in the garage is justified by the fact that the reinforced concrete base has the following advantages:
- High load-bearing capacity. A well-made screed can withstand tens of tons of vertical load without any problems.
- Constancy of form. If the soil is mobile to movements and subsidence, then concrete products always remain smooth and even.
- Purity. A competently processed surface will not become dusty; it can be washed with any chemical reagents without fear of damage.
- Waterproof. The substance is so dense that it can be operated even without waterproofing, but subject to compaction at the stage of pouring.
- The variability of the finish. The board can be an independent front surface or a base for applying liquid, piece and roll coatings.
Concreting a garage floor is inexpensively much cheaper than ordering a factory-made monolithic slab. Independent work compensates for a good half of the costs of specialist services.
Calculation of consumables
At the first stage of construction, design is carried out, the dimensions and structure of the structure are established. The landowner decides whether the floor should be smooth or rough, with a pit or basement. The minimum slab thickness is then determined taking into account the maximum vertical loads. To be sure to support the weight of the machine and equipment, a minimum fill of 20 cm is recommended.
Then you should calculate the demand for materials. The proportions of concrete for pouring the floor in the garage are recommended in a ratio of 3: 3: 1, where the parts are sand, crushed stone and cement, respectively. The need for a square meter is determined first, and then for the entire floor. The expense for reinforcement should also be taken into account. It is made from rods with a diameter of 12-16 mm at the rate of 20 running meters. per square, plus 8 mm rods for frames and knitting wire for connecting parts.
To concreted the site, you need formwork, sand and crushed stone for backfilling, geotextile fabric.
It is not recommended to operate the stove in its pure form. You will need a durable floor covering, sanding or special surface treatment.
Tools required for the job

To fill the floor in the garage with concrete with your own hands, you need to prepare such a set of tools and equipment:
- concrete mixer (better than 2 units);
- construction mixer;
- Bulgarian;
- level;
- ax;
- shovel;
- a hammer;
- putty knife;
- vibrator;
- crochet hook;
- roulette;
- square.
To work, you need to purchase rubber boots, a tight robe, goggles, gloves, a gauze bandage.
Preparatory work
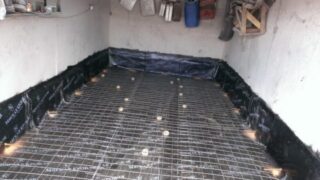
The success of the final result largely depends on the correct preparation.
Step-by-step instruction:
- Open the pit to a depth of 40 cm. Align and compact its bottom. Get rid of the roots of trees and shrubs.
- Cover the pit with a geotextile. Bring its edges to the surface. This technique will prevent bedding from eroding and sprouting.
- Fill in a layer of crushed-stone cushion with a height of at least 15 cm. Carry out its leveling and compaction.
- Install a waterproofing sheet. It can be roofing material or thick plastic wrap. The edges, in turn, are also brought up.
In conclusion, insulation must be laid on the canvas in order to avoid condensation in the cold season. The best option is extruded polystyrene foam with locks along the edges.
Screed reinforcement
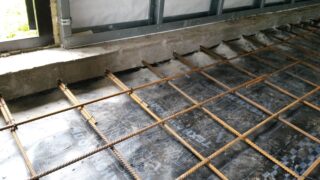
It is advisable to reinforce with rods with notches, which provide them with a stable position in the mass of concrete and exclude the appearance of backlash. To ensure the proper strength of the slab and its resistance to fracture, it is recommended to make a volumetric frame with a distance of 8-10 cm between the gratings. First, the sections are assembled, then they are connected into a single structure. The optimal mesh size is 15-20 cm.
Experts recommend connecting rods with frames, sections with wire. Welding weakens the metal and prevents the rods from taking the optimal position in the mortar after casting the mold. After assembling the frame, it must be fixed in space. For this, ceramic or plastic spacers are inserted between the rods and the formwork. The fixation must be rigid in order to exclude movement of the reinforcement during further stages of work. It is advisable to clean the iron from rust and treat it with any anti-corrosion agent before pouring.
Pouring concrete
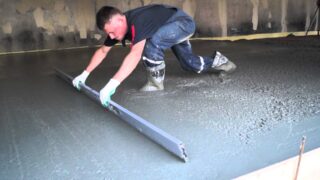
When planning and preparing this stage, it should be borne in mind that the solution must be poured continuously. It is intended to add each new portion in 20-30 minutes. So the solution will not have time to set and a solid monolithic plate is formed. The work should be organized in a brigade way, when one is engaged in mixing concrete, the second distributes it, and the third compresses with a vibrator and levels. Since for pouring it will be necessary to prepare up to 5 m³ of the mixture, the process must be started in the morning to complete it by nightfall.
It is recommended to carry out the work in the following sequence:
- Install beacons every 100-120 cm. The best option is a corner aluminum profile embedded in cement slides. In this case, it is necessary to make a slope within 1-2 degrees from the center to the edges in order to ensure the outflow of spilled liquid to the walls.
- Knead the solution. First, dry components are mixed, and only then water, pigments and plasticizers are added. Typically, it takes 5-8 minutes for one serving.
- Submit the solution into the mold. This should be done from the corners, since these are the most difficult and inconvenient areas. The solution is constricted by the rule by moving it along the beacons.
- Compact and level the mixture. A vibrator or steel rod is used first. Then the surface is smooth with a wide trowel.
- Grout the floor. This is done after 2-3 hours, when the concrete has already lost its fluidity, but still remains loose. The procedure is performed with a scraper and a mesh float. After that, the surface must be moistened and brought to a mirror shine.
Finally, cover the slab with plastic wrap or thick cloth.
For 7-10 days, the screed must be moistened with water to dry it evenly and prevent cracking. Full strength is gained after 28 days.
Finish coating

After hardening, the concrete is not yet ready for use. Its top layer consists of a mixture of sand and cement, which cracks and crumbles to dust.
Topcoat options:
- Two-component polymer composition. It is applied according to the instructions on the package, absorbs into the concrete, strengthens it to the state of a natural stone.
- Liquid glass. Penetrates pores and crevices, protects the coating from moisture and abrasion.Gives the surface a pleasant shine and presentability.
- Acrylic paint. Inexpensive, beautiful and fast. The liquid impregnates the composition to an insignificant depth and therefore it is erased after a while.
- Ceramic tile. The coating is strong, reliable and durable. For a garage, you need to choose porcelain stoneware, which is characterized by a homogeneous structure in volume and greater strength than that of household tiles.
- Rubber asphalt. The coating combines reliability, elasticity and abrasion resistance. Able to serve for at least 10 years.
- Modular polymer tiles. Fits like a puzzle. Provided the joints are sealed, it forms a beautiful monolithic and waterproof coating.
- Bulk mixtures. Monochrome and multi-colored solutions are used. They differ in strength, smoothness and beauty.
The choice of finishing coat is determined by the interior design of the garage, the priorities and financial capabilities of its owner.


