A modern heating system must not only maintain a comfortable temperature level during the operation of the boiler, but also after that. The decrease in the temperature of the coolant in the pipes occurs relatively quickly, therefore it is necessary to install additional devices. Do-it-yourself heating system with a heat accumulator has proven itself best in this regard: a diagram, a calculation, the connection of which can be done for almost any autonomous complex.
The principle of operation of the heat accumulator

The heat accumulator is a large container filled with water. It is heated directly or indirectly by the heating system. As a result, the water temperature rises to its maximum value. When the boiler stops working, the reverse process occurs - the energy from the heated water is transferred to the coolant.
To accomplish this task, the connection to the heating system of the heat accumulator should be carried out as close as possible to the outlet of the boiler. In addition, the following design requirements are imposed:
- Calculate the volume correctly. It directly depends on the area of the heated room;
- Thermal insulation of the walls. This is necessary to reduce heat losses in order to ensure maximum heat capacity;
- Possibility of additional function of hot water supply (DHW).
Such a heating system with a heat accumulator can reduce fuel consumption by up to 30%.
The level of comfort is significantly increased, which is expressed in maintaining the optimal temperature for a long time, even when the boiler is not working.
However, before planning the manufacture and installation of a heat accumulator, the following negative factors should be taken into account:
- Decrease in efficiency. Since part of the energy from the coolant will be spent on heating the water, the temperature in the radiators will be lower than without the heat accumulator;
- It is important to install an effective home-made heat accumulator for heating only for systems with a high temperature operating mode - from 80/60. Otherwise, heat loss due to water heating will significantly reduce the degree of air heating in the rooms;
- Large capacity. To store sufficient energy, you should choose heat storage units with a large capacity. Only in this way will their work be truly effective.
Before self-manufacturing, you must first decide on the optimal design.
Model overview
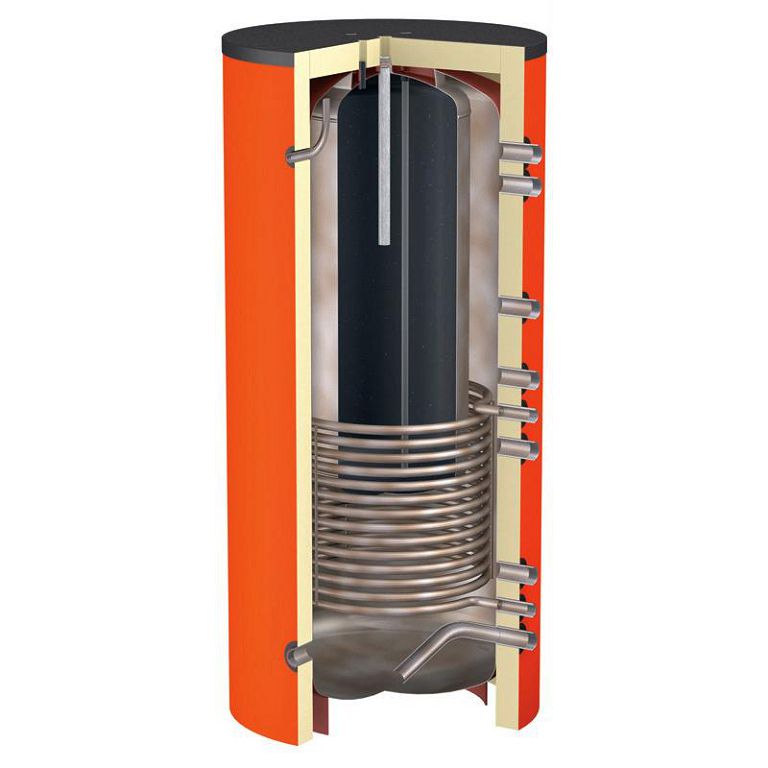
As a basis for a home-made heat accumulator for heating, you can consider the standard factory model. It is a container with several connections. Inside there is a pipeline in the form of a spiral, through which the coolant flows. The pipe is made of copper or galvanized steel.
To increase the efficiency of work, an additional heating element is provided in the design - an electric heating element.
It serves as an alternative source of thermal energy to maintain the temperature of the water in the tank at the desired level. Particular attention should be paid to the design, and in particular to ensure maximum thermal insulation. It consists of two walls, between which there is a layer of insulation. Most often it is basalt wool.As a result, such a heat accumulator for heating boilers has the following positive qualities.
- Uniform heating of water throughout the total volume;
- The possibility of functioning of heating systems with the help of heating elements, even when the boiler is not working;
- Minimal heat loss from the walls of the case.
However, the cost of such a structure is high, and its independent manufacture is problematic due to the complexity. Therefore, a different heating scheme with a heat accumulator is most often used.
In this case, the structure is a container in which a spiral heating pipe is installed. It has four connections for the straight and return pipe - inlet and outlet. Its manufacture is much easier than for the above model. To do this, it is enough to weld the container and make the appropriate pipes in it.
If the heating system with a heat accumulator with your own hands according to the scheme and calculation does not provide for the connection of additional sources of energy intake - you need to consult with specialists on this issue.
One of the advantages of this design is the low labor intensity of the work. But it is less effective, which affects the cooling time of the water. It can be upgraded by installing an electric heating element. A similar heating system with a small heat accumulator will work even without a boiler. But in this case, the cost of electricity will increase significantly. It is not recommended to use the DHW system, since the decrease in the efficiency of the installation will be great.
Calculation of the power of the heat accumulator
The main technical parameter of the heat accumulator is its useful volume. The amount of heat energy that can be accumulated in water depends on this.
The correct calculation of the heat accumulator for heating begins with an analysis of the room.
First, its area is determined, based on which the minimum power value required to heat all rooms for one hour is calculated. This is done using the following formula:
Q = S / 10
Where Q Is the heat loss of the building or the amount of energy to compensate for it,S - the area of the house.
For a room with an area of 90 m², it is necessary to generate 9 kW of energy per hour. Next, you should calculate the amount of stored energy in the heat accumulator for heating for 1 m³ of water. This indicator depends on its temperature. To avoid lengthy calculations, the table shows data for various values of energy transfer from the coolant to the water in the tank.
| Temperature, ° С | Energy kW / hour |
| 90/70 | 23,26 |
| 80/50 | 34,89 |
| 70/55 | 17,45 |
| 80/30 | 58 |
Let's assume that the standard heating temperature is 80/30. In this case, when calculating a heat accumulator for heating, designed for effective operation for 12 hours, the total usable volume will be equal to:
V = 12 * 9 / (58) = 1.86 m³
To fill such a volume, it will be necessary to make a cylindrical structure with a radius of 1 m and a height of 2.3 m.
Making a heat accumulator with your own hands

Is it possible to make a heat accumulator for heating with your own hands? To do this, you will need to make a structure with a calculated volume. It is best to use thick-walled galvanized steel. Since the dimensions of the future type of battery are large enough, the welding work should be entrusted to professionals. Any seam defect can lead to sad consequences - depressurization of the entire structure.
To improve the strength characteristics, it is recommended to make a two-layer container. The material of the inner layer should not corrode under the influence of water and high temperatures. The outer sheath must fulfill the function of mechanical protection. You also need to choose the correct diameter of the nozzles so that the connection of the heat accumulator to the heating system is carried out without additional adapters.
The work can be divided into the following stages:
- Manufacturing of internal piping. It is best to make it U-shaped, while the height should be 5-7 cm less than that of the container;
- Welding of the inner cylinder. It must be provided with holes for branch pipes;
- Manufacturing of the outer cylinder.
After the manufacture of a heat accumulator for the heating system with your own hands has been completed, it is necessary to check its strength. For this, the structure is filled with water and visually observed for the absence of leaks or depressurization.
To improve the thermal insulation qualities, the outer wall is insulated with basalt wool. In this case, the efficiency of the heating system with a heat accumulator will increase significantly, since heat losses will be minimal. The thickness of the protective layer must be at least 50 mm.
Installation features and storage tank connection diagram
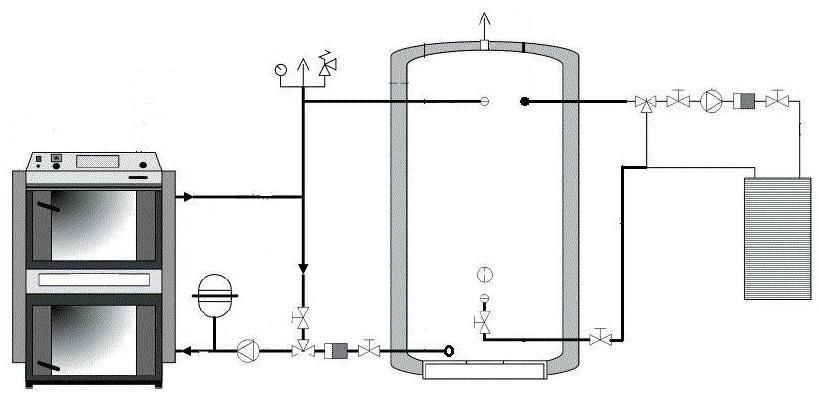
To connect the heat accumulator to the heating system, it is necessary to choose its location correctly. It is best if it stands in the immediate vicinity of the boiler. In this case, the temperature of the coolant will be high, which will have a positive effect on the rate of heating the water in the tank.
You should also make a pedestal for it, since the total mass of the filled heat accumulator will be quite high. In our case, it will be approximately equal to 2.1 tons. In a private house, for this you need to prepare a separate foundation. If hot water supply is provided in a heating system with a heat accumulator, a water supply should be installed in the room. It is connected to the tank through a shut-off valve. Alas, there are still no general schemes for the manufacture of a heat accumulator for heating. Most often they are guided by personal experience.
Practical advice
Based on the numerous experience in the manufacture of homemade batteries for heating, several recommendations can be distinguished:
- Steel corrugated hose can be used instead of the factory coil. Then the total heat exchange area will increase;
- In order not to manufacture a steel structure, plastic containers of the appropriate volume can be used. To maintain their shape, they must be enclosed in a lattice frame;
- Small heat accumulators for heating can be used to feed the hot water floor system.
But for a large area of the room, it is still recommended to purchase factory models, since their strength and functionality were calculated by specialists.
When choosing ready-made heat accumulators for any heating boiler, pay attention to the number of inlet and outlet pipes. This determines the possibility of connecting the device to a hot water supply system, underfloor heating or the use of an alternative source of water heating - a solar collector.
The video demonstrates the work of a heat accumulator paired with a heating boiler:


the simplest battery and the cheapest - the usual capacity of 5 cubic meters. Equipped accordingly with thermal insulation. that's all. In addition to thermal insulation, it must be protected from corrosion and covered with waterproofing on the outside.
Such a capacity does not require expensive costs for an internal heat exchanger (coil). So, for heating equipment with such a tank, a pumping pump is not required.
This is an open heating system, without pumping the coolant. This further reduces energy costs.
The system must be performed by playing with the diameters of the pipes. The first thread is made with pipe 2 ″, the next one is 1 size smaller - 1 3/4 ″, the next one is 1.1 / 2 ″, then 1 2/4 ″ and the last one is 1 ″. After the last radiator, the pipes are increased upward in the same way up to the boiler. For each change in the diameter of the pipes, a radiator is placed. With this arrangement, pumps are not required. Acceleration is desirable to be done with a fire boiler, and maintenance - with an electric one.