Underfloor heating in the bathroom allows you to heat the room efficiently and evenly and make your stay in it comfortable and safe. It is better to equip this system at the stage of building a house or overhauling an apartment. If this was not done, there are several ways to do the reconstruction of the bathroom with your own hands. To make the right decision and avoid annoying mistakes, you should familiarize yourself with the types, features of heating equipment, the rules for its installation and operation.
Is it possible to make a warm floor in the bathroom
The room is distinguished by increased dampness, the presence of steam and the constant ingress of water on the floor. There is always a risk of failure of shut-off valves, clogging of the sewage system and flooding of neighbors from below. The conditions are not optimal, but they are not critical either.
In favor of the fact that the bathroom can be equipped with heating elements, the following arguments testify:
- Sockets are located at sufficient distance from taps, floors and sprayers to eliminate the slightest chance of short circuits.
- Floor slabs are very durable and resistant to deformation. Communications laid under the external facing will not be exposed to mechanical stress.
- Modern insulating materials ensure complete tightness of the joints between the panels and the bearing surfaces themselves. Even in case of a breakthrough, there will be no flooding of the lower levels.
- The structures used for laying have high reliability and long service life. They remain in good condition throughout the entire operation of the building. If you follow the installation and operation technology, you will not have to carry out laborious repairs to replace the heating elements.
SNiP does not prohibit the installation of floor heating systems in apartment buildings. The only caveat is the need for approval when connecting to central heating.
Advantages and disadvantages
Like any design, a warm floor has its positive and negative sides. Thanks to the use of modern technologies, the technical characteristics of products are improved, the levels of their reliability and safety increase.
Pluses of structures:
- Optimum distribution of warm air. It forms at the zero level, rises up and fills the entire volume of the room. This achieves the same temperature at all points in the room.
- Lack of protruding parts, as is the case with radiators and coils. If necessary, the controls are masked in niches or taken out.
- The comfort of being in the bathroom. The legs of a person rest on a warm base, there are no discomfort and the likelihood of illness from hypothermia. The heated floor eliminates the formation of mold and mildew.
- Ease of installation. You can do the installation yourself using a minimum number of special tools.
The design also has disadvantages, they are as follows:
- The inevitability of raising the floor level to accommodate heating elements. Depending on the type of product, this figure is 2-10 cm.In some cases, it is necessary to increase the threshold of the door in order to level it with the finishing cladding.
- Lack of access for inspection, maintenance and repair. Products are filled with cement screed or tile adhesive. After that, they become an integral part of the monolithic slab.
- The need to install reflectors so that the heat goes up, and not to the ceiling of the neighbors below.
- Additional costs when using electrical products. The power consumption is 150-200 W / m². Even for a small bathroom of 3 m², 14 kW will be consumed per day, and 420 kW per month. With today's electricity tariffs, comfort charges can be too high.
You can choose the best option for arranging a bathroom after familiarizing yourself with the characteristics and features of the heating systems on sale.
Underfloor heating options for the bathroom
By the type of conductor used, the heated floor in the bathroom for tiles is divided into 2 categories - water and electric. Selection criteria are determined by such factors as the form of ownership of the property, type of heating, the presence of a constant supply of hot water to the heated towel rail. A private building can be equipped with any system, while there are some restrictions for repairing an apartment in a municipal building.
Water floor
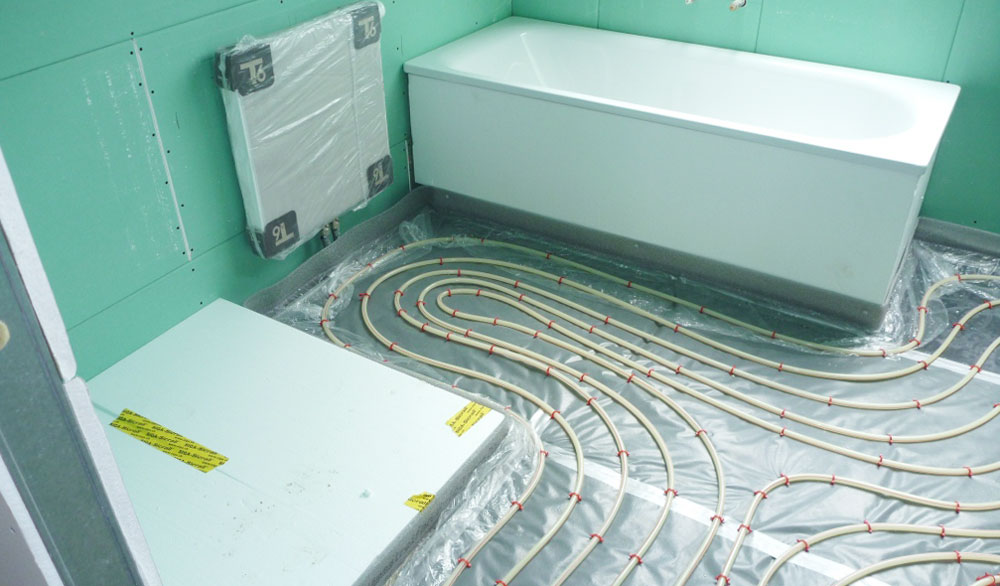
Owners of apartments on the upper floors need to know that the installation of such structures is allowed only on the first levels of the building. This is due to the fact that the screed and pipes filled with water create a critical load on the walls of the structure. In addition, the likelihood of highways breaking and flooding of the lower floors is taken into account.
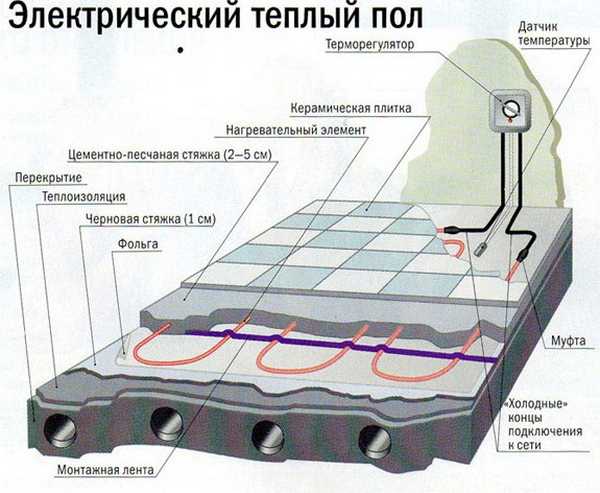
Water structures consist of several parts, each of which performs a specific function:
- Waterproofing. Prevents leaks in case of communication breaks and condensate retention when heating is stopped.
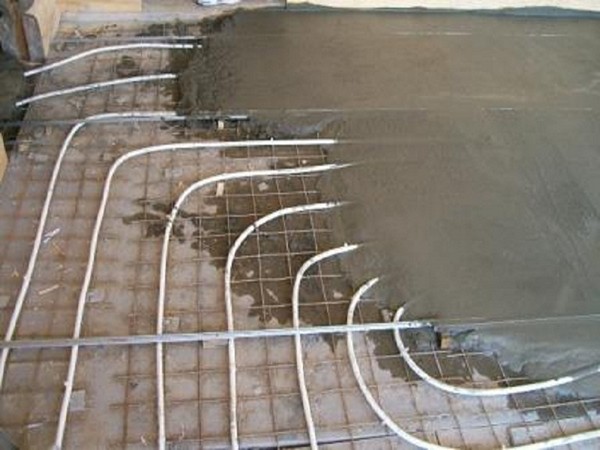
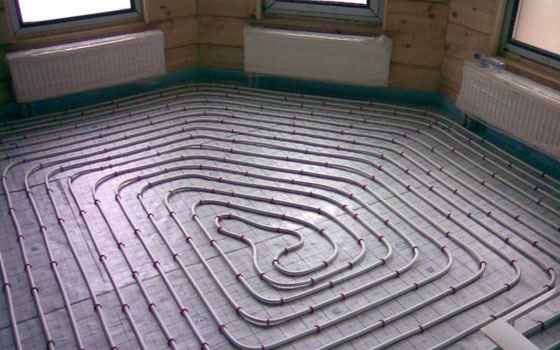
- Conductors. They are special flexible pipes. Products are distinguished by strong walls, good thermal conductivity and low coefficient of thermal expansion. The stacking pattern can be spiral or snake.
- Reflective screen. Serves to direct heat in the right direction (so as not to heat a thick floor slab).
- Cement strainer. It takes the released energy into its array and distributes it evenly over the surface. Performs the task of fixing pipes and protecting them from external damage.
- Collector. Designed to distribute hot water to circuits.
- Finishing finish. Ceramic and stone tiles are used, which have a low heat transfer resistance.
If the system is connected to central heating, a mixer is additionally installed to reduce the surface temperature to optimal. The degree of heating is adjusted by hand by turning the taps.
Electric floor

Installation and operation of these structures is not accompanied by such risks and difficulties that are inherent in water analogues. For installation, there is no need to obtain permission from the management company and coordinate your actions with anyone in the house.
For heating floors in bathrooms, you can use the following heating elements:
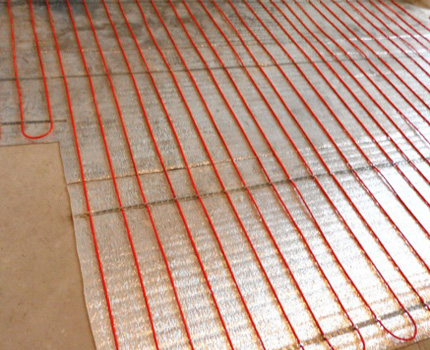
- Heating cables. They consist of a metal core and polymer insulation that conducts heat well. The thickness of the various models varies between 5-16 mm. Installation is carried out on a previously prepared frame, after which it is poured with cement mortar. The step between the rows is determined based on the degree of heating and the area of the room.
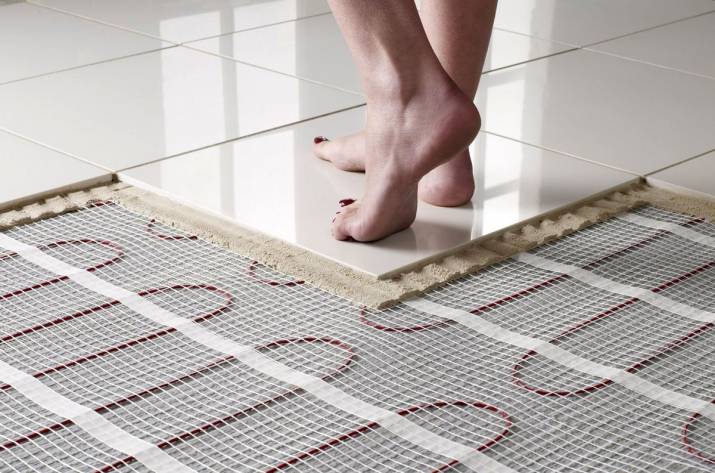
- Heating mats. They are thin heating wires rigidly fixed to a plastic mesh. They are produced in the form of strips equipped with terminals for connecting products into a single network. For installation, there is no need to raise the level of the base and fill the screed.It is allowed to use an adhesive with a thickness of 3-4 mm on which the tiles are laid.
- Infrared film. It is an innovative material with minimal thickness and high efficiency. Given its high cost and fragility, it is advisable to equip a wooden floor with a film, slabs finished with a waterproof laminate, varnished parquet or WPC engineering board. It should be borne in mind that the glue practically does not adhere to the smooth surface of the film.
When deciding which material to choose for insulation, you need to objectively evaluate all factors, eliminate risks and correlate price, quality and future costs.
How to install
The installation technique at the initial stages is the same for all types of systems, regardless of the characteristics of the building and the selected heat carrier.
Installation should be carried out in the following sequence:
- Remove old coating, take out debris.
- Clean holes and cracks. Fill with sealant or tile adhesive.
- Level the surface with a plaster screed so as not to overload the board.
- Place thermal insulation material on the base. Depending on the characteristics of the room, tiled polystyrene or rolled foil penofol is used. Seal the joints with aluminum tape.
- Fasten the waterproofing sheet. The strips are laid with an overlap of 15 cm, the ends are brought out to the walls by 20-25 cm. The joints are also glued.
- Attach a damper tape around the perimeter of the walls to compensate for the thermal expansion of the coating.
It is better to lay the water pipeline in special foam blocks, in which there are already depressions of the desired configuration. After laying the pipes, the excess is cut off and the ends are attached to the manifold pipes. Then it must be connected to the heated towel rail. To do this, cut-outs are made in it from metal pass-through fittings. A ball valve is placed at the inlet, which can be used to turn off the water supply when it is not needed or when there is a leak. Then the screed is poured and the tiles are laid.
The cable is laid on a fixed metal mesh, to which it is attached with wire or plastic ties. Then the mixture is poured and the tiles are applied.
Heating mats can be glued directly onto the waterproofing; no mechanical fasteners are required. After the glue has set, the floor is tiled.
The final stage in the installation of any system is to check its operability. It is necessary to identify signs of leaks or short circuits using instruments. The structures can be used only after the screed or glue has completely hardened.
Common mistakes
When arranging a water floor, inexperienced craftsmen make the following mistakes:
- Use of steel pipes for the water system. Right angles inhibit the flow of water, the metal rusts, and the joints begin to leak over time.
- Application of a spiral scheme over a large area. This leads to uneven heating and a cold surface in the last third of the return line.
- Ignoring the installation of the manifold, thermostat, mixer and tap. The result is uneven heating of the base, the creation of extremely high temperatures and the inability to control the system.
A competent choice of materials and adherence to construction technology are the key to creating an effective and safe underfloor heating.


