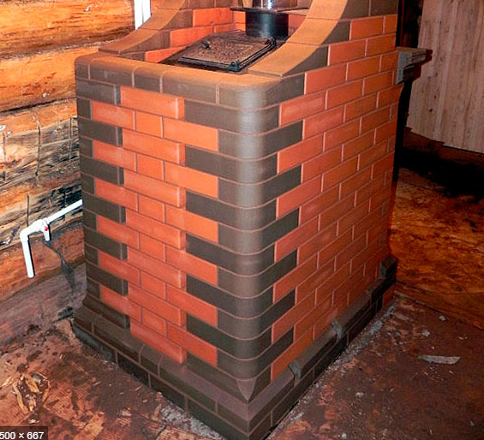
The brick lining of an iron sauna stove is an event that most lovers have a tasteful and beautiful steam experience. This is justified not only by improving the appearance of this product, but also by increasing the level of its performance. To cover the iron stove in the bath with bricks, you can invite professional craftsmen, but it will cost a lot. It is better to do it yourself, and use the saved funds for the purchase of building material. To achieve a good result, you need to choose the right brick and follow the step-by-step instructions for laying it.
The advantages of using a metal oven in a bath
Metal furnaces are highly popular due to their numerous advantages over their counterparts made from other materials.
Iron foci have the following advantages:
- Affordable cost. Thanks to the well-established production technology, the production of products is carried out in a semi-automatic mode with minimal human participation.
- Easy and quick installation. If you even have basic skills in working with metal, you can make a furnace yourself.
- Sophisticated and efficient design. When developing various models, such nuances as the configuration of the furnace, air supply, removal of combustion products and regulation of flame intensity are taken into account.
- Fast heating. Iron has excellent thermal conductivity. Energy is not wasted, but is spent on heating the product body.
- Profitability. The firebox consumes little fuel compared to classic models. Products with an overhead blower can operate on one filling up to 10 hours.
- Versatility. Steel stoves with cast iron grates are capable of burning wood, briquettes, pellets and even coal.
- Compactness. This quality is important for small steam rooms, where every centimeter counts.
However, the iron hearth also has some drawbacks that contribute to the decision to brick the iron stove in the bath.
Why brick a stove in a steam room
Despite the fact that modern products look beautiful and representative, they will look inorganic in the interior of the steam room against the background of natural wood. And this is not the only reason to put bricks on the stove in the bathhouse.
The following factors speak in favor of the event:
- The outer surface of the metal is very hot. This leads to overheating of the room and creating an uncomfortable environment in it.
- Risk of fire. If you overdo it with fuel, the heat from the boiler becomes so strong that it can begin to smolder and then burn the finish of the steam room.
- Possibility of getting burned by accidental contact. In the case of a brick, such a risk is excluded, since this material absorbs heat, evenly distributing it throughout the entire volume.
- Iron heats up quickly and also cools down quickly. Because of this, it is difficult to control the temperature in the room.
- Corrosion protection. Sooner or later, the protective coating comes off the iron and the boiler begins to rust. This is not aesthetically pleasing and is fraught with thinning of the walls of the furnace body in the future.
- The harmony of the interior.Brick against wood looks much better than metal.
The disadvantages of a metal heater are not critical, but they do not allow making the rest in the steam room comfortable, pleasant and healthy. To solve the problem, bricking a sauna stove with a remote firebox helps.
Methods for lining the stove in a bath
The hearth is heated to a high temperature during the furnace, which is accompanied by its thermal expansion. All this must be taken into account when choosing a facing material and the method of its application. In this case, it is necessary to plan the decoration of not only the walls, but also the pipes.
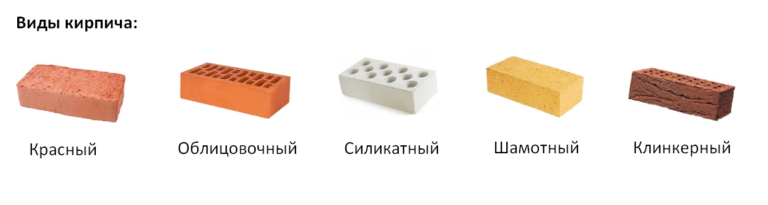
You can cover the oven with the following materials:
- An ordinary red baked clay brick. It is better to choose solid blocks that conduct well and keep heat longer.
- Monolithic ceramic brick. An excellent material with medium thermal conductivity, strength and resistance to sudden changes in temperature.
- Fireclay refractory stone. It is used for laying the firebox, it absorbs heat well, and therefore is not suitable for external decoration.
There are such options for covering the hearth, regardless of its location:
- Solid cladding. This is the easiest way to finish the boiler. It is similar to laying tiles on the floor and walls of rooms. Only here there are some nuances. The first is choosing the right cladding. It is necessary to take tiles that are resistant to high temperatures and have the same coefficient of thermal expansion as metal. Another condition is the preparation of a solution with the desired composition. A mixture of clay, sand and cement works best. Seams must be trowelled with a special waterproof grout.
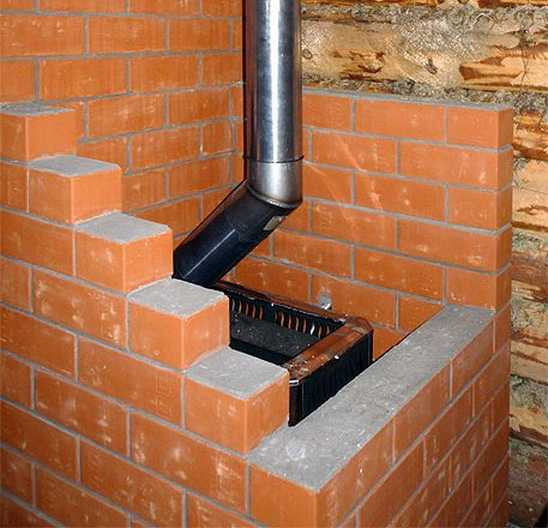
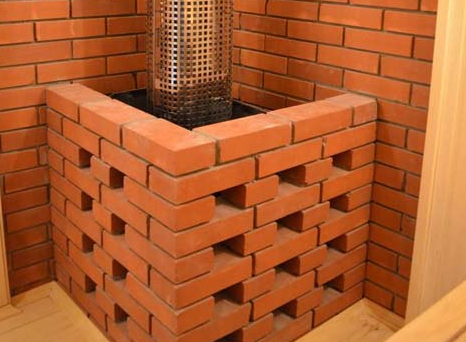
- Heat shield. This structure is a blank brick wall, laid out at a distance of 2-3 cm from the outer surface of the boiler. The advantages of this design are that the heat is transferred to the stone, which ensures good heating of the room, while preventing the likelihood of fire and burns. In addition, the absence of contact between the metal and the brick excludes the appearance of cracks in case of uneven thermal expansion of materials.
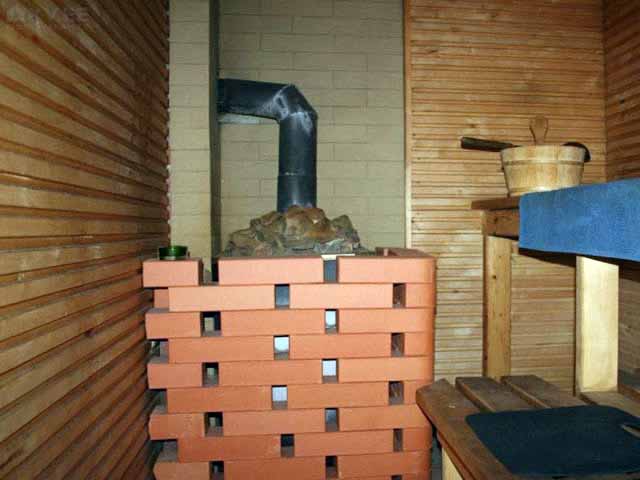
- Facing convector with air vents. Such structures are used for cladding high-power hearths, which are developed by pyrolysis installations or long-burning boilers. A vertical wall in half a brick is laid out 4-5 cm from the stove. In the lower and upper parts, air vents are left through which air circulates under the influence of differences in height and air temperature. Such a system works efficiently, evenly distributing heat throughout the entire volume of the steam room.
The choice of technology is made based on the size of the steam room, its configuration, the type of fuel used and the estimated time of the bath procedures. The thinner the brick layer, the faster it will heat up. But a thick layer of lining keeps heat longer in case of accidental or forced interruptions in fuel loading.
Step-by-step instruction

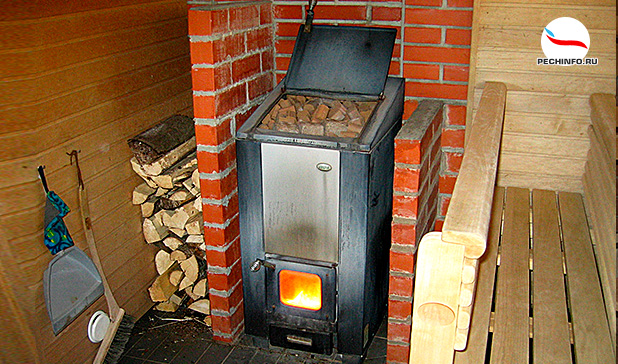
Equipping a sauna boiler with bricks is a sequential event that begins with planning. First you need to choose a stove. Consideration should be given to where it will stand in order to heat the steam room most efficiently. The most common option is the center of the wall farthest from the entrance with the removal of the firebox outside. Sometimes the hearth is placed in a corner, with shelves around it. If the room is large, the best choice is to install a large round boiler in the middle.
It is necessary to calculate the building materials and the need for tools.
For work you will need:
- mixer for mixing the solution;
- level, tape measure;
- shovel, trowel, trowel, steel trowel, rubber trowel;
- thermal plaster;
- facing brick;
- adhesive mixture;
- grout for joints;
- mixing container;
- respirator, goggles and gloves.
Since construction involves the use of solutions, a positive temperature inside the sauna is required.
Foundation
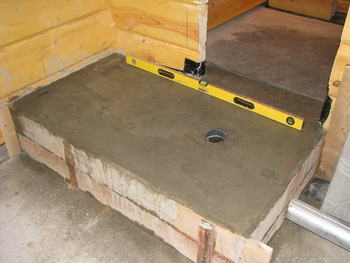
The boiler can be placed directly on the floor of the steam room if it is a reinforced concrete slab or thick boards on powerful logs with supports. If these conditions are not met, it is necessary to equip the foundation. It must be made separate, not tied to a strip structure or piles. The support plate for the boiler should be 10-15 cm larger on each side.
The work should be done in the following sequence:
- Make markings taking into account the boiler perimeter.
- Dismantle the hearth if it was installed earlier.
- Make supports for the joists if the floor is wooden.
- Dig a pit for a concrete base up to 40 cm deep.
- Fill the hole with a layer of crushed stone and sand 20 cm high, spill the mixture with water and level.
- Make a frame from reinforcement, install it on plastic props 5 cm in size.
- Knead a mortar of cement, sand and crushed stone in a ratio of 1: 3: 3.
- Pour the concrete, removing air bubbles from it with a steel bar or a factory vibrator. Smooth the surface with a spatula.
The foundation must withstand at least 21 days to gain strength. The surface should be moistened daily with water to prevent cracking.
Oven base
After the screed hardens, the following work is carried out:
- Its level and evenness are checked.
- If there is a serious difference in height, it is eliminated with a brick, fastened with cement mortar.
- A sheet of steel with a thickness of 5-6 mm is laid on the masonry. So that it does not budge, it is secured with pins or anchor bolts.
- The base is cleaned of rust, treated with an anti-corrosion compound and covered with paint.
- The device is installed in its place, the chimney is connected to it, the joint between the pipe and the boiler is sealed.
Before carrying out further work, the boiler is covered with polyethylene so as not to stain it with the building mixture.
Preparation of the solution
A problematic issue is the risk of mortar cracking and delamination from the base. Despite the fact that it will not get very hot, a special recipe is required, the basis of which is clay. This material is more ductile than cement and can withstand heat better.
Ready mixes are sold in hardware stores. Given the specifics of the issue, it can be quite difficult to find them, so it makes sense to prepare the solution yourself. Some components can be found for free.
The following ingredients are used to make the mixture;
- river sand;
- red clay;
- tile adhesive;
- plasticizers.
Cooking sequence:
- Sift the sand through a sieve to remove coarse impurities. Rinse it to remove soil and biological impurities.
- Place the clay in a container, fill it with an equal volume of clean water. Stir the material periodically, kneading the lumps.
- Add sand to the tank and mix thoroughly. Add plasticizers.
- Immediately before use, pour in the adhesive mixture in the amount of 10-15% of the base.
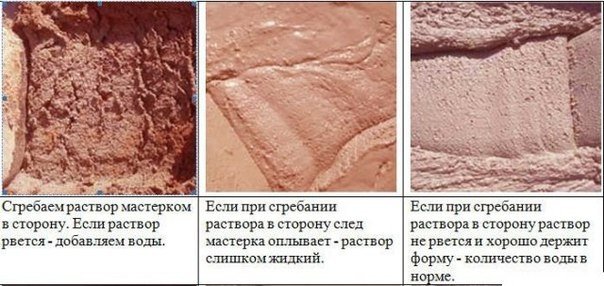
A properly prepared composition should resemble homemade sour cream in consistency. If it is too thick, you need to add water, dry sand is added to the slurry.
Brick preparation for cladding
Before laying out the bricks around the boiler, you need to carry out the following actions with them:
- Check for evenness of edges, conformity of length, height and thickness, absence of cracks and chips. The rejected products will be useful for filling the openings remaining in the rows.
- Submerge stones in water for 5-6 hours to allow the material to absorb moisture. When laying the masonry, they will not take water from the solution, thereby not weakening its astringent properties.
It is necessary to remove the bricks from the container 30-40 minutes before starting work, so that water flows from them, the surface dries out.
Furnace cover
The laying is carried out in the following order:
- Waterproofing is laid on the base.
- From one of the corners, the first row is laid out until the completion and filling of the voids.
- All subsequent levels are made with a half-brick dressing.
- Steel rods are laid every 2 rows.
- The masonry is checked by the level after each row.
- Excess mortar is removed immediately to a depth of 10 mm.
- The lower air vents are made in the second row, and the upper ones in the penultimate one.
- Seams are rubbed.
- The openings for the firebox and blower are reinforced with steel corners.
The laying should be carried out in two stages so that the first part of the wall gets stronger and settles.
The finishing should dry for 3-4 days before the test firebox. After that, you need to warm it up by burning branches, paper and other material that emits a small amount of heat. After another day, you can heat the boiler with 2-3 logs, constantly tossing them for 4 hours. The oven is then ready for use.


And what could not have been done more accurately without smearing the brick? Bad bricklayer.
Will the waterproofing burn? And is she needed?