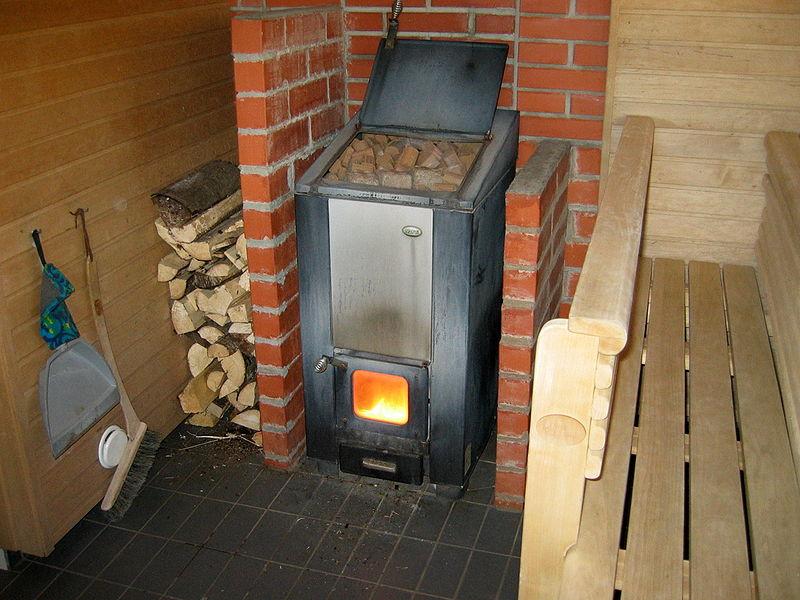
The traditional Russian sauna stove, fired with ordinary wood, has several designs and different performance. It can be made from bricks or welded from thick steel / cast iron blanks. In addition to the type of material used, when choosing a furnace design, attention is paid to its heat output (power).
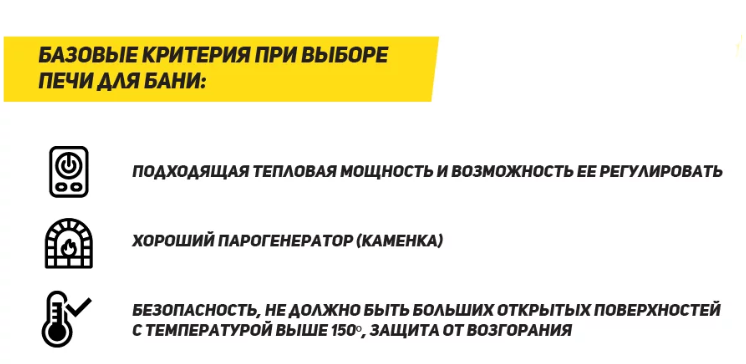
Basic requirements for choosing a stove for a bath
Before choosing the desired sample of the furnace device, you will need to familiarize yourself with the basic conditions for its effective operation. The following requirements are imposed on a wood-fired sauna stove:
- should warm up the air in the steam room to 40-50 degrees in the lower zone with a gradual increase in heat up to 80 degrees under the ceiling;
- requires rapid heating of stones to a high temperature and maintaining it at the same level;
- the design must exclude the possibility of smoke and carbon monoxide penetration into the steam room itself.
Additional requirements for choosing a wood-fired sauna stove are at the discretion of the owner. Someone may want a metal sauna stove to heat the room and store large amounts of hot water.
Determination of furnace power
- dimensions and layout of the steam room;
- volumes of heated water in the tank;
- characteristics of the chimney system.
Based on this, the total number of people who can take bath procedures at the same time is also determined.
The power indicator should be optimal for each case. At the stage of selection by users, a typical mistake is made when a heater is purchased with a surplus of power reserve. It is assumed that this will reduce the heating time of the steam room, but a further increase in power is no longer possible. Having reached the limit, wood-burning sauna stoves switch to a stable mode of operation. As a result, the air becomes hot, and the stones remain unheated. It makes no sense to splash water on them - there will be no steam at all, or very little.
Materials used
The sauna heater or stove is made of the following materials:
- simple cast iron;
- steel billets;
- brick (hearth or red).
The service life of the selected structure depends on the quality of the raw material. The most durable are modern stoves made on the basis of chrome steel. Steel units guarantee a good heat, eliminating the burning of oxygen in the steam room. The best examples of products are produced by the Finnish companies Helo and Harvia.
Bath equipment with a cast iron firebox is not easy to find, although the quality of the source material is considered good. Among the factory samples, the "Sudarushka M" from the domestic manufacturer "Inzhkomtsentr" deserves attention.
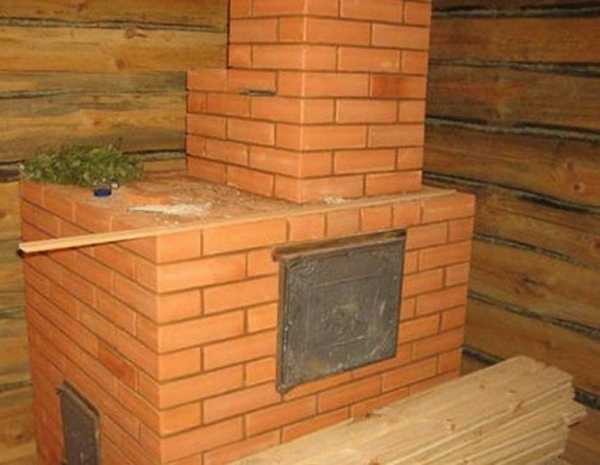
Brick stoves are perceived as a tribute to tradition and are built on the condition of reliable masonry. Brick stoves have their disadvantages, including many nuances:
- the complexity of the construction due to the lack of professional stove-makers;
- long heating (heating period);
- the need to equip a "powerful" foundation.
All this leads to an increase in the cost of making a brick stove for a bath with your own hands.
Modernization direction
It is more convenient to trace the improvement of modern furnaces on the models "New Russia 18 L", produced by the companies "Teplodar". Its set includes a chimney from pipes of the well-known Ferrum company. The same process is followed when reviewing the characteristics of the well-known Kalina unit.
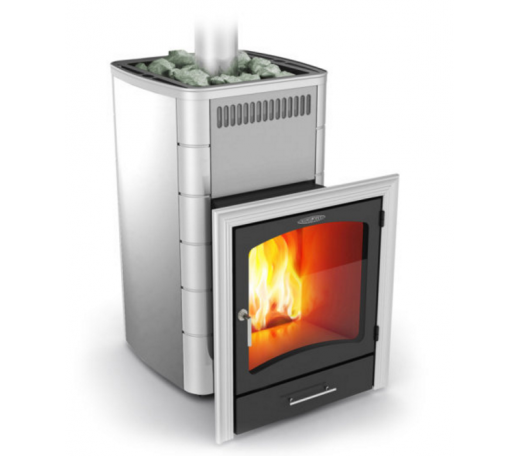
Furnaces "Rus"
Highly efficient devices are used to generate highly dispersed steam, similar to the Russian steam bath. Ideal for both private baths and public saunas. There is a wide range of models from this manufacturer on the market. It contains conventional basket ovens, as well as samples with a stove and steam dispenser, which have a high efficiency.
Additional accessories allow equipping paired with equipment of different configurations, determined by the preferences of the owner. The materials of the Rus products were selected taking into account the significant heat load on the furnace structure.
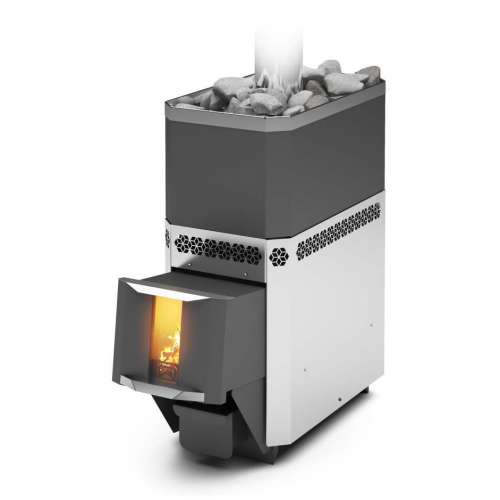
Stove "Kalina"
The sauna stove has a transparent screen that visually increases the size of the fuel channel. It has a wide firebox that allows you to observe the flame from different positions. A labyrinth gas duct of a special design provides quick heating of a steam room with a volume of up to 30 cubic meters and high-quality heating of stones weighing up to 100 kilograms.
Thanks to the built-in heat exchanger, the water is heated in a metal remote tank (located in an adjacent room). The heat-resistant stainless steel of the furnace walls is chemically inert and not subject to oxidation, keeping oxygen in the air.
Self-production
To make an iron stove in a bath with your own hands, you will need to prepare sheet steel of the maximum possible thickness. With limited costs, it is enough to choose steel sheets with a standard size of about 1.5-2.0 mm. After that, you need to do the following:
- Prepare a sketch of the furnace, where all the details and their characteristic dimensions are indicated.
- Calculate the number of structural elements and their total area.
- Determine the need for iron.
- Transfer the dimensions from the drawing to the metal, and then cut all the blanks.
When cutting with a grinder, you must strictly maintain angles of 90 degrees, and also make sure that the opposite sidewalls are the same in size. After that, a flat area is selected, on which the furnace body is assembled from the blanks. This will require:
- Place two workpieces at an angle on the edges and make several tacks for welding.
- First, you need to adjust the current on the welding unit so that the arc does not melt the metal - then the seam will turn out to be uniform and durable.
- You need to grab 2-3 millimeters; 4-5 tacks are enough for one corner.
- It is important to control the position of the corner blanks, since the finished seam after cooling will lead the sheets to the sides.
- After aligning their position, check with a 90 degree square.
- In the same way, a second pair of workpieces for the sidewalls are tacked for spot welding.
- Two carbon body halves are attached and welded to maintain 90 degree joints.
The result is a steel box for the heater, to which it remains to weld the bottom and lid.
The frame of the future furnace, closed at the top and bottom, has uncooked slots, which are subsequently welded with a continuous seam.
Welding rules

When welding, you must adhere to the following notes:
- It is not possible to maintain exact dimensions during grabbing and fitting. This is not scary, because when welding with a continuous seam, they will hide and will not be noticeable - run-up or deviations from different sides are compensated.
- To prevent the lid from falling into the box when brewing, a high round stand is placed inside it.
- The bottom of the inner heater is a 10 mm sheet. This will allow it to withstand the main heat of the flame, and too thin a bottom will quickly burn out.After that, smoke will begin to flow into the steam room.
Having completed the design of the top and bottom, proceed to the preparation of the holes. First, a small hole is made in the stove in the lower part - for the firebox.
- The box is laid horizontally and markings are applied in the right place.
- A grinder or a welding machine cuts a hole for the firebox.
- A door of the same size is cut from a sheet of metal blank.
- In the lower part (third) of the box in which the stones are placed, several holes are made for pipes - their number is selected as needed. They are placed at least 5 cm from the bottom baffle to improve traction. A box with heavy stones is supposed to be installed on them.
- Another hole is welded in the upper part - for inserting the inner case.
- Along the perimeter of the hole from 3 sides, two 4 cm wide plates are attached to the welding - to strengthen the cut line. The first 3 strips are attached to the inner surface of the case, and the remaining ones to the outer part of the window with mixing.
- A gap is left between the plates enough to insert the inner box.
- One plate is welded to the inside and to the doors of the firebox - for reinforcement.
- The firebox is fenced off from the ash pan with a grate made of steel rods with a diameter of 10-12 cm.
- For complete combustion of firewood, a better air flow is needed, so the grates are welded along the direction of the blower.
According to the assembly scheme, the stove is made of 2 parts - internal and external - with a size difference of about 10 centimeters. This gap is necessary for the removal of combustion waste into the chimney. During assembly, the inner part is placed in an outer shell, which in the simplest case is attached to the smoke exhaust pipes. Their diameter is chosen as arbitrary, but not too small. Size should be sufficient to create good traction.
When making a homemade sauna stove with your own hands, the main thing is to monitor all joints in the structure, which exclude heat loss and the exit of combustion products into the room.


