A compact stove invented in Holland is a great solution for a small house and summer cottage. For its construction, significant efforts and funds will not be required, in addition, it quickly warms up the room. A Dutch stove is a budget option for a heating device with a small mass, which allows it to be installed on the second floor. The stove can be folded without any problems by yourself, without contacting the masters.
Principle of operation
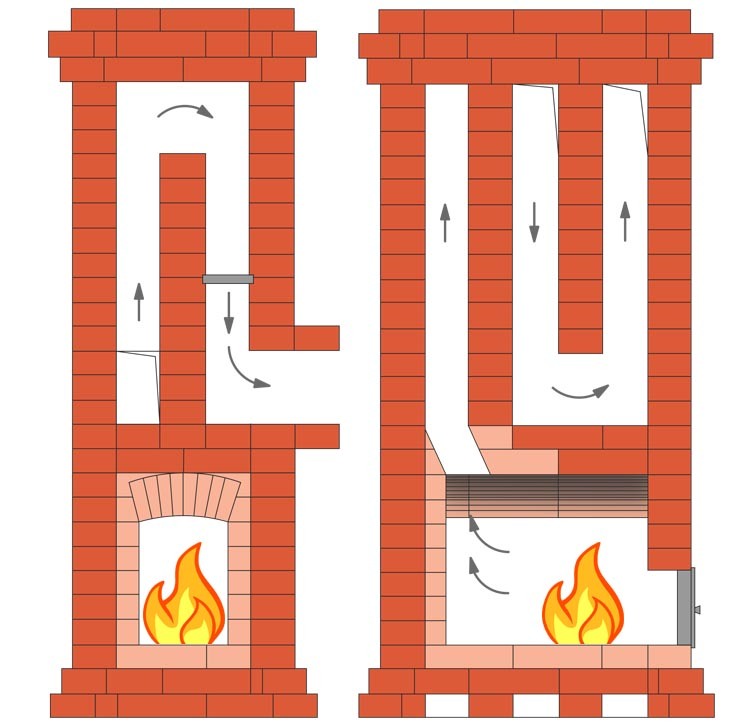
The classic Dutch stove constructively provides for a rather long chimney for removing exhaust gases. Due to this, a tall structure is obtained, but having a small size in area. The flue gases that are formed during the combustion of fuel, when removed, almost completely give off thermal energy. The cooled air leaves the device through a special side hole.
The smallest oven of this type, the 52x52 cm "countermark", can easily heat a room with an area of 20 square meters. m.
The principle of operation is that inside the combustion chamber the fuel burns with the lowest intensity. The combustion process is slow, due to which the formed gases pass through the created passages and give all their heat to the brick walls. Such an oven heats up rather quickly, but cools slowly. The surface of the Dutch woman during active operation can warm up to a temperature of 60 ° C.
Advantages and disadvantages
The Dutch woman has many advantages:
- takes up little space, which is important for small houses;
- created from inexpensive materials, including used ones;
- does not need a strong foundation;
- heats up quite quickly, keeps warm for a long time;
- it can be of almost any height, which has no effect on its performance;
- looks great in any interior;
- if necessary, it is equipped with additional elements;
- does not require pre-heating.
The main disadvantage is the rather low efficiency - about 50 percent. In addition, if the view is left open after firing, the device will cool down rather quickly. These flaws were leveled by the Soviet engineer Grum-Grzhimailo. He equipped the stove with a grate and a hood. The Dutch bell-cap turned out to be very economical and provided good efficiency - over 80%.
Varieties of Dutch stoves
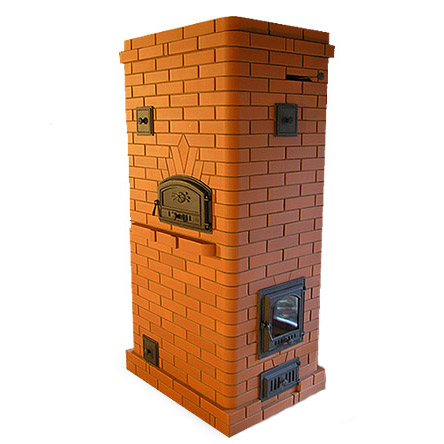
Craftsmen are able to create real works of art on the basis of a simple Dutch woman. The outer surface can be finished with tiles, natural stone and other materials. To save space, most stoves are built corner. A variant of the square device is a round Dutch oven. They are often performed in cases - metal casings. You can also buy ready-made units, for example, Weber GBS.
Initially, the stove was only a heating device. Over time, the design has improved, options with a fireplace, tiles, oven and even a stove bench began to appear. The latter model is usually installed between the kitchen and the living room, which allows the heat, after heating the kitchen, to move to the living area, where the owner can rest.
Classic dutch
A device of this type is an excellent choice for a summer residence.Heats up the room quickly, cools slowly, easy to install, economical in materials. For the oven to work, you need to harvest wood or coal. As a rule, such units are six-channel. Laying is carried out on a foundation base according to a simple scheme.
Fireplace stove

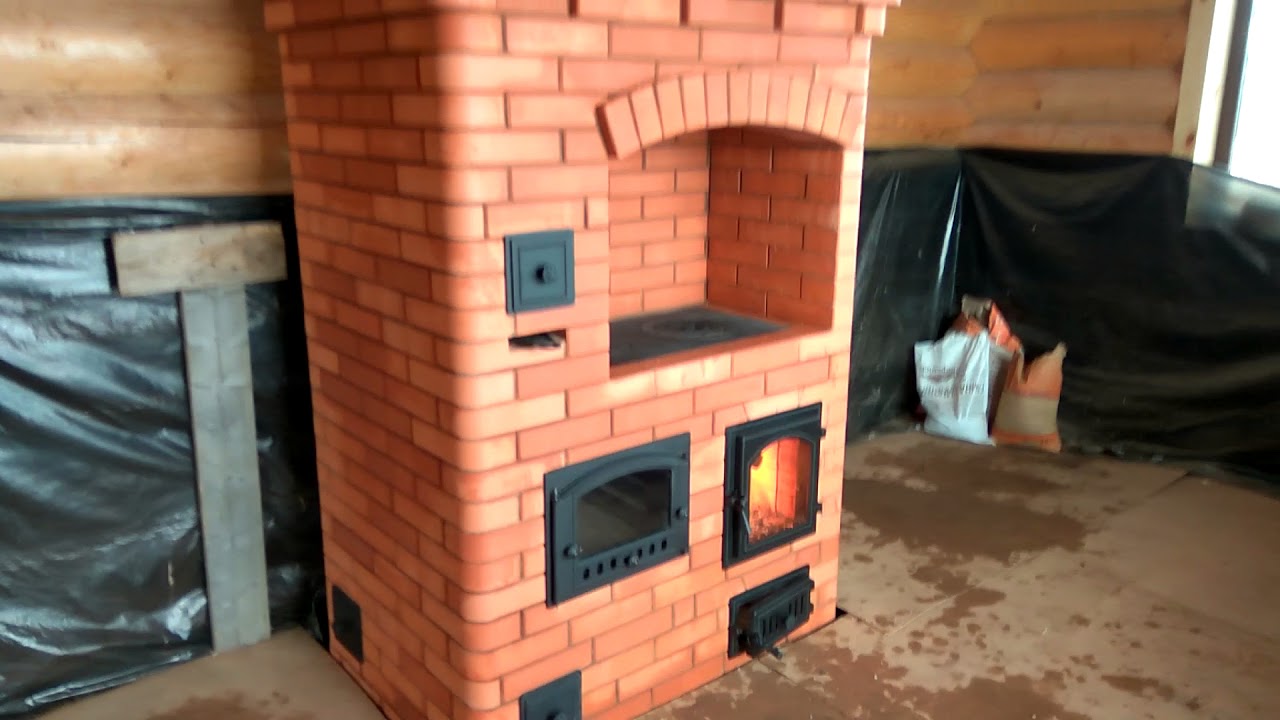
To warm the house and create comfort, a Dutch heating stove is turned into a fireplace. The masonry differs from the classical one in that instead of a cast-iron door, a heat-resistant glass sash of the required size is installed on the combustion chamber. To maintain the fireplace style, the stove-maker rounds the corners of the brick, works out the geometry, increases the foundation and builds an ash pan and a chimney on the second row of masonry.
With oven
The oven is located above the combustion chamber and below the hob. Because of this, the standard dimensions of the Dutch woman change slightly and the costs of materials increase. With its help, you can cook more dishes with the same consumption of firewood. It is difficult to bake cakes in the oven due to the lack of a temperature regulator, but other dishes: bread, pizzas, pies, vegetable and cottage cheese casseroles, meat are obtained with a bang.
Cooking Dutch
To use the stove for cooking food outside the oven, a cast iron hob is placed on the fifth row of masonry above the firebox. A layer of clay-based refractory mortar is laid between the metal and the brick. The area above the hob is placed on a metal corner. A Dutch oven with a hob is good in the country for preserving vegetables: it is used to sterilize cans and the finished product.
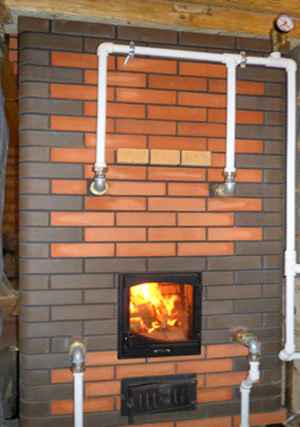
With a water circuit
A similar device heats many more rooms and provides hot water to the entire house. A metal boiler with a coolant is built into the furnace array, which is heated directly from the burning of wood. One pipe extends from the boiler and serves to dilute the heated water around the house. The water circuit, passing along the walls of all rooms, returns the liquid back to the heating tank.

Tools and building materials
- raw materials for creating a foundation;
- binder solution;
- refractory and simple solid brick;
- oven doors;
- metal sheets;
- steel wire;
- asbestos cord.
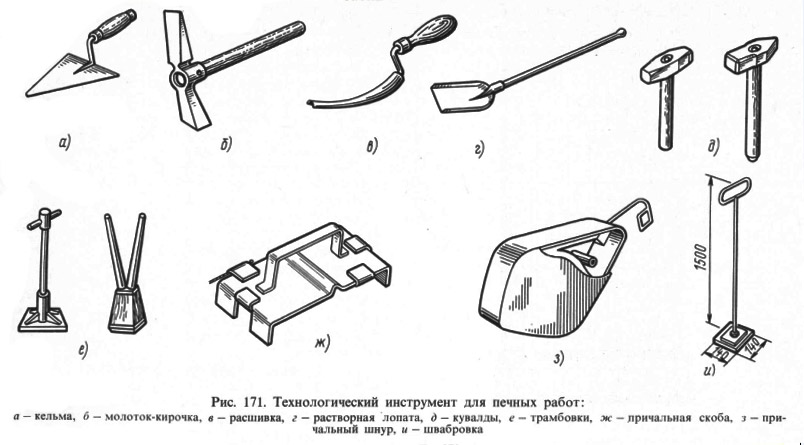
Basic tools are required: a trowel for applying mortar, a hammer or sledgehammer for tamping, angle grinders for cutting bricks, a plumb line, a level, a tape measure.
For the construction of a Dutch woman, building material of low quality, and even previously used, will completely pass. When chipped bricks are used, the rough side is placed outside. As for the solution, in consistency it should resemble sour cream. You can create it yourself from sand, clay and water, or buy a ready-made one at a hardware store.
Cement does not have high resistance to thermal effects, so you should not use it for masonry. When making a solution on your own, they break the clay into small pieces, fill it with water and wait for it to be absorbed. Mix it with sifted sand in a two to one ratio. Stir well and add water - 1/8 of the total. The preparation of the solution begins a couple of days before the start of construction.
Preparatory work
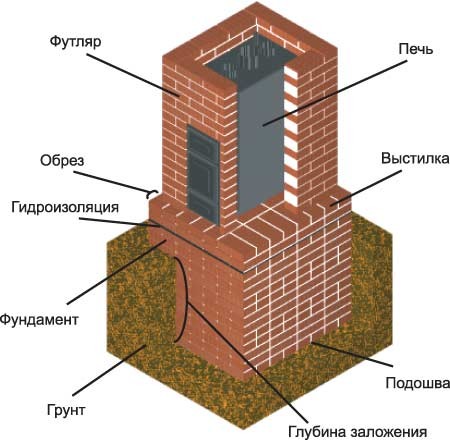
Before building the furnace itself, you need to equip the foundation.
- If the floor covering is already installed, remove it. Ideally, a place for a Dutch woman is calculated even at the initial stage of building a building.
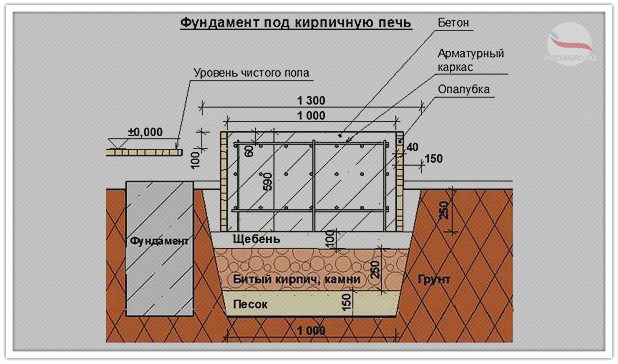
- A pit is prepared with each side by 20 cm more than that of the future furnace, and a depth of half a meter.
- The bottom is covered with a sandy layer 0.15 m thick, after which a slab or bricks are laid.All are poured with a thick sand-cement mortar in a ratio of 1: 3.
- Until the cement has set, the surface is reinforced - a reinforcing mesh is laid out with a mesh size of 10 × 10 cm. At the joints, reinforcement rods are vertically installed. The intersections are fixed with steel wire. A ten-centimeter layer of gravel is poured onto the reinforcement strapping.
- Prepare the formwork for pouring the base. Each side is wrapped with roofing felt or waterproofing. A layer of concrete is poured over the gravel and leveled. Damp concrete is sprinkled with dry cement powder and left until final setting.
The foundations should be allowed to stand for about 30 days. After the concrete has completely solidified, a 3–5 cm layer of sand is poured onto its surface and covered with a waterproofing material.
Step-by-step instructions for laying
The finished Dutch woman externally looks like a narrow brick pipe to the ceiling, on which of the external elements there are only the firebox doors, the blower and the valve. Before starting the installation itself, the masters recommend that beginners first build a stove without mortar, apply the necessary marks and cuts on the bricks. For reliability, you can assign the desired number to each brick. So that the structure does not come out oblique, you need to pull the plumb lines vertically and constantly use the building level.
Also, the masters advise to immerse the bricks in water for 2 minutes before laying, and rub the inner surfaces of the oven every 4–5 rows with a wet bristle brush or an ordinary piece of cloth.
The size of the seam for laying the oven is no more than 5 mm. Steel paws or steel wire are attached to the oven doors, which are later placed in the seam. Installation of all metal elements is carried out together with the masonry.
The order of a simple Dutch woman 52x52 cm:
- On roofing felt, sprinkled with a thin layer of sand, lay the first row of 12 bricks on a dry flat. Check the evenness of laying with a level, fill the surface with a binder solution, smooth it out.
- Install the blower door by wrapping it with asbestos cord. Use a steel wire to secure the door. Insert it into the box and twist it twice. Make a cut at the top edge of the brick. Insert the wire into it, bend it and intertwine it with the masonry.
- Lay the second row of ordinary bricks on the mortar, the subsequent ones are already made of refractory material. Place a grate 200x300 mm between rows 3 and 4.
- In the fourth row and further, lay the brick on the edge. Install the firebox door in the same way as with the blower. From the fourth to the seventh row, lay the bricks on the back wall of the stove in a dry way, so that in the future it will be easier to clean the combustion chamber.
- Place the seventh row flat from 3/4 of a brick to increase the reliability of the suture dressing, but guide the laying of the back wall on the edge.
- For the eighth row, take a beveled brick or a simple one, laying it out flat obliquely. Here you will complete the creation of the combustion chamber.
- Lay the next rows flat, in the ninth, slightly moving the brick back to expand the chimney. In the tenth, install the base of the metal pipe.
- In the 16th and 17th rows, lay out a clean hole and fit the door in the same way as the blower.
- From the 18th to the 24th row, form the return channels. Be careful not to protrude the bricks.
- Lay out the channel overlap on the 25-28th rows. Move the bricks to the side. In the 28th row, leave an outlet for the chimney duct.
- In the 29th, install the damper, close the chimney with the thirtieth row and bring out the pipe.
It will take 14 days to dry. During this period, the door of the firebox must not be closed. In order to test the draft in the oven, it is recommended first to burn the paper. The stove is ready for use if there are no obstructions to the smoke outlet.
Dutch woman's firebox and safety
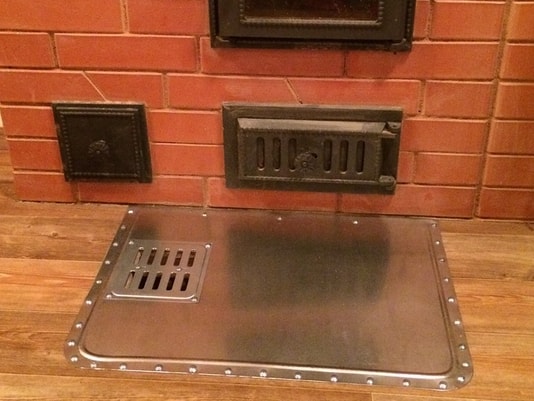
To prevent a fire from accidentally falling out coals, the floor in front of the stove is covered with a steel sheet.
If you heat it too often - more than twice a day, carbon monoxide can accumulate in the room.For heating, you should not use fast-burning fuels, because the device operates in a smoldering mode.
Regular inspection and cleaning of combustion ducts prevents the accumulation of soot and reduces the risk of fire.
It is forbidden to use logs and boards that do not fit into the combustion chamber for kindling the stove. If they protrude, the flames can jump onto nearby objects. Furniture and other furnishings must be installed at a distance of at least 50 cm from the stove.
A Dutch woman is a great way to heat a country house in a cool season with seasonal living. It is economical in terms of fuel consumption, it has high heat transfer rates, thanks to which the room warms up quickly. It can also be installed in a small house that is used constantly, especially in regions with mild winters.


I want to add something, the upper part I do not make passages, but I lay large granite stones to the top. I flooded it and bask in the warmth for two or three days. And I also put the recumbent Dutch women, like a bed, I lay the top layer in addition with debris or pebbles and another layer of brick. flooded and sleep for three days on a warm stove.