The home brick oven is a traditional heating product that continues to attract the attention of homeowners. They are especially in demand in places where there are interruptions in the supply of gas and electricity. In regions rich in commercial timber reserves and where problems with firewood do not arise, the presence of a brick stove allows you to save on energy resources.
Variety of designs
According to their purpose, brick ovens for the house are divided into the following types:
- cooking products;
- cooking and heating;
- stoves used to heat living spaces.
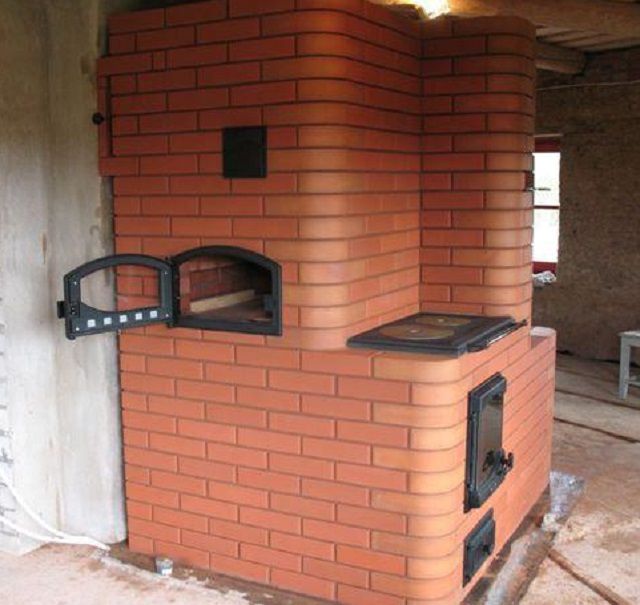
A brick cooking stove for a home is optimal for a summer cottage, for example, where the owners live in the summer. Sometimes it is used as an addition to other types of heating and saves on expensive fuel. Its design contains a hob, a built-in oven, and in some cases a tank for heating drinking water. Despite its relatively small size, its power is sufficient to heat a medium-sized room.
Brick ovens for a house of the second type can have:
- hob;
- built-in oven;
- a tank in which water is heated;
- drying place.
They are also used as a fireplace or water circuit. This design remains in demand even in the presence of a gas boiler.
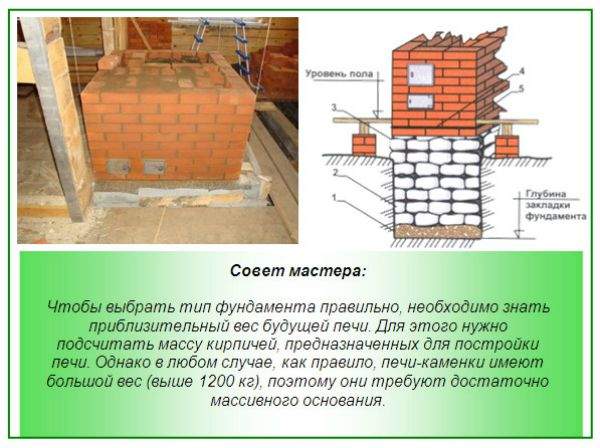
Purely heating brick ovens are used exclusively for heating interior spaces. Often they have several tanks, allowing them to be used as a fireplace in a bath or for quickly heating water. When choosing, it is also important to determine the configuration and dimensions of the furnace, which affect the selection of its installation site.
Place selection
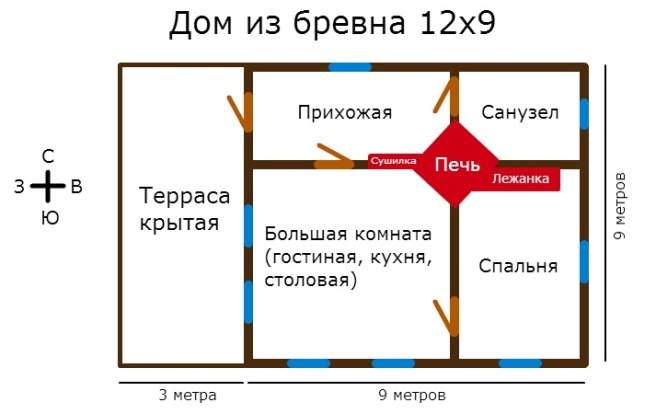
The stove can be placed in any suitable place, but the most convenient option is to be built into the wall between two adjacent rooms. Thanks to this arrangement in buildings of a small area, it is possible to get by with one unit, designed for the appropriate heat transfer. It is undesirable to install the stove close to the outer wall, as this will dry out faster. The place chosen for laying the furnace is carefully measured taking into account the following points:
- the condition of the ceiling, allowing you to easily bring the chimney out;
- the possibility of preparing the foundation, which needs to be made more than its base by 100-110 mm;
- lack of nearby structures made of combustible and flammable materials.
The chimney, when passing it through the ceilings and the attic, should not bump into the supporting beams and roof rafters.
Materials and blanks
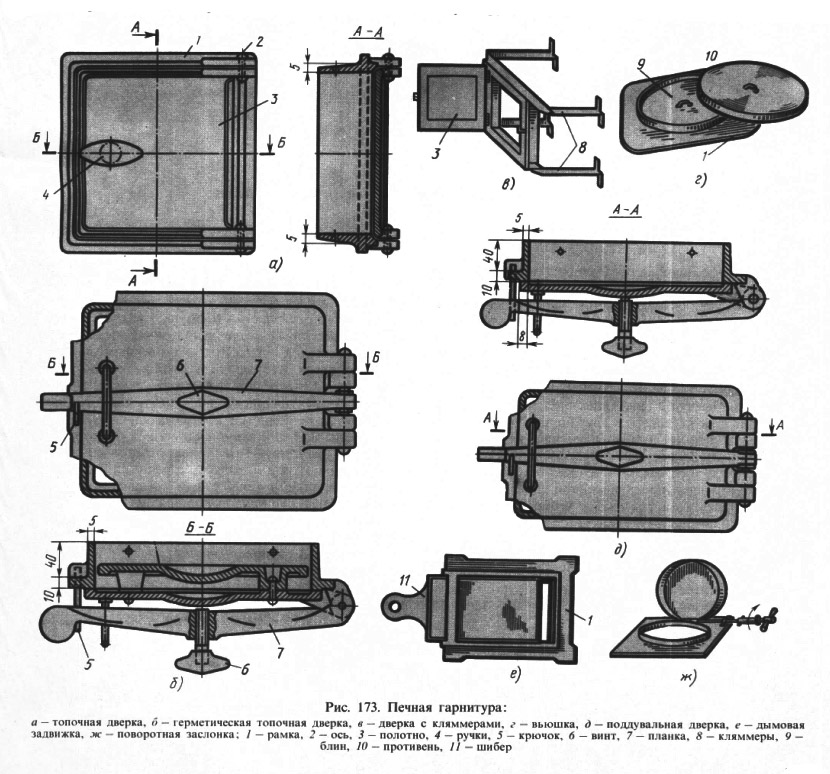
The range of components and the amount of required building materials depend on the type of the selected furnace structure, within which they differ little. For purely heating samples, it is not necessary to include a hob, oven or water tank in the project. A typical set of elements made of cast iron and steel includes the following items:
- ash pan door and its furnace counterpart;
- cleaning channel doors;
- street chimney valve;
- burners;
- the hob itself.
The list is completed by a grate, traditionally made of cast iron.
In addition to all of the above, steel parts will be required for the construction of the structure. Their list includes the following items:
- built-in oven;
- container for water;
- strips of arbitrary length and width;
- corner of standard size 50x50 mm;
- well annealed wire 2-3 mm;
- steel sheet laid at the firebox.
For the manufacture of the base (foundation) and the furnace body, you will need to prepare consumables. They are selected on the basis of the selected masonry scheme and taking into account a special table, as a rule, attached to it.
This list includes:
- crushed stone, rubble stone, as well as broken brick, simple sand and cement;
- boards for arranging formwork for the foundation and a piece of roofing material for waterproofing;
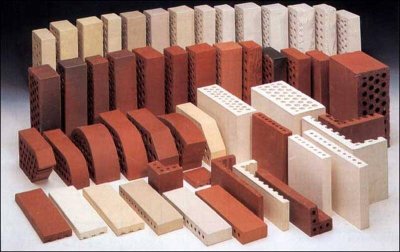
- bricks of two types;
- asbestos sheet and marking cord;
- initial components for the preparation of clay mortar.
As an alternative to the traditional composition for laying the furnace, a ready-made heat-resistant mixture is often purchased.
Layout and subsequent arrangement of the base
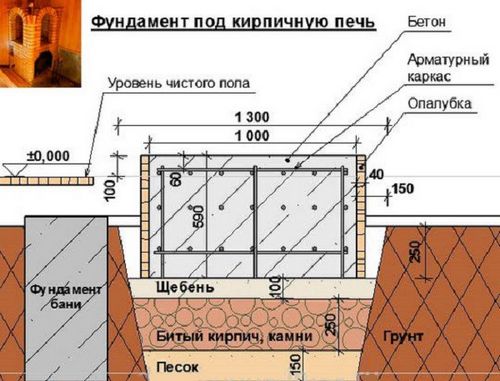
Before you build a brick oven with your own hands, you need to carry out a number of preparatory measures. The operations for laying the stove structure are preceded by the marking and pouring of the foundation that can withstand its weight. Before choosing a place, it is important to take into account that the chimney, when passing through the ceiling, should be laid out to the side of the wooden beams (at a distance of at least 120-150 mm). For accurate marking of the area where it is necessary to cut the boards in the floor, you will need a plumb line, the twine of which is fixed in the right place on the ceiling. Moving the plumb line from one corner to another, outline a square corresponding to the shape of the proposed foundation (with a margin).
According to the resulting markings, the boards are carefully cut out, after which access to the ground is opened. In this place, the stove foundation will be located, which is not associated with the base of the whole house - the shrinkage of these two buildings is different. In the exposed soil, it will be necessary to prepare a foundation pit 0.5 meters deep, and then proceed with the arrangement of the foundation, constructed from rubble stone or brick battle. In the first case, no formwork is required; it is enough to lay clean stones on the bottom, layer-by-layer poured with concrete. When laying, it is important to ensure that there are no clearly distinguishable voids left between the rubble blanks.
Upon reaching the surface of the ground, stones should be placed in a special form in the form of a box, limited by formwork boards and covered from the inside with a layer of polyethylene. When laying the buta, make sure that the upper cut of the foundation is approximately 140 mm below the floor level. The surface of the resulting base is leveled and left to dry completely.
Preparation for laying
The main materials used in the construction of a brick stove with their own hands are ordinary red brick and its fireclay refractory analogue. The first is used only for the construction of the outer shell of the structure; the walls and bottom of the furnace are made from the second. The purchased brick is carefully sorted out - only whole samples are taken without chips and cracks. When used material is used, each sample is thoroughly cleaned of soot and solution, and then soaked in water for half a day. Before use, it is enough to rinse fireclay blanks with clean water, which will remove accumulated dust from them.
Preparation of brick blanks
The preparatory operations also include work on the manufacture of incomplete brick blanks obtained by splitting solid samples. When laying the stove, you will need:
- halves;
- three-quarter blanks;
- quarters and other small fragments.
To facilitate the preparation of bricks by size, marks are made on the handle of the pickaxe.
Preparation of the solution
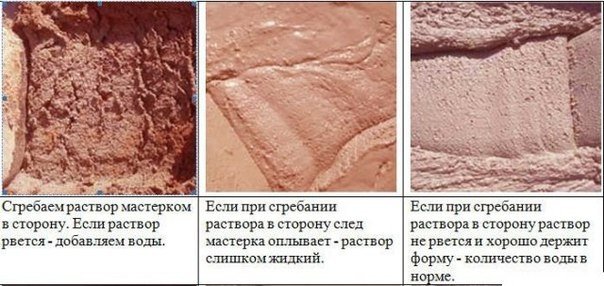
The strength and service life of brick ovens depend on the condition and condition of the masonry mortar, which guarantees a high-quality seam. Its thickness should not exceed 8 mm, i.e.otherwise, cracks appear at the joints and the heating efficiency decreases. The solution is prepared only from high-quality clay and carefully sifted sand. It is brought to a homogeneous mass without lumps and impurities in its composition.
Regardless of the type of solution used (lean, normal or greasy), when mixing it with the water component, you need to monitor the consistency of the mixture. It should look like a thick dough that does not stick to human hands and a trowel. To lay refractory bricks, you will need to prepare a special mortar, which includes greasy clay and chamotte sand, taken in a one-to-one ratio.
Installation recommendations
It will be possible to start them well if you use a building level and a goniometer. To make sure that the row is laid out evenly, you should measure its diagonals, which should be the same in length. The next row is laid out on the mortar, which fills the gaps of the first. When it is laid out, a very thin layer is applied to the corner blanks with an increase in its thickness on all subsequent elements. In the process of laying, according to the instructions, a level is placed on two bricks laid side by side, one side of which is pressed on the second workpiece, leveling it horizontally. Do the same with the 3rd and 4th bricks (and so on according to the step-by-step scheme).
Laying (ordering)
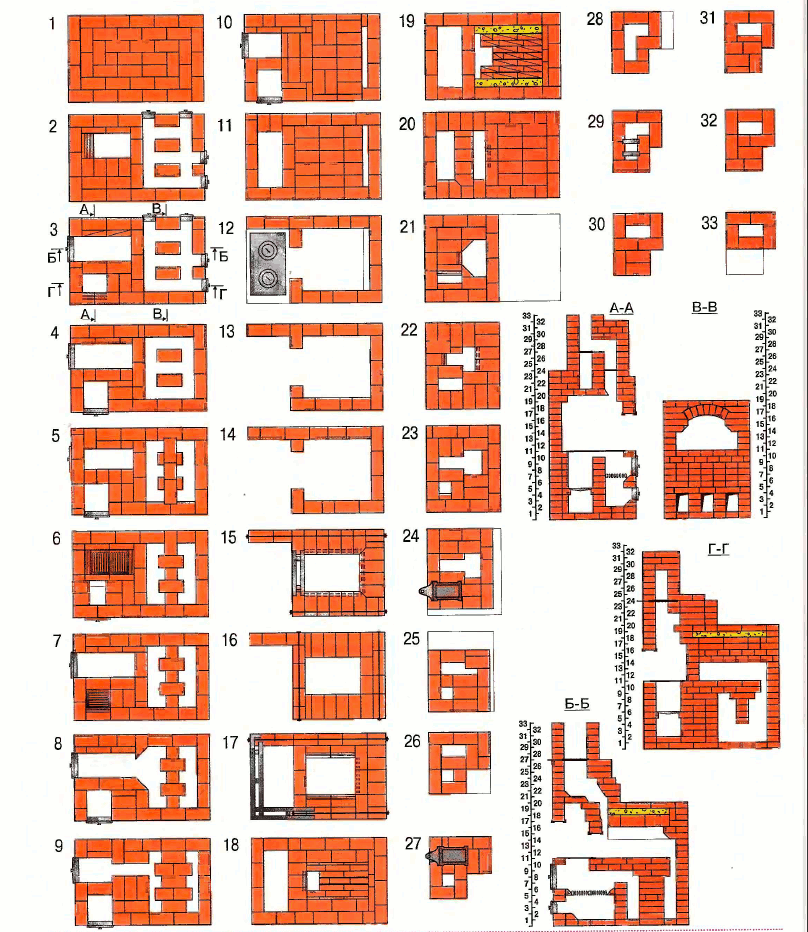
In order for the laying of the initial rows to turn out to be even along the entire perimeter of the furnace, from the outside, it will be necessary to vertically pull the plumb cords attached at several points on the ceiling and floor. Next, they move on to laying out the remaining rows, the quality of which depends on the following factors:
- the correct application and distribution of the solution on the working plane;
- evenness of laying bricks;
- compliance with the gap between them.
At this step, using a trowel or spatula, the mortar is placed on the already laid out previous row and carefully leveled with a layer of about 9-10 mm thick. The first corner brick beacon is immediately laid on it. Then the same solution is applied to the end of the second one, which is immediately laid down, pressed against the previous one and tapped with a hammer. When maintaining masonry, it is important to observe the ordering, according to which the joints of each subsequent row are displaced relative to the previous one.
At the end of the masonry work, leave the oven to dry, to speed up which it is recommended to open all windows and doors. To shorten the natural drying time of the stove, you can place a 200 Watt light bulb connected to the mains in its firebox. Another option is to place a fan heater in front of the door.


