Underfloor heating is gaining more and more popularity. It is installed as additional space heating and as the main heating. It is indispensable in private houses with a cold basement or apartments on the ground floors. There are two main types of such systems on sale: water and electric underfloor heating. The latter are considered more common, run on electricity. Systems can fail, therefore, it is necessary to check their operability at the time of purchase, during installation work and further during operation.
Checking underfloor heating upon purchase and after installation
The first check of the warm floor with a multimeter is carried out at the time of purchase. The seller is obliged, at the request of the client, to demonstrate all the functionality of the product. Included with the product must be accompanied by documentation with the specified technical characteristics, insulation resistance values and mats. This data must be verified with the real readings of a tester or multimeter.
After laying the heating elements, but before installing the floor covering or pouring the screed, it is necessary to check the warm floor for operability a second time. To do this, you first need to make sure that the heating cable is intact. Then the system is connected to the mains and for some time they observe the operation of different modes. At this stage, it is important to make sure that the temperature sensor and thermostat are functioning correctly. Correct operation involves uniform heating of all sections of the cable. There should be a change in the heating temperature of the elements in accordance with the specified parameters of the thermostat.
If a malfunction is detected during the installation process, it is best not to look for the problem, not to try to solve it, because this is most likely a warranty case. You should contact the store where the product was purchased, replace it with a working version.
Measuring resistance with a multimeter
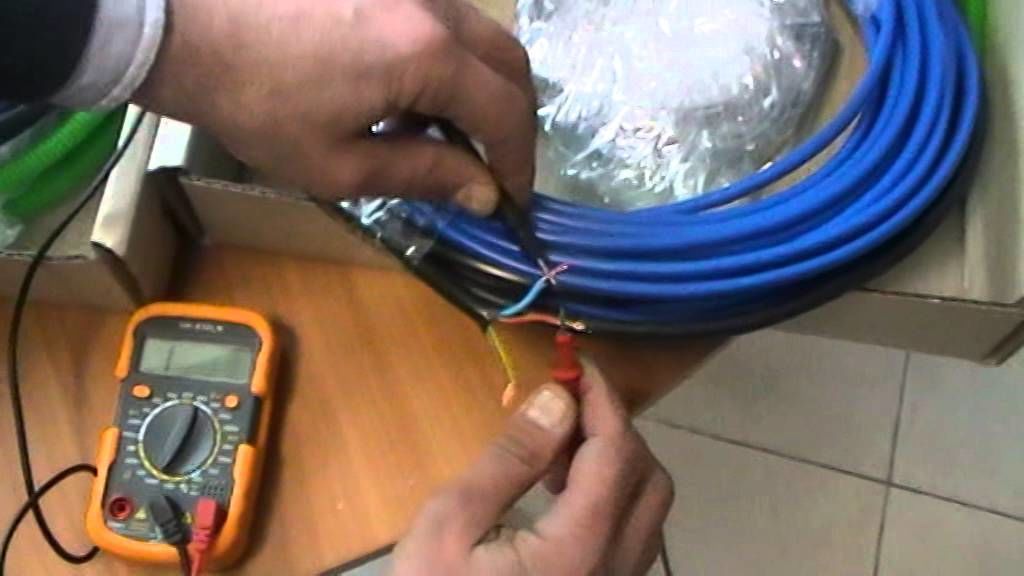
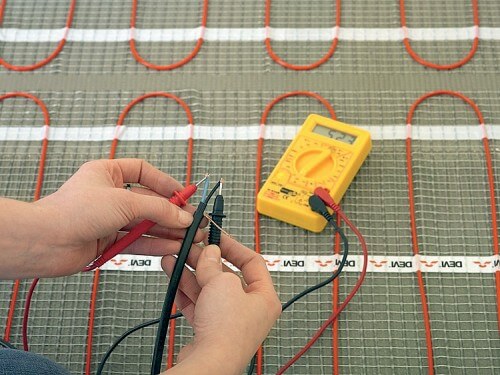
When ceramic tiles are selected as the flooring, the heating cable of the system must not be connected to the network until the screed and tile adhesive are completely dry. To make sure that the device is working, you need to use a special device - check the warm floor with a multimeter:
- The resistance measurement mode is set on the device, the limit is set at 2000 Ohm. Make sure to set up the multimeter correctly. To do this, you need to short-circuit its probes - zero should appear on the screen.
- Find a heating cable and measure the resistance between its conductors. The result is 409 ohms.
- The obtained result is compared with the data indicated in the device passport. It should be borne in mind that the resistance of the underfloor heating may depend on the ambient temperature and the length of the cable. The permissible error is considered to be a difference in measurements of 10-15%. In this case, the user manual indicates 360 ohm impedance. The difference between the measurement and the value prescribed in the document was 14%, which is considered acceptable.
- Measure the resistance of the insulating material. Transfer the multimeter to 2000 kOhm mode, and ring out each core of the cable.The readings of the device should tend to unity, which confirms the absence of violations of the integrity of the braid of the heating element.
It is advisable to carry out a trial check at all stages of working with a warm floor. When buying in a store together with a sales assistant, then after installing the system, pouring the screed and laying ceramic tiles.
The main causes of malfunctions
To find and eliminate a malfunction in the underfloor heating cable system, you must have an idea of its design. It consists of a cable, thermostat, temperature sensor.
- A heating cable is a heating element that generates heat. It can be of two types: resistive and self-regulating. The latter reacts to temperature changes and independently changes the resistance level.
- The temperature sensor monitors the degree of heating of the wire. It is installed inside the concrete screed directly next to the heat source.
- The thermostat (thermostat) turns on or off the heating element depending on the set temperature. It looks like a small switch and regulates the voltage that is supplied to the cable.
For proper operation and long-term service of the warm floor, the length of the cable must be clearly calculated. Some of its types cannot be shortened, because these actions will change the current characteristics and the heating level. If this property is neglected, the system will not function correctly, the insulation of the wires will quickly collapse.
Check if a fault occurs
During installation or further operation of the warm floor, as with any other devices, malfunctions may occur. The user can call the wizard to fix the problem or do the repair himself. In general, no special difficulties should arise. However, the diagnostic methods and causes of malfunctions for different types of systems may differ.
Diagnostics of malfunctions of a water heated floor
When a water underfloor heating is installed in the house, which is connected to central or autonomous heating, there may be several reasons for the lack of heating. System diagnostics is performed when it is fully turned on.
If there is no heating in the whole house, the hydraulic pump is faulty or the filter is clogged. Possibly there is not enough water in the distribution tank or the boiler is not working. The first step is to check the level of the liquid in the expansion tank, because in 20% of cases, this is the cause of the malfunction.
If some part of the warm floor does not heat up, for example, one room, the coil is most likely faulty or the filter is clogged.
When there is enough water, the filters are free of impurities, but the heating problem persists, check for an air lock. For this, pumping is carried out. The air valve opens, the water gradually squeezes air out of the expansion tank. As soon as the air is completely exhausted, liquid will begin to drip from the air valve. Then the valve is tightly closed, the system is refilled with water.
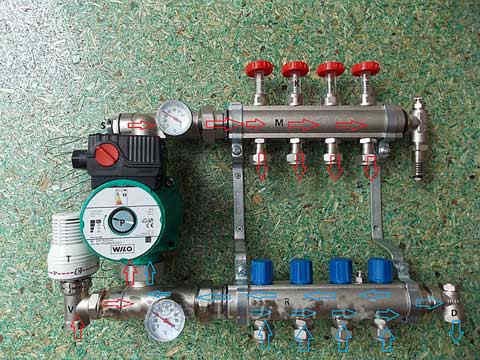
Also, the reason may be incorrect operation of the circulation pump. It should work smoothly, without extraneous noise and vibration. If not, the pump should be replaced.
It will be useful to check the pressure in the system. For this, a pressure gauge is installed after the pump. In normal condition, it should read 0.5 bar. Low pressure is caused by a leak in the pipe. In this case, it is required to determine the place and open the problem area for its repair.
Another reason for the lack of heating of the water floor can be the clogging of pipes with silt deposits. They are formed due to poorly filtered water.Only masters can remove the blockage using special reagents.
Diagnostics of malfunctions of electric underfloor heating
To begin with, you need to make sure that there is electricity in the house and it is supplied to the thermostat. The glow of the light bulb or the display panel on the device is checked. Next, you need to check the temperature settings. If everything is normal here, they check further.
- There is no heating over the entire area. When the underfloor heating is connected to the network, the machine in the dashboard is turned off by protection, this indicates a short circuit in the cable. To determine the location of the damage, the voltage is turned off, the supply wires are disconnected from the thermostat. You need to ring the segment between the flap and the regulator. The multimeter shows zero resistance - the wiring in this place is damaged. Otherwise, the search continues. The heating cable is disconnected from the thermostat, you need to measure the resistance at its input. If a short is found here, the damage is inside the regulator and must be replaced. If there is no short circuit, only the heating cable itself remains. The resistance between its conductors is measured. If the readings on the device screen tend to infinity, this indicates a cable break.
- The temperature is not regulated. If the elements of the underfloor heating are warming up over the entire area, but do not respond to changes in the values on the thermostat, then the regulator is not functioning correctly or the temperature sensor is faulty. In the first case, the thermostat must be replaced. In the second, the wires of the temperature sensor are disconnected from the regulator and the resistance is measured between them. The value must match the data from the manufacturer's documentation. If the values do not match, the floor covering is removed and the sensor is replaced with a new one.
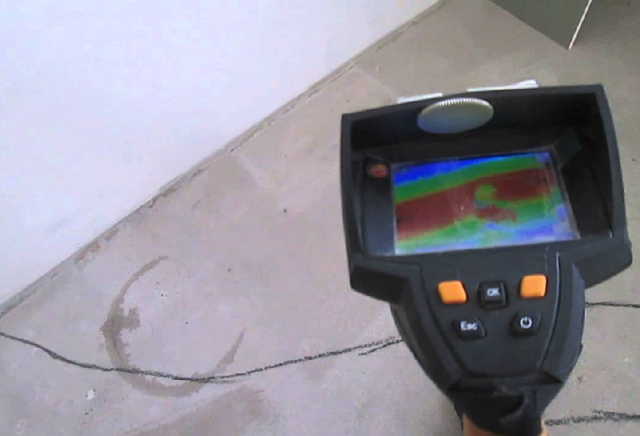
- Individual areas do not heat up. The uniformity of heating is checked using a thermal imager. In case of uneven heating, you need to check the amount of power consumption. If it is less than the one declared by the manufacturer, the heating cable was broken and some of the elements remained de-energized. The system consumes increased power - a short circuit has occurred between the individual cable elements. With this option, some of the heaters do not function, and the other part consumes an overestimated amount of electricity.
Checking the cable or infrared film underfloor heating for faults using a multimeter must be done at all stages of work with heating elements. This will help you acquire and install working hardware. If a problem arises during operation, the multimeter will help to correctly identify and independently cope with the breakdown, repair or replace the failed parts of the system.


